Caution, Install door bracket (fig. 2-12), Establish powerhead mounting height(fig. 2-15) – Genie Pro max PMX-IC B Series User Manual
Page 16: Install door braces (see caution below)
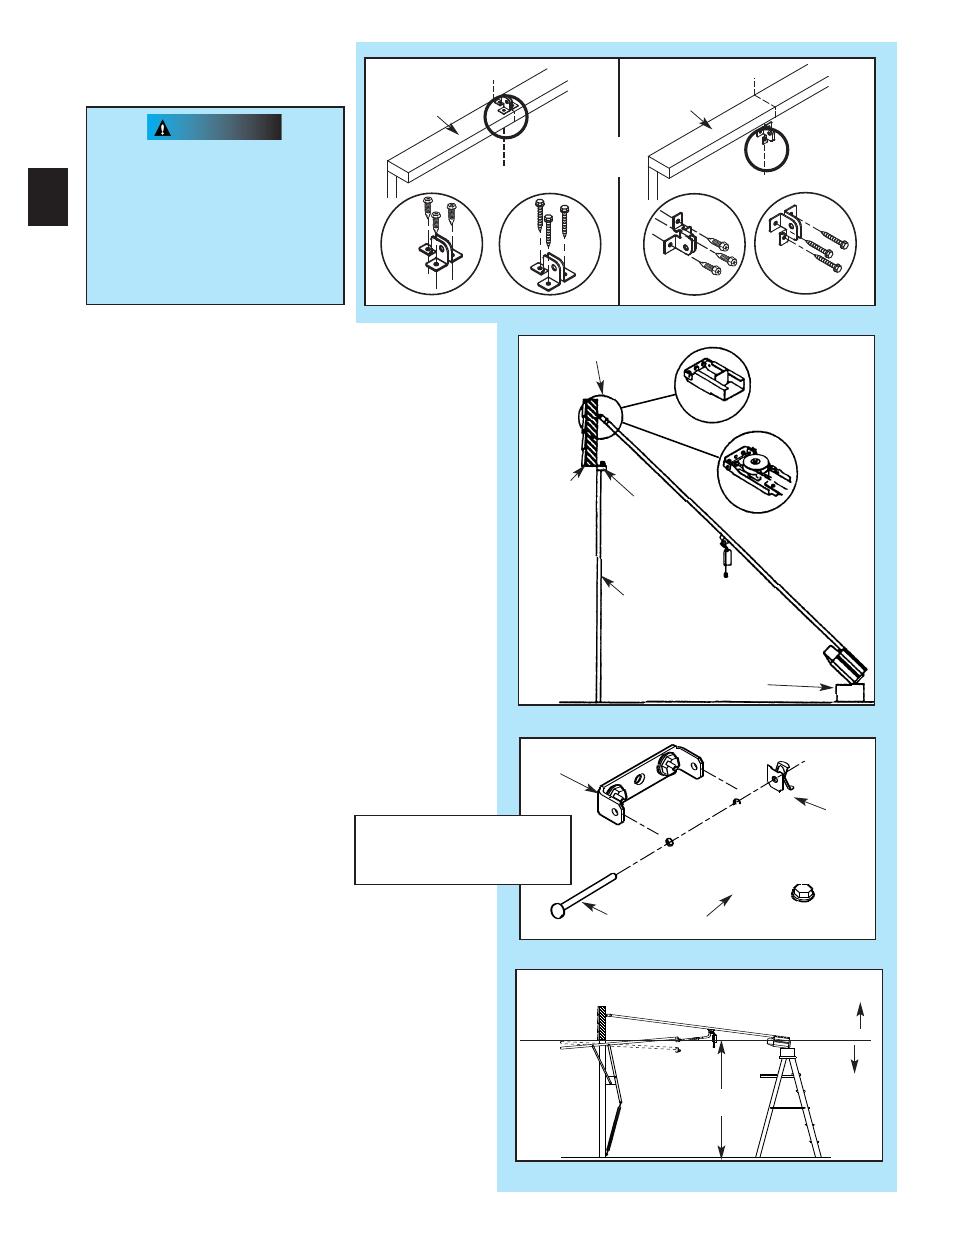
CAUTION
6. Install door bracket (Fig. 2-12).
•
Contact door manufacturer for proper installation.
NOOTE: Sellf-ddrriilliing scrrewss arree intennddeed for use wwith
ligghhtt-weeight door onlyy, whhiile llag sccrewws arree meaant
foorr wood doors oonnlly.
BBecauusse ddoooorr desiigns vvaryy, modiiffiicaatiions mmaay
be reequiredd aand addddiitionall matteerials nneeeddeed. Plleasse
contacct your door maanufaacttuurreer witthh aany quesstions
concerninngg yyour door..
Doors made of masonite,
lightweight wood, fiberglass,
and metal must be properly
braced before mounting
an operator.
Contact door manufacturer
or distributor for
bracing instructions.
7. Attach channel/rail assembly to header
bracket (Fig. 2-13).
•
Fasten header end of the channel/rail to the
header bracket with pin.
•
Install speed nut onto pin (Fig, 2-14).
•
Place cardboard packing under power head. Use
additional support if needed.
8. Establish powerhead mounting height(Fig. 2-15).
•
Power head should be at door height above floor
or higher.
•
Temporarily support power head in this position.
Use
–
rope.
–
ladder with cardboard packing.
–
wood.
5. Install door braces
(See CAUTION below).
Header bracket
Header
Door
Power head
(Protected by cardboard
or packing)
Door
bracket
Fig. 2-15
CORRECT
r
WRONG
Door height
Fig. 2-12
Fig. 2-14
Door
br ket
Pin
Speed
nut
Same arrangement applies
to channel (not shown)
Channel
Rail
16
Fig. 2-13
Critical height is point where the rail/channel attaches to power head.
“
V
”
“
V
”
“
V
”
“
V
”
Top of Door
OR
Top of Door
de la rte
[79]
[96]
[79]
[96]
[82]
[81]