Picture image adjustment (computer mode) – Ask Proxima DP9250 User Manual
Page 37
Attention! The text in this document has been recognized automatically. To view the original document, you can use the "Original mode".
#
PICTURE IMAGE ADJUSTMENT (COMPUTER MODE)
Picture adjustments have been preset at the factory. If you want to change the setting, operate the projector as
follows.
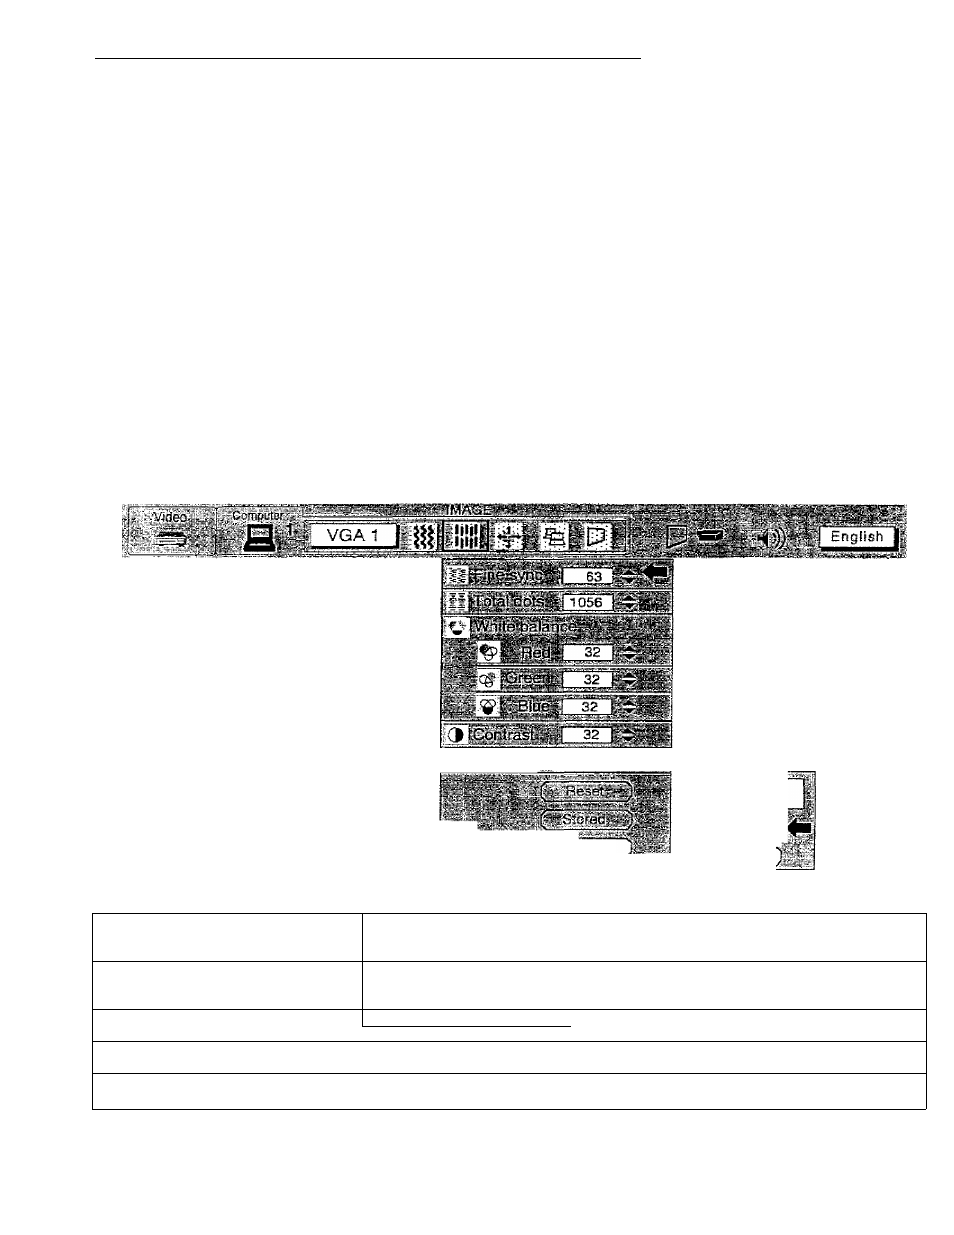
1. Press the MENU BUTTON and the MAIN MENU DISPLAY dialog box will appear.
2. Press the POINT LEFT/RIGHT BUTTON(s) to select IMAGE and press the SELECT BUTTON. Another dialog
box IMAGE ADJUST DISPLAY will appear. This shows the current picture settings.
3. in this dialog box, you can adjust the settings by increasing or decreasing the levels shown as numbers. The
items and the range of the levels that you can adjust are summarized in the table below.
4. Press the POINT DOWN BUTTON and a red arrow will appear,
5. Move the arrow to an item that you want to adjust by pressing the POINT UP/DOWN BUTTON(s}.
6. To increase the level, point the arrow to ZL and then press the SELECT BUTTON. To decrease the level, point
the arrow to
V
and then press the SELECT BUTTON.
7. You may want to store the settings in the memory so that you cari recall them later. To store the settings, move
the arrow to Stored and then press the SELECT BUTTON. When you have stored the settings, "OK ?” is
displayed for confirmation.
8. Move the arrow to Yes and then press the SELECT BLrTTON, The stored settings are permanently held even if
the MAIN ON/OFF is switched off.
3. To quit the MENU, move the arrow to Quit and then press the SELECT BUTTON.
10. if you do not want to store the settings, move the arrow to Quit and then press the SELECT BUTTON. The
settings changed remains effective until the MAIN ON/OFF switch is turned off.
11. To recall the settings from the memory that you have stored, move the arrow to Reset and then press the
SELECT BUTTON. When you have reset the settings, "OK ?” is displayed for confirmation. Move the arrow to
Yes and then press the SELECT BUTTON. You can adjust the settings again if needed.
MAIN MENU DtSPLAiY
b
IMAGE ADJUST
DISPLAY
NOTE: The projector may not reproduce
a proper image for some SXGA
signals.
Since SXGA (1280
x
1024)
image is converted to XGA
(1024
X
768) image by partial
scan, some lines and dots of the
image do not appear.
Some video noise of flicker on
this compressed SXGA image
cannot be eliminated even though
you try to make a Fine sync
adjustment.
OK?
' '' '!
I
No
TABLE OF PICTURE IMAGE ADJUSTMENT
FINE SYNC'
Adjust the picture as
flicker from the display.
necessary to eliminate ^
127
TOTAL DOTS
The number of the total dots in one horizontal period. Adjust the
number to match your PC image.
WHITE BALANCE (Fl/G/B)
npr^QPAQi^ n
,r-
^
53
INCREASE
CONTRAST-'^
LIGHTER 0
63
DEEPER
BRIGHTNESS
DARKER 0
63
BRIGHTER
— 37 .