Assembly (cont.), Warning, Seat assembly – Bolens 13067 User Manual
Page 8: Engine oil, Spark plug, Wheel assembly (if required), Front wheels
Attention! The text in this document has been recognized automatically. To view the original document, you can use the "Original mode".
ASSEMBLY (Cont.)
6. Re-install battery after servicing, with
negative (-) terminal to the left. Re-install
battery hold-down clamps and secure. It
may be necessary to hold "L"-Bolts up
against the underside of frame, so nuts
can be threaded onto the tops of the "L"-
bolts.
WARNING!
BATTERY ELECTROLYTE CAN CAUSE
SEVERE BURNS AND BLINDNESS.
WEAR EYE PROTECTION AND PRO
TECTIVE CLOTHING WHEN WORKING
NEAR A BAHERY.
FAILURE TO FOLLOW THIS
INSTRUCTION COULD RESULT IN
PERSONAL INJURY OR PROPERTY
DAMAGE.
IN THE EVENT OF AN ACCIDENT,
FLUSH WITH WATER AND CALL A
PHYSICIAN IMMEDIATELY.
7. Re-connect first the positive (+) cable
to the positive (+) battery terminal and
then the negative (-) cable to the negative
(-) battery terminal.
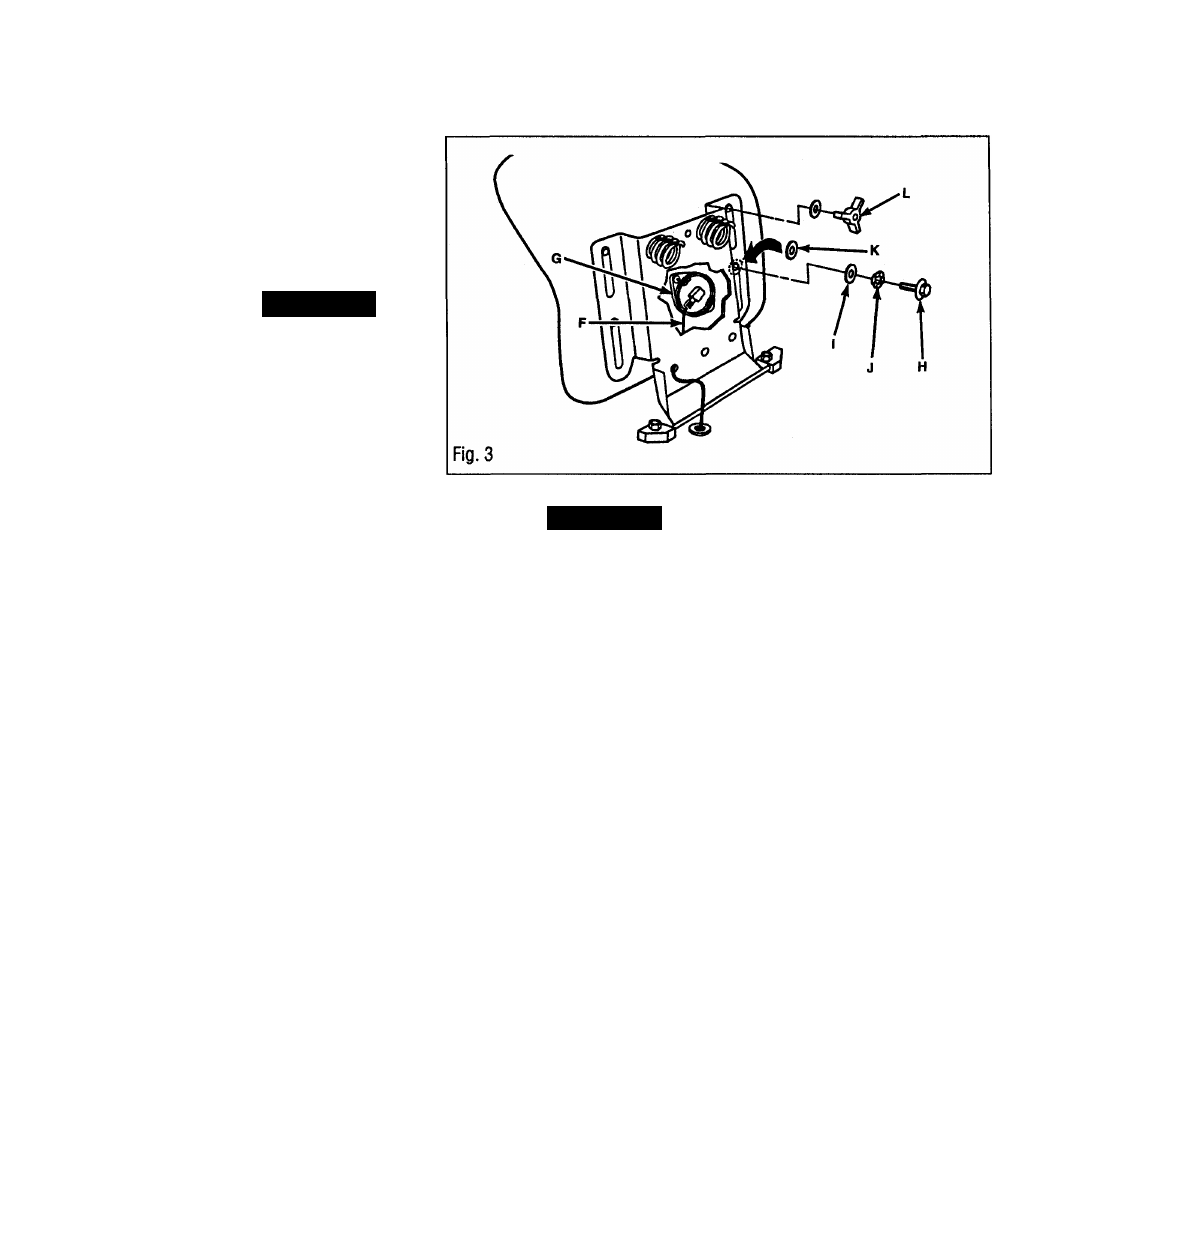
Seat Assembly
1. Locate wiring harness (F, Fig. 3) under
seat support and connect to seat interlock
switch (G).
2. Attach front of seat to seat support
using two shoulder bolts (H), nylon
washer (1) and wave washer (J). Position
nylon washer between wave washer and
seat support. Add one 1-1/4" steel washer
(K) between seat and seat support on each
bolt (H). Secure rear of seat with two flat
washers and hand knobs (L).
Seat Adjustment
The seat can be adjusted forward and
backward by loosening hand knobs (L).
Re-tighten after seat is in desired position.
Engine Oil
Refer to the Engine Owner’s Manual
supplied for engine oil specifications.
WARNING!
YOUR UNIT HAS BEEN SHIPPED
WITHOUT OIL IN THE ENGINE. DO
NOT START THE ENGINE WITHOUT
FIRST CHECKING THE ENGINE OIL
LEVEL. THE ENGINE WILL BE
SEVERELY DAMAGED IF IT IS
STARTED WITHOUT OIL IN THE
CRANKCASE.
Spark Plug
Unplug spark plug wire from spark plug
and keep wire well away from plug until
you are ready to use your riding mower.
This will help prevent accidental starting.
WHEEL ASSEMBLY (If
required)
Rear Wheels
1. Grease axle (Never Seize).
2. Place spacer (Z, Fig. 4) onto each side
of rear axle.
3. Place two 1 -1/4“ flat washerS (Y) on
each side of rear axle and install wheels.
5.
RIGHT SIDE OF AXLE:
Place two
1-1/4" washers (P) and second spacer (Z)
on right axle. Place two 1 -1/2" shim
washers (X) on the right axle and secure
with retaining ring (W).
5.
LEFT SIDE OF AXLE:
Place two 1-
1/4" washers (P) and second spacer (Z) on
left axle. Add two or three 1 -1/2“ shim
washers (X) on the axle as required. Place
spacer and shims to eliminate play without
restricting wheel movement. Secure with
retaining ring (V).
7. Attach protector caps (V) to both sides
of axle.
Front Wheels
1. Place one 1-1/4" washer (Q) and two 1-
3/8" washers (S) onto front axle. Place
wheel on front axle.
3. Place two 1 -3/8" washers (U) on axle
as required to eliminate free play without
restricting movement.
4. Secure wheel & washers with retaining
ring (T).
5. Attach protector caps (R) to both sides
of axle.