Warning, Maintenance (coni.) – Bolens 13067 User Manual
Page 29
Attention! The text in this document has been recognized automatically. To view the original document, you can use the "Original mode".
MAINTENANCE (Coni.)
2. If brake pad (A, Fig. 47) does not
squarely contact both top and bottom
surfaces of pulley (B), re-position pulley
(B) as follows;
Pulley (B) has one washer on top and on
bottom. To raise pulley up, remove screw
(C) , place both washers on bottom and re
install screw (C). To drop pulley down,
remove screw (C), place both washers on
top and re-install screw (C).
3. Adjust cable (S, Figs. 48 & 49) at nuts
(R, Fig. 47 & 48) so there is a slight siack
in spring (T, Fig. 47),
WHEN
ADJUSTED. SPRING (T) SHOULD
NOT BE UNDER TENSION
4. If blade still does not stop within 5
seconds after the mower drive has been
disengaged, replace brake pad (A, Fig. 47).
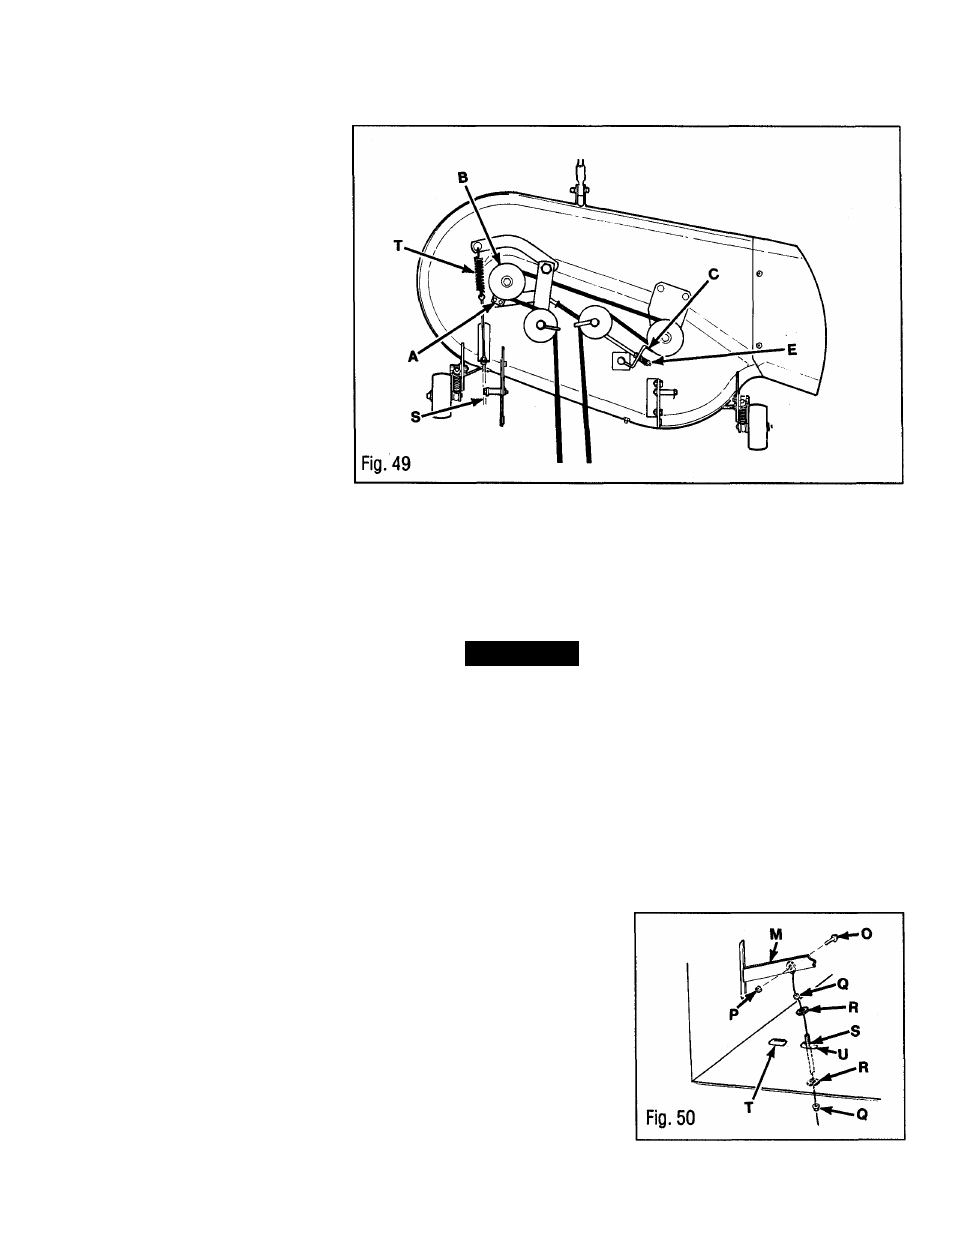
36" Mower Deck Brake
Adjustment
1. Move mower biade drive lever to the
disengaged (DOWN) position.
2. Adjust brake pad (A, Fig. 49) so it
squarely contacts pulley (B).
3. Adjust nut (E, Fig. 49) untii the ieg on
brake arm (C) contacts beit.
3. Adjust cabie (S, Figs. 48 & 49) at nuts
(R, Fig. 48) so there is a slight siack in
spring (T, Fig. 44).
WHEN ADJUSTED.
SPRING (T) SHOULD NOT BE
UNDER TENSION
4. if biade stiii does not stop within 5
seconds after the mower drive has been
disengaged, repiace brake pad (A, Fig. 49).
Other Deck Adjustments
information about other deck adjustments
can be found in
DECK ADJUSTMENT..
MOWER DRIVE CABLE
REPLACEMENT
1. Unhook cabie from mower deck and
remove screw and nut (P & 0, Fig. 50)
securing cabie to mower biade drive lever.
2. Loosen nuts (Q) securing cable
adjusting barrei to tractor. Remove cabie.
3. Route new cable up into tractor. 28"
and 36" deck cables are routed through
front hole (T) 33" deck cable is routed
through back hole (U). Secure cable
adjusting barrel to tractor. Secure cable
end to the right-hand side of mower blade
drive lever (M) with screw and nut (P &
0). Re-attach cable to mower deck.
Blade Maintenance
WARNING!
WHENEVER YOU INSPECT OR WORK
ON THE MOWER BLADE(S),
DISCONNECT THE MOWER BLADE
DRIVE, SHUT THE ENGINE OFF, BLOCK
THE RIDING MOWER’S WHEELS,
ALLOW THE ENGINE TO COOL,
DISCONNECT THE SPARK PLUG WIRE
AND PREVENT IT FROM TOUCHING
THE SPARK PLUG, AND REMOVE THE
KEY FROM THE KEYSWITCH.
FAILURE TO FOLLOW THIS
INSTRUCTION COULD RESULT IN
PERSONAL INJURY OR PROPERTY
DAMAGE.
Blade Inspection
Periodically examine ends of mower
blade(s) and area between turned-up and
flat portions on the top of blade.
When mowing grass in dry or sandy
conditions, abrasive particles wear away
the metal connecting these portions of the
blade. (A, Fig. 51 .on the following page)
If a separation starts forming in the blade
as shown in (B, Fig. 51), you must replace
the blade.
If this wear is allowed to continue, the
separation will enlarge and eventually
allow a portion of the blade to break off.
For best results, always keep blade(s)
sharp. A sharp blade will cleanly cut
grass. A dull blade tends to tear it. See
next page for blade sharpening
information.
29