Trouble-shooting and maintenance – Sears 831.159341 User Manual
Page 26
Attention! The text in this document has been recognized automatically. To view the original document, you can use the "Original mode".
TROUBLE-SHOOTING AND MAINTENANCE
Inspect and fighlen alt parts each time you use rfie CROSS TRAINER e. Replace ony worn parts immediately. Outside
surfaces of the CROSS TRAINER e con be cleaned using a damp cloth and mild detergent. Keep all liquids away from
the stepper console and the PERSC^
n
IAL TRAINER computer. Most CROSS TRAINER e [Hx>blems can be solved by h>llow-
Ing the steps below. Find the applicable symptom and follow the step(s) listed. If further assistance is needed, call our
Customer Service Department toll-free ot 1-800-999-3756, Monday through Fridoy, 6 a.m. until‘6 p.m. Mountain
Time (excluding holidays).
1. SYMPTOM: THE PERSONAL TRAINER COMPLTTER DISPLAYS AN ERROR CODE ("EEE")
a. While the weight setting is changing, the motor will be heard and the SETS and REPS displays will show a rapidly
rotating indicator. To prevent damoge to the weight system, do not put any pressure on the leg developer, arms
or cobles while the weight setting is changing. If the lot bar or rower bar is attached to the high pulley station, rest It
in the rock neor rfie high pulley stotlon. Wait for.the sound of the motor to stop before you continue. If the comput
er senses pressure on the weight system while the weight setting is changing, the WEIGHT display will show on
error code ("EEE") for two seconds, and the weight setting vnTI stop changing. The WEIGHT display will then show
the current weight setting. Make sure that there is no pressure on the leg developer, arms or cables. Press the
increase or decrease button beneath the WEIGHT display to chonge the weight setting as desired.
2. SYMPTOM: THE MAIN CABLE DOES NOT MOVE SMOOTHLY, OR THERE IS SLACK IN THE MAIN CABLE
a. Inspect the routing the cables and moke sure thot they are In the grooves in all of the pulleys. If they are not,
correct the problem. If the cables are not properly routed, they will be danxiged when us^..
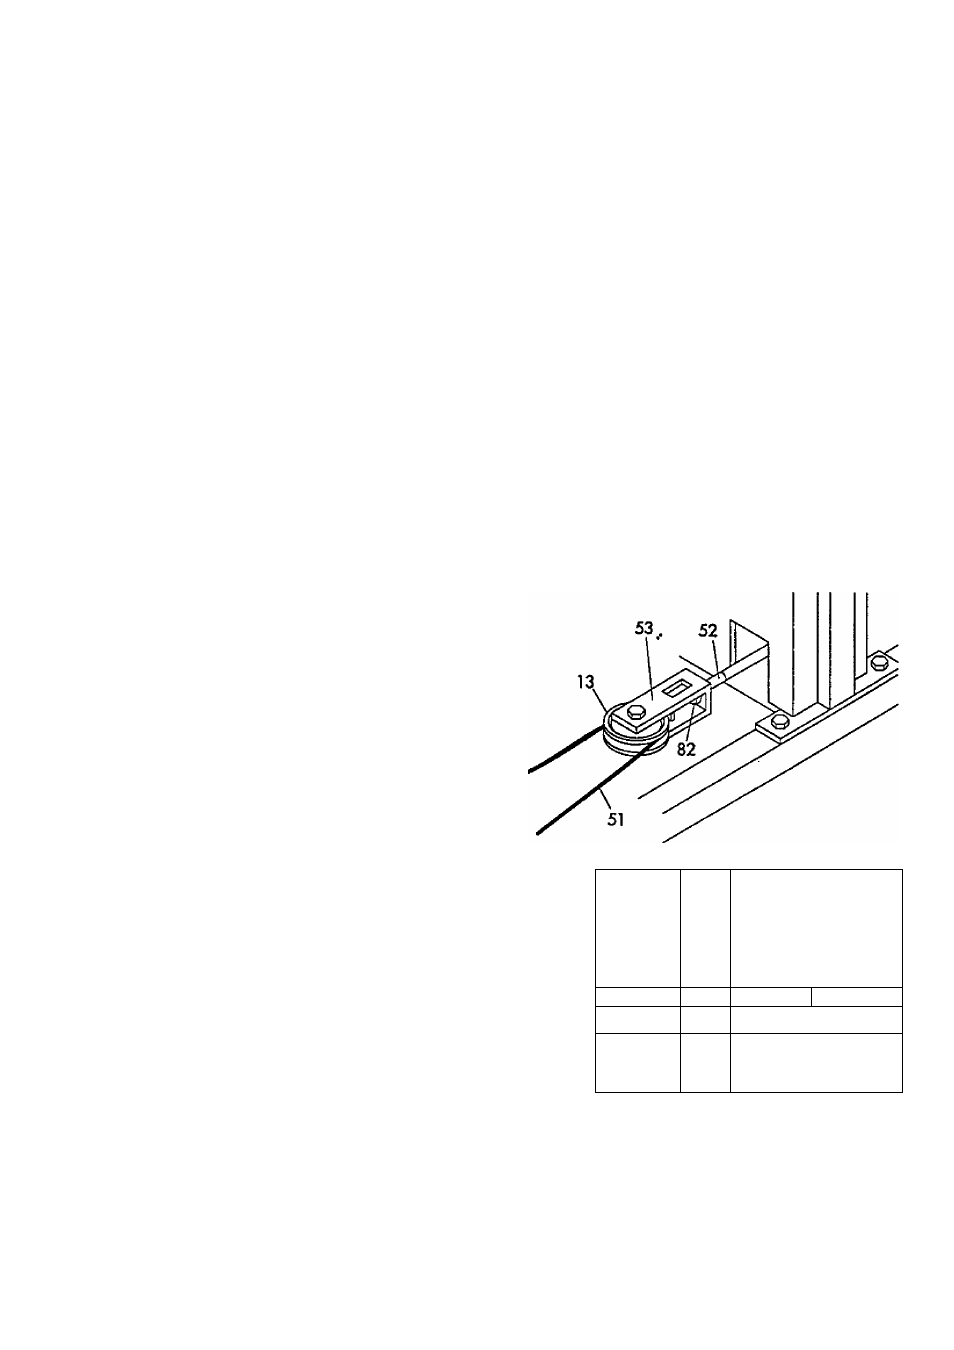
b. If there Is slack in the Main Cable (51), locate the
Adjustment Brocket (53) neor the bottom of the
. right side shield. Hold the end of the Weight Cable
-
(52) firmly, and slide the Adjustment Bracket for-
ther onto the Weight Cable. Tighten the 5/16" Nut
(82) ogainst the Adjustment Bracket. Test the Main
Cable. If the motor stalls or hesitates, loosen the
5/16* Nut slightly. If the 5/16" Nut is tightened as
for as possible and there is still slock, the Main
Coble should be replaced. See ORDERING
REPLACEMENT PARTS on the back cover of this
owner's nrtanual.
3. SYMPTOM: THE STEPPER CONSOLE DOES NOT
FUNCnON PROPERLY
o. As you step, move the stepper pedals vertically at
least 8 inches. If your steps ore too shallow, the
movement of the stepper pedals will not be detect
ed. If the stepper console still does not function
properly, the Reed Switch (99) can be adjusted by
slidir^ the barrel of the Reed Switch up and down
slightly. Repeat until the stepper console displays
correct feedback. If necessory, the 3/4' Screw
(119) attaching the Reed Switch Bracket (120) can
be loosened ond the position of the Brocket con be
adjusted.
120^
99
/
LL. _1
n/'
\
Mounting
Sleeve
25