Establishing the plc-link, Ethernet plc-link) [sysmac cj series, Checking the global settings of the cv-x series – KEYENCE CV-X Series User Manual
Page 3
359GB
KEYENCE CORPORATION. Vision System Division
‐ 3 ‐
www.keyence.com
1
1. Establishing the PLC-Link
(Ethernet PLC-Link) [SYSMAC CJ Series]
✎
Checking the Global Settings of the CV-X Series
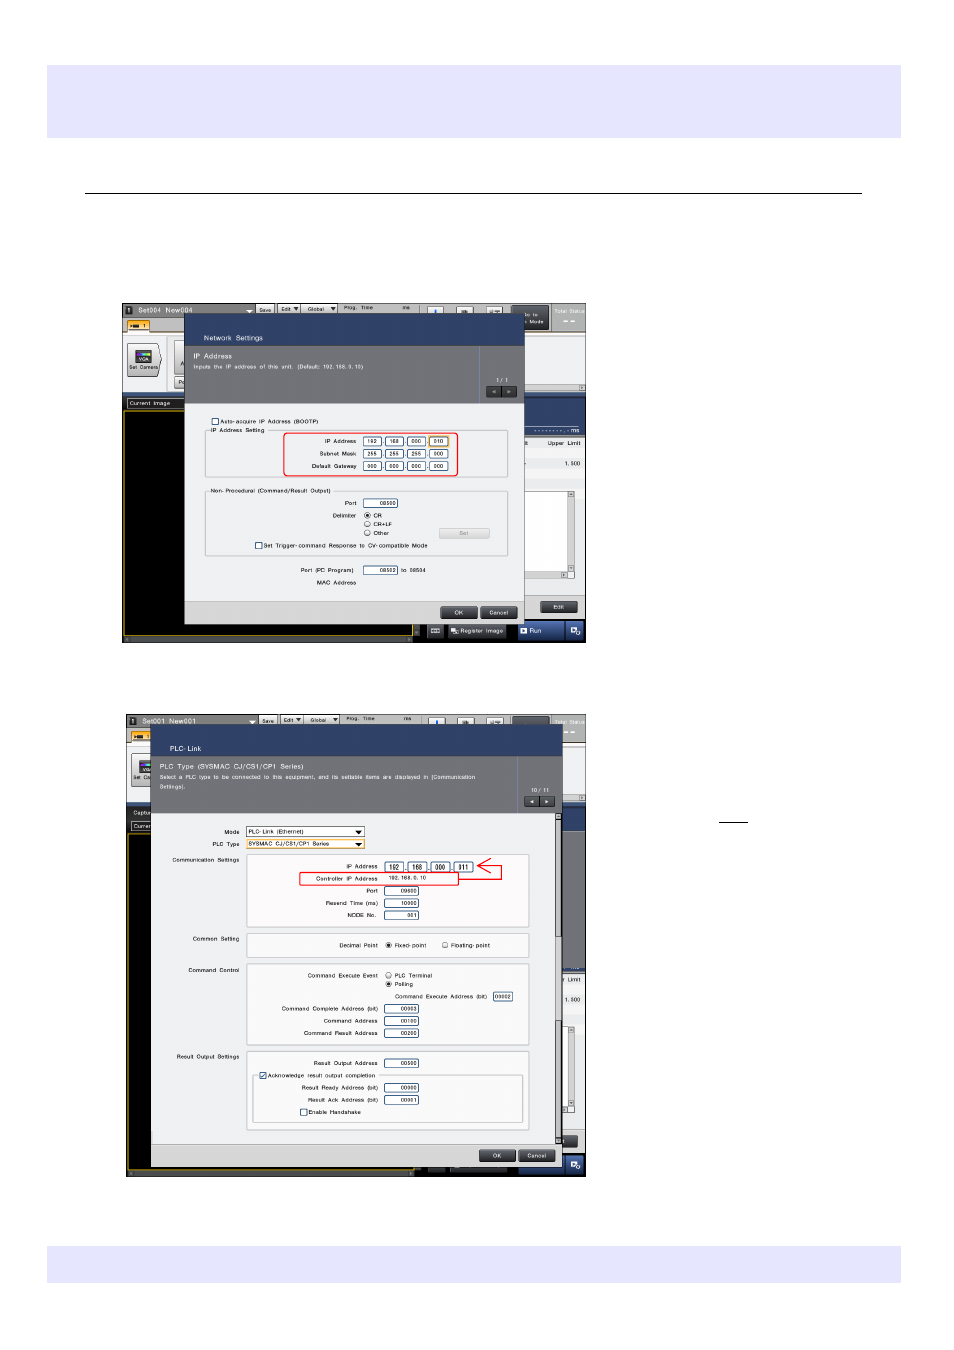
Select [Global] > [Communications & I/O] > [Network] on the controller, and then configure the network
(Ethernet) settings on CV-X.
2
Select "OK" to close the "Network Settings" screen, select [Global] > [Communications & I/O] > [PLC-Link],
and then configure the PLC-Link settings.
3
Select "OK" to close the "PLC-Link" setting screen and then restart the controller.
Configure the network settings for CV‐X.
IP Address: 192.168.0.10
Subnet Mask: 255.255.255.0
Default Gateway: 0.0.0.0
Configure the PLC‐Link settings.
Mode: PLC- Link (Ethernet)
PLC Type: SYSMAC CJ/CS1/CP1 Series
IP Address: 192.168.0.11
Port: C
hange to 9600
Resend Time (ms): 10000
NODE No.: 001
"IP Address" above indicates the one for
the KV Series that will be connected. Set an
address whose fourth number differs from
that of the "Controller IP Address" set in
step 1.
"9600" is the recommended port (as the
initial port No. of SYSMAC is "9600").
Decimal Point: Fixed- point
Command Execute Event: Polling
Command Complete Address (bit): 00003
Command Address: 00100
Command Result Address: 00200
Result Output Address: 00500
Result Ready Address (bit): 00000
Result Ack Address (bit): 00001
This section describes how to establish the PLC‐Link.
[Important] If it fails, establish a one-to-one connection between PLC and CV-X, and follow this manual to configure the settings and check the
operations. Confirm that it operates properly, and change settings if necessary.
Be careful not to use
the same IP address.