Connecting multiple amplifiers, Calibration method, Detecting even small differences – KEYENCE FS-N10 Series User Manual
Page 2: Two-point calibration, Other calibration methods, Increased resistance to dust and dirt, Maximum sensitivity calibration, Calibrate with a moving workpiece, Fully automatic calibration, Position workpiece
2
.
Connecting Multiple Amplifiers
Up to 16 expansion units can be connected to one main unit. However, two output types will be
treated as two main units.
1
Remove the protection covers from the main unit
and expansion unit(s).
2
Install the amplifiers on the DIN rail one at a time.
3
Slide the main unit and expansion unit(s) together.
Engage the two claws of the expansion unit with
the recesses on the main unit side until you hear/
feel a click.
4
Attach the end units (option: OP-26751) to the DIN
rail in the same way as step (2).
5
Secure the amplifiers between the end units.
Tighten the screws at the top (two screws x two
units) with a Phillips screwdriver to fix the end
units.
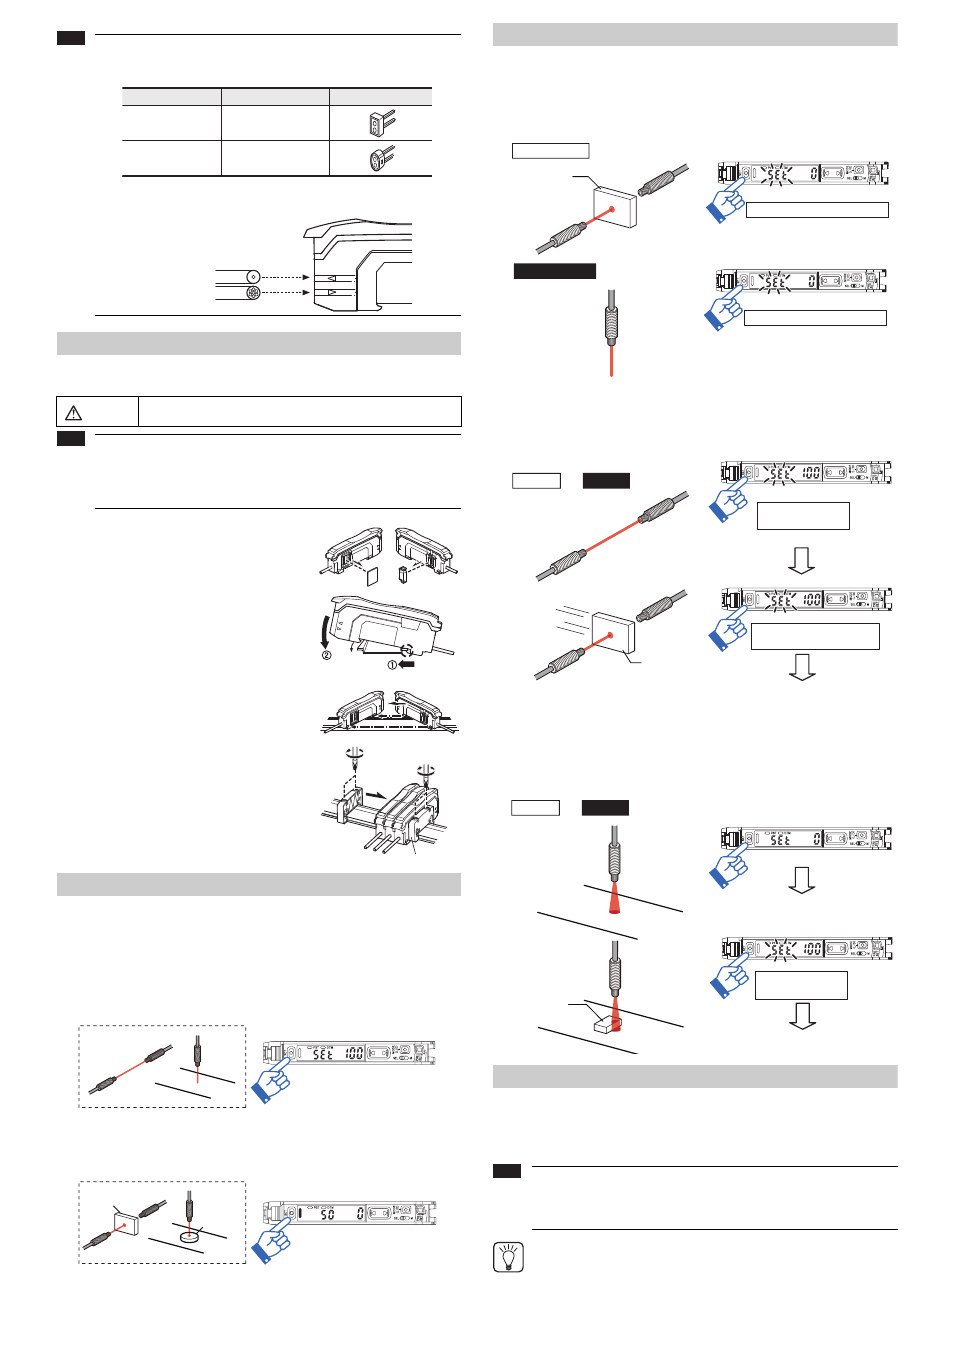
Calibration Method
Detecting Even Small Differences
z
Two-point Calibration
Two-point calibration is the basic method of calibration.
Press the [SET] button once without the workpiece, and then press it once again with the
workpiece.
1
Press the [SET] button with no workpiece.
[SET] will be displayed on the sub-menu (green display).
2
Press the [SET] button with workpiece.
The values will be set and the submenu (green display) will flash. The values will be set to
the mid-point between the light intensity when there is no workpiece, and the light intensity
when there is a workpiece.
If "----" flashes for two seconds on the main screen, the light intensity is too small between
conditions when the workpiece is absent and when it is present. These values will be set,
but there is the possibility that detection may become unstable.
Other Calibration Methods
Increased Resistance to Dust and Dirt
z
Maximum Sensitivity Calibration
In the state shown below, press and hold the [SET] button for three seconds or more. Stop
pushing when "
5'6" flashes.
The sensitivity is set slightly higher than the received light intensity.
Calibrate with a Moving Workpiece
z
Fully Automatic Calibration
Press and hold the [SET] button with no workpiece in place. While “
5'6” is flashing, pass a
workpiece through. (Continue pressing the [SET] button while the workpiece passes through.)
Position Workpiece
z
Positioning Calibration
Press the [SET] button with no workpiece.
Place the workpiece in the location you wish to position it. Press and hold the [SET] button
for at least 3 seconds. Release the button when "
5'6" flashes.
Simple, User Friendly Functions
Setting the Current Value to 100.0
With the FS-N10 Series, you can set the current value to 100.0 using simple operations.
Standardizing the current value makes it possible for the sensor amplifiers to instantly differ-
entiate reductions in light intensity and is useful in predicting the need for maintenance.
• If a thin fiber unit is used, an adapter provided with the thin fiber unit will be
required.
Unless the correct adapter is connected, the thin fiber unit will be loose and
not detect targets correctly (the adapter is supplied with the fiber unit).
• To connect the coaxial reflective type fiber unit to the amplifier, connect the
single-core fiber to the transmitter side, and connect the multiple-core fiber
to the receiver side.
Mount on DIN rail and install on metal surface when connecting to
multiple amplifiers or mounting main units together.
• When connecting with units other than N-bus (a general term for the KEY-
ENCE wire-saving connection system) compatible sensor amplifiers,
including the FS-N10 Series, and the network unit NU Series, consult your
nearest KEYENCE dealer.
• Turn the power off before connecting multiple expansion units.
• Do not touch the expansion connector with your bare hands.
Note
1.3
1.0
Adapter A
(OP-26500)
Adapter B
(OP-26501)
Cable outer dia
Adapter
Appearance
Receiver
Transmitter
Single-core fiber
Multi-core fiber
Warning
Note
OP-26751 (a set of two)
Workpiece
Workpiece
• The various Preset functions listed below cannot be used when the Zero-
Shift function is enabled. Disable the Zero-Shift function before executing
the following functions.
• The Preset functions are not suited for transparent workpieces and other
cases of detection with low light intensity differences.
You can disable various Preset functions by pressing and holding the [PRESET]
button.
Workpiece
Thrubeam model : with
workpiece
: without
workpiece
Reflective model
Press and hold for 3 seconds or more
Press and hold for 3 seconds or more
Workpiece
Common to
Thrubeam and
Models
Reflective
While pressing the [SET] button
pass through a workpiece
Settings complete
Press and hold until
"
UGV
" flashes
Common to
Thrubeam and
Models
Reflective
Workpiece
Press [SET] button once with
no workpiece
Press and hold [SET] button with
workpiece
Settings complete
Press and hold until
"
UGV
" flashes
Note
Tip