Install nurse tank hitch, Free break-away coupler, Install hitch extension – Great Plains NP30A 30-foot Predelivery Manual User Manual
Page 33: Install hitch, Relocate break-away coupler
Great Plains Manufacturing, Inc.
Install Components
29
08/30/2011
407-313Q
Install Nurse Tank Hitch
If the implement was ordered without a rear hitch, con-
tinue at “Install Tongue” on page 30. If it is a 3-point
model (on which the hitch should already be installed),
continue at topic “Install SMV Reflector” on page 31.
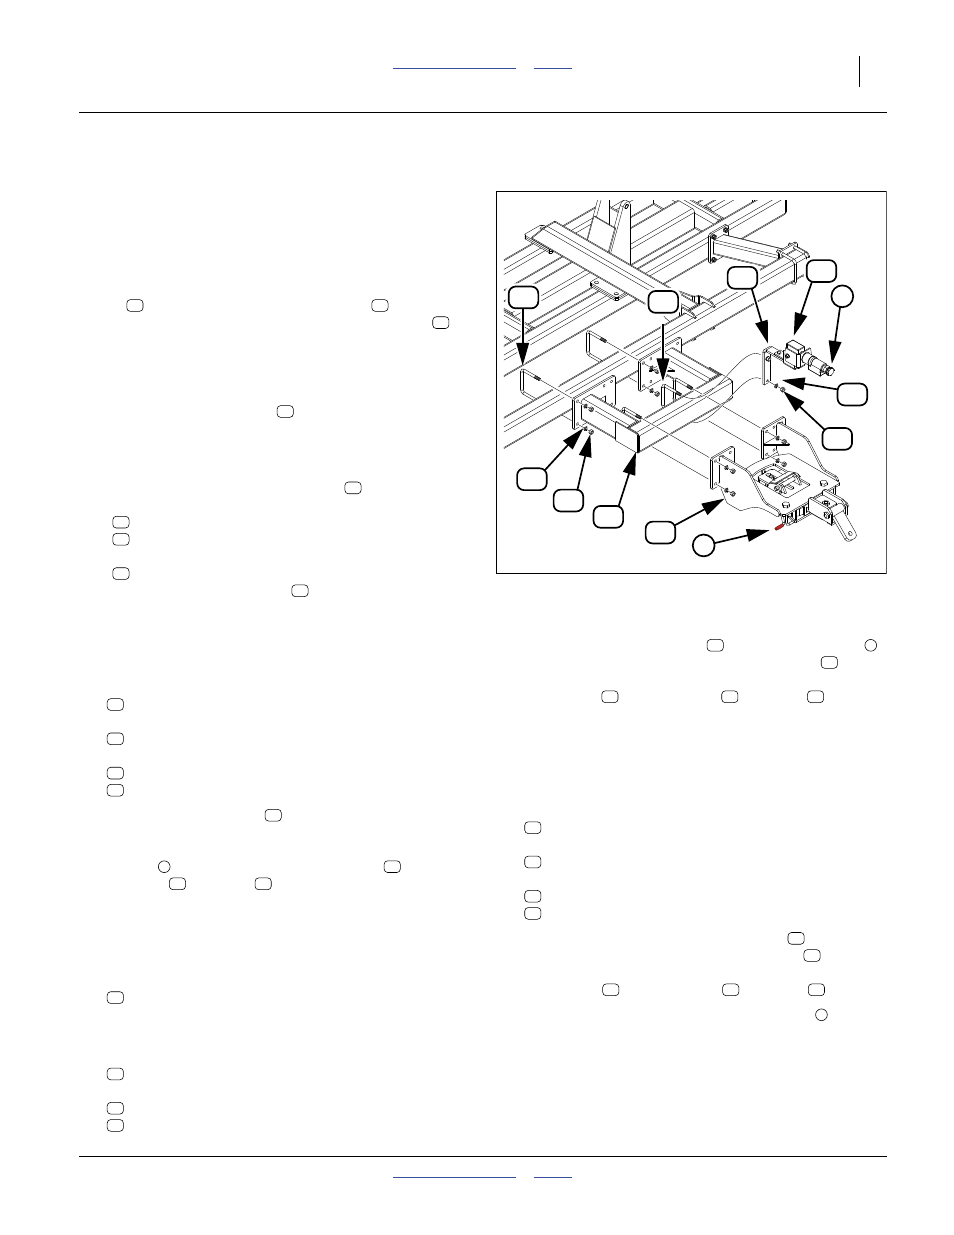
Refer to Figure 39
For shipping of other configurations, at least the hitch
mount
is removed. The hitch extension
may also
be removed, in which case the break-away coupler
needs to be relocated.
Free Break-Away Coupler
Hitch extension is used on 2-Point and Pull-Type models.
If there is no hitch extension
for this implement, and
the breakaway coupler is already installed at the center
of the rear-most tool bar, continue at topic continue at
topic “Install Hitch”.
138. At the break-away coupler mount
, remove and
save two sets:
803-020C NUT HEX 1/2-13 PLT
804-015C WASHER LOCK SPRING 1/2 PLT
and one:
806-034C U-BOLT 1/2-13 X 6 1/32 X 5 1/4
Set the coupler assembly
out of the way.
Install Hitch Extension
If there is no hitch extension, but the hitch is not
mounted, continue at topic “Install Hitch”.
139.Select one:
407-273H HITCH EXTENSION
and six:
806-016C U-BOLT 5/8-11 X 6 1/32 X 5 3/4
and twelve sets:
804-022C WASHER LOCK SPRING 5/8 PLT
803-021C NUT HEX 5/8-11 PLT
140.Position the extension
at the center of the rear-
most tool bar. If the hitch is already installed on the
extension, orient the entire assembly with the red
handle
down. Secure with six U-bolts
, lock
washers
and nuts
.
If the hitch is already installed on the extension, continue
at topic “Relocate Break-Away Coupler”.
Install Hitch
141.Select one:
407-304H MOUNT HITCH SHUCK
which should already have the Schick hitch installed
within it.
142.Select six:
806-016C U-BOLT 5/8-11 X 6 1/32 X 5 3/4
and twelve sets:
804-022C WASHER LOCK SPRING 5/8 PLT
803-021C NUT HEX 5/8-11 PLT
143.Orient the hitch assembly
with the red handle
down, and centered on the hitch extension
(or if
no hitch extension, on the rear tool bar). Secure with
six U-bolts
, lock washers
and nuts
.
Relocate Break-Away Coupler
This applies to anhydrous models only. For other models,
or if the breakaway coupler was not removed at step 138,
continue at topic “Install Tongue” on page 30.
144.Select the set-aside:
407-322S FLO-MAX BREAKAWAY COUPLER ASY
and one:
806-034C U-BOLT 1/2-13 X 6 1/32 X 5 1/4
and two sets:
804-015C WASHER LOCK SPRING 1/2 PLT
803-020C NUT HEX 1/2-13 PLT
145.At the rear tube of the hitch extension
(or if none,
the rear most tool bar), orient the mount
with the
break up and to the rear. Secure to tube or tool bar
with U-bolt
, lock washers
and nuts
.
146.Orient break-away so that inlet Acme cap
implement rear.
Figure 39
Hitch Components
31715
25
21
18
70
64
57
1
71
56
62
2
30
21
18
25
18
30
56
62
71
25
18
70
64
57
18
70
64
57
21
70
64
57
21
18
70
64
57
25
71
62
56
18
30
71
62
56
2