Soleus GPS Sole (SG007) - Manual User Manual
Page 2
RDY13
Step 2) Charging the Battery:
Charge the unit for at least 4-5 hours before first use. The length of time for a fully charged
battery will last depending on the actual usage. It is recommended to regularly re-charge your
battery every 1-2 months even if it is not used to maintain good battery condition.
2.1) Plug your USB cable/charging clip to your PC.
2.2) Align the charging clip with the 4 contact pins on the back of the watch.
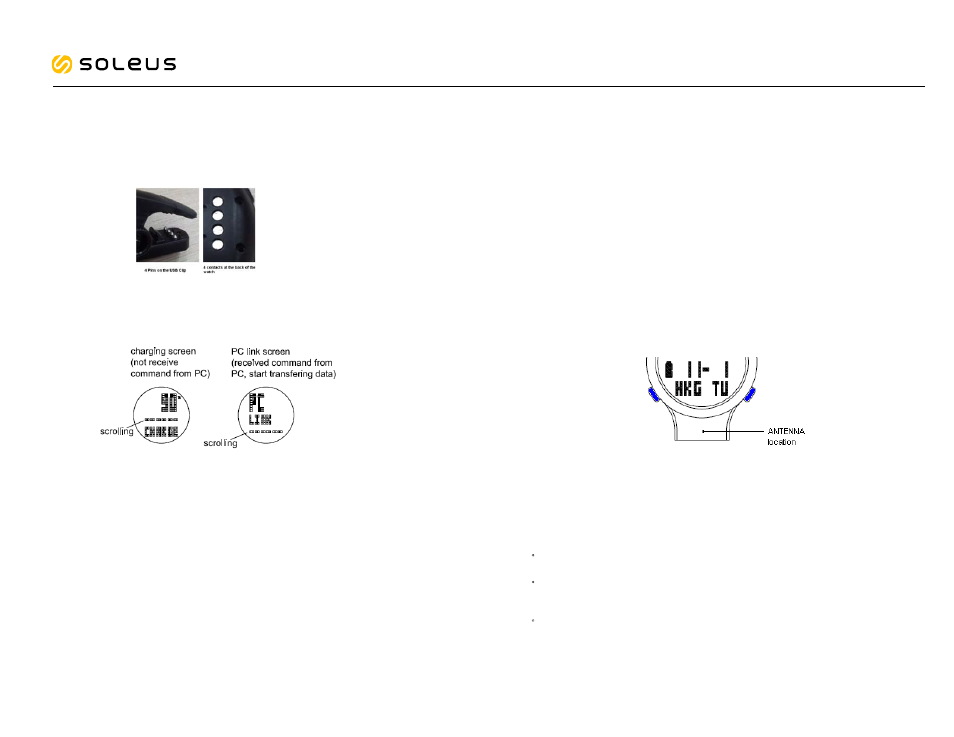
2.3) Connect the charging clip securely to the watch. The watch will display the charge level
of the battery and the lower bar scrolling. This is the display if there is no communication
between the PC and the watch. When you start to down load the data to the PC, the
display will change to
PC LINK with the scrolling bar at the bottom.
Note: Please thoroughly dry the charging contacts and surrounding area to ensure proper
electrical contact and prevent corrosion.
When the battery is low, it is time to charge the GPS watch. Once the battery is full, it will
display CHARGE 100% FULL.
Battery low condition:
You cannot turn ON the GPS when the battery is low. The watch will display BATT LOW. You
need to recharge the battery in order to use the GPS again.
Please make sure the battery have enough battery power before doing your exercise in order
not to lose your data.
When the battery level becomes very low, the watch will automatically turn OFF the display
(blank-screen).
Step 3) Configure your watch:
Before using your GPS watch, User can opt to do the following.
3.1) Go to SET mode to set the following parameters: AUTO LAP, TIME, UNIT, USER details,
HRM, LINK HRM, NIGHT, CONTRAST, CHIME, ALARM, TIMER, and VIEW.
3.2) You can also enter individual set modes of specific modes by press & hold S11 for 2-3
seconds while the Chronograph is stop or save/reset. Following are the parameters to
set in individual modes when you press & hold S11:
•
RUN mode: AUTO LAP/ UNIT / USER/ VIEW
•
TIMER mode: set the 6 timers, Timer Alert ON/ OFF.
•
HRM mode: LINK HRM / HRM.
•
ALARM mode: set the 5 alarms.
Step 4) Acquire Satellite signals:
To get the correct time of day and begin using your GPS watch, you have to acquire GPS
signals. It may take few minutes to acquire the satellite signals.
4.1) Go outside to an open area away from tall buildings and trees. Orient the GPS antenna
towards the sky for best reception. The antenna is located at the 6 o’clock position of the
watch.
Note: In order to accurately navigate the GPS, you need to have a good line of sight to
the satellites.
4.2) Stand still and do not begin moving while locating the Satellite until the signals are
already received.
4.3)
How to turn ON GPS:
Following are the possible ways:
•
Press & hold S7 for 2-3 seconds while the GPS is initially OFF will turn ON the
GPS. The watch will display GPS ON and start searching for GPS Signal.
•
Every time you enter
RUN mode, CHRONOGRAPH mode, HRM mode, and TIMER
mode, the watch will automatically search for GPS signal. If GPS is already ON, it
will directly go to the first view.
•
Press S1 from Time mode and the watch will display the
GPS/ INDOOR screen.
Select GPS by pressing S1 or S11 and then press S5. The watch will then start
searching for the GPS signal.
GPS Sole