Photoflex SB-FLXFLSH400W FlexFlash 400W Strobe User Manual
Page 6
Visit photoflex
lightingschool
.com® for the best free learning resource!
For detailed specifications,
product tutorial videos
and more, please visit
www.photoflex.com®
PROFESSIONAL PHOTOGEAR
The rear control panel of the FlexFlash allows all
of the operating features of the flash to be
controlled from this one area. Below is a more
detailed description and instruction for use for
each of these features.
A. Main Power Switch - Make sure the switch
is turned off (O) when plugging in the power
cord and when removing or installing a
flash tube or modeling light.
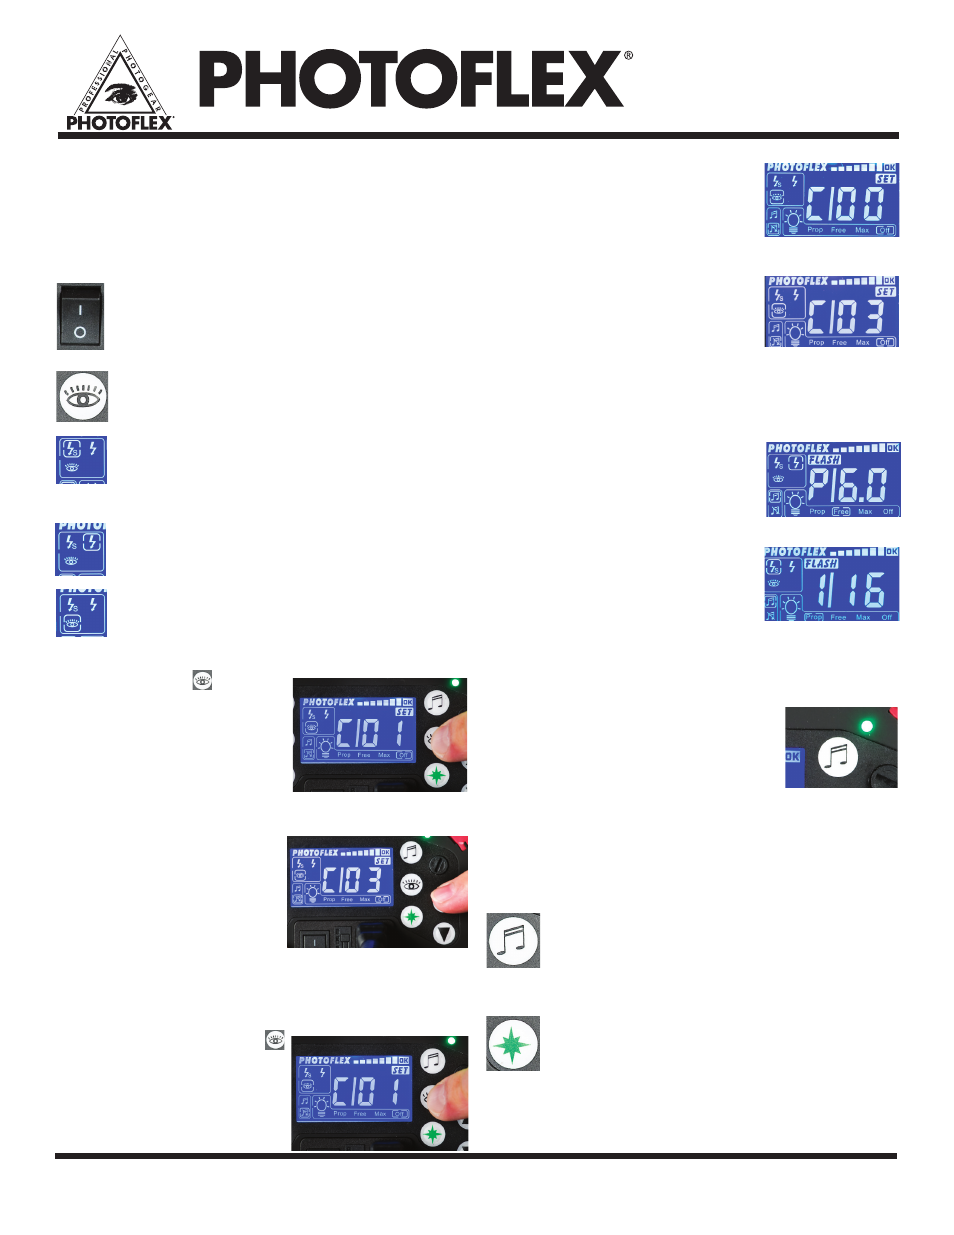
B. [Photocell] Slave Sensor – There are three
user selectable options for this feature:
a. Slave sensor off. Use this setting to
prevent another photographer’s flash from
triggering your unit, when you are using a
sync cord or wireless trigger.
b. Slave sensor on. Use this setting to trigger
your unit with another flash.
c. Pre-Flash Recognition. Use this setting,
following the instructions below to set
pre-flash recognition when using a TTL Flash
to trigger your unit.
c.1. Push the eye icon
button on the rear instrument
panel until you land on the
eye
on the LCD display,
then hold the button down for
four seconds. The LCD screen
will show a decimal display.
c.2. For manual pre-flash
setting, use the power up
or down buttons to set the
number of pre-flashes for
your camera.
c.3. For automatic pre-flash recognition, follow the
steps below to set the FlexFlash to recognize how
many pre-flashes your camera uses:
Step c.3.1. Push the eye icon
and when you land on the
eye
on the LCD display, hold it
down for four seconds.
Step c.3.2. The LCD screen will
show a decimal display. Using the
down arrow go to the
00 setting.
The display will blink indicating it is
ready to automatically sense the camera’s pre-flash.
Step c.3.3. Take a test picture with
your camera to train the FlexFlash.
After the shot is taken, the FlexFlash
will display the number of pre-flashes
used by your camera. The FlexFlash will be set to
remember your camera’s pre-flash, even after the
FlexFlash is powered off.
C. Flash power adjustment buttons
The power level can be set for
decimal display using 1/10th step
adjustments 2.0 – 6.0; or the
power can be set for a fractional
display using 2/10 step adjustments
1/64 – 1/1. To change the display
format from fractional to decimal,
turn off the power, then re-power
the unit on while holding down
both up and down power
control buttons.
D. Power Indicator Light
This light will be green when the
unit is powered on. It will turn red
indicating the unit is in power save
mode when the unit is left inactive
for 20 minutes.
Note: The unit can be taken out of power save mode
by firing a flash to awaken it.
E. Audible Alert On/Off Button
The FlexFlash can be set to sound an
audible alert (a beep,) when the flash is fully
charged and ready for the next exposure.
F. Test/Discharge Button
Pressing this button will discharge the unit
by firing the flash.
Digital Display
Fractional Display
5