INCRA Jig User Manual
Page 8
8
Rout a test groove
NOTE: The following instructions apply to Dovetails AND Box Joints.
After setting your router bit depth of cut, you will position your INCRA Jig and
install the joinery template. This is accomplished through a setup operation
called “centering”. Centering locates your INCRA Jig so that the router bit is
aligned with the center of the stock width you select. Once you find the center,
install the joinery template and you’ll be ready to cut a perfect joint. The simple
steps to follow should always be used when setting up for joint making.
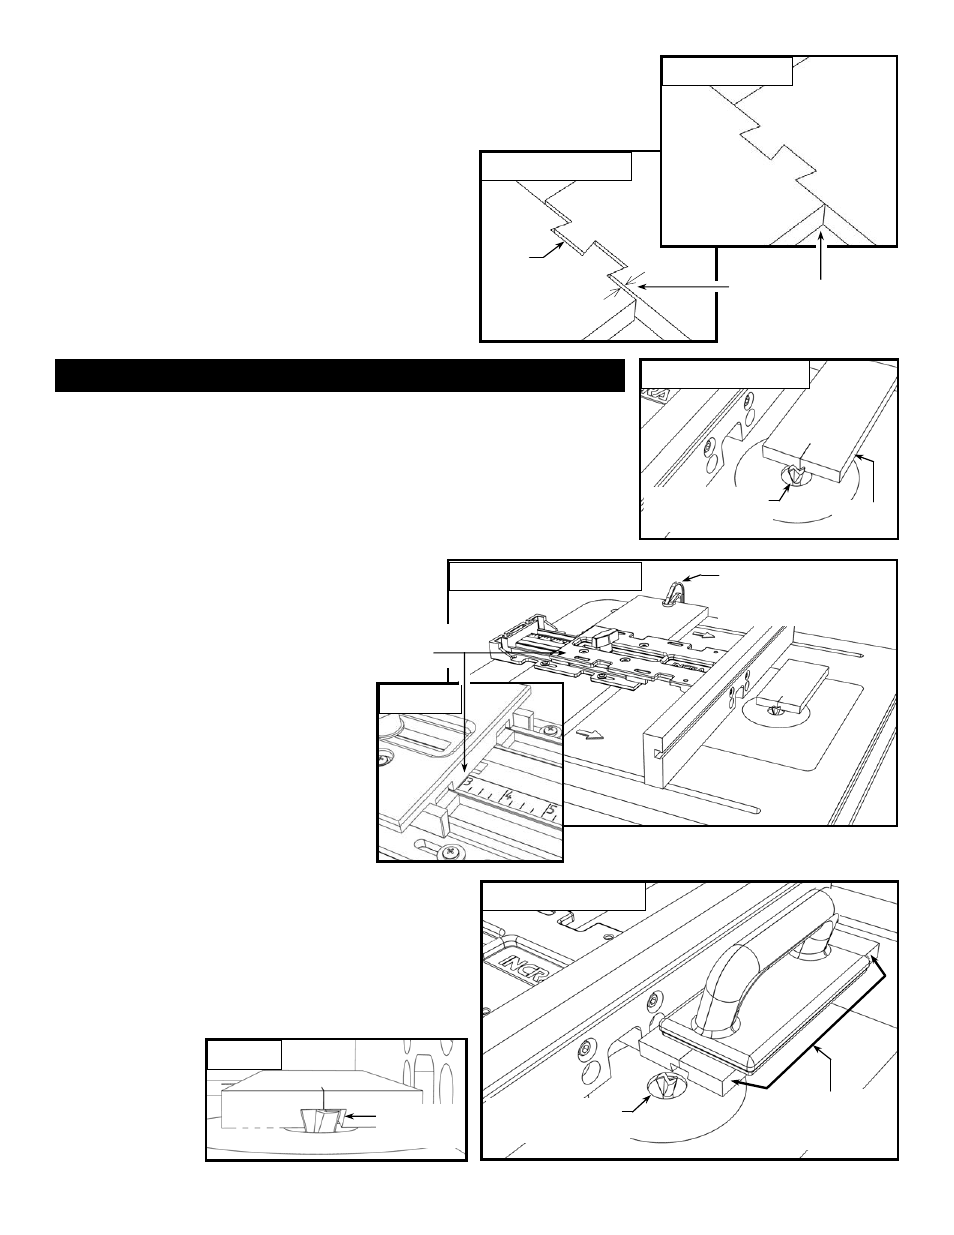
Begin by cutting a piece of 3/4” thick stock to the same
width as the boards you wish to join later on. Mark the
center of this board’s width on one end and place the
board face down on the router table with the
center of the board aligned with the
approximate center of the bit, Fig. 29.
Set your INCRA Jig to 3” on the scale and
tighten the clamping knob. Then loosen the
clamps that secure the base panel, and slide
it forward until the fence contacts the edge of
the board. Make sure the center mark on the
board is still aligned with the approximate
center of the bit, then re-tighten the clamps,
Figs. 30 and 30A.
Turn the router on, and using a good rubber
soled push block, cut a groove along the
entire length of the board, Fig. 31. Now turn the stock end
for end and make a second pass over the router bit. The
second pass should widen the groove slightly (unless you
are already perfectly centered). Make sure you have turned
the stock end for end before making the second pass. (This
places the center mark at the back of the board.)
With the router off, turn the cutter to it’s widest profile. Slide
the test board against the fence to rest just over the cutter.
There should be a
small gap between
the edge of the bit
and one side of the
groove, Fig. 32.
Unclamp the two boards and test the fit by joining them as
shown in Fig. 27. As with any dovetail jig, a little trial and
error is needed to achieve a snug fitting joint. To tighten
the fit, raise the bit up slightly; to loosen the fit, lower the
bit slightly. Just remember this phrase: “Heighten to
tighten, lower to loosen”. After adjusting the bit height,
make a new set of trial cuts on a fresh uncut corner of the
boards. After a few adjustments and trial cuts, you’ll have
a perfect fit.
Tip: When the fit is too loose, the trial cuts provide a
gauge to let you know how much to raise the bit. Just join
the trial pieces end to end and gently pull the boards to
wedge the dovetails apart, Fig. 27. The gap that appears
is equal to the distance you need to raise your dovetail bit
to achieve a tight fit, Fig. 28.
Fig. 27
Fit is too loose
Fig. 28
Perfect fit
Raise the bit
this much . . .
Gap
Heighten to tighten
Or
Lower to loosen
. . . to produce a
perfect fit
First: Lock upper
body to 3”
Second: Loosen clamps and slide base
panel forward until fence contacts
edge of centering board
Fig. 30
Set initial fence position
Fig. 29
Align board with bit
First: Rout a groove along the
entire length of the stock
Second: Rotate board end-
for-end and make a second
pass over the bit
Fig. 30A
Fig. 31
Rout test groove
3/4” stock
Align center of board with
approximate center of bit
Centering the router bit on your workpiece
Fig. 32
Small gap on one
side of the bit