INCRA Jig User Manual
Page 10
10
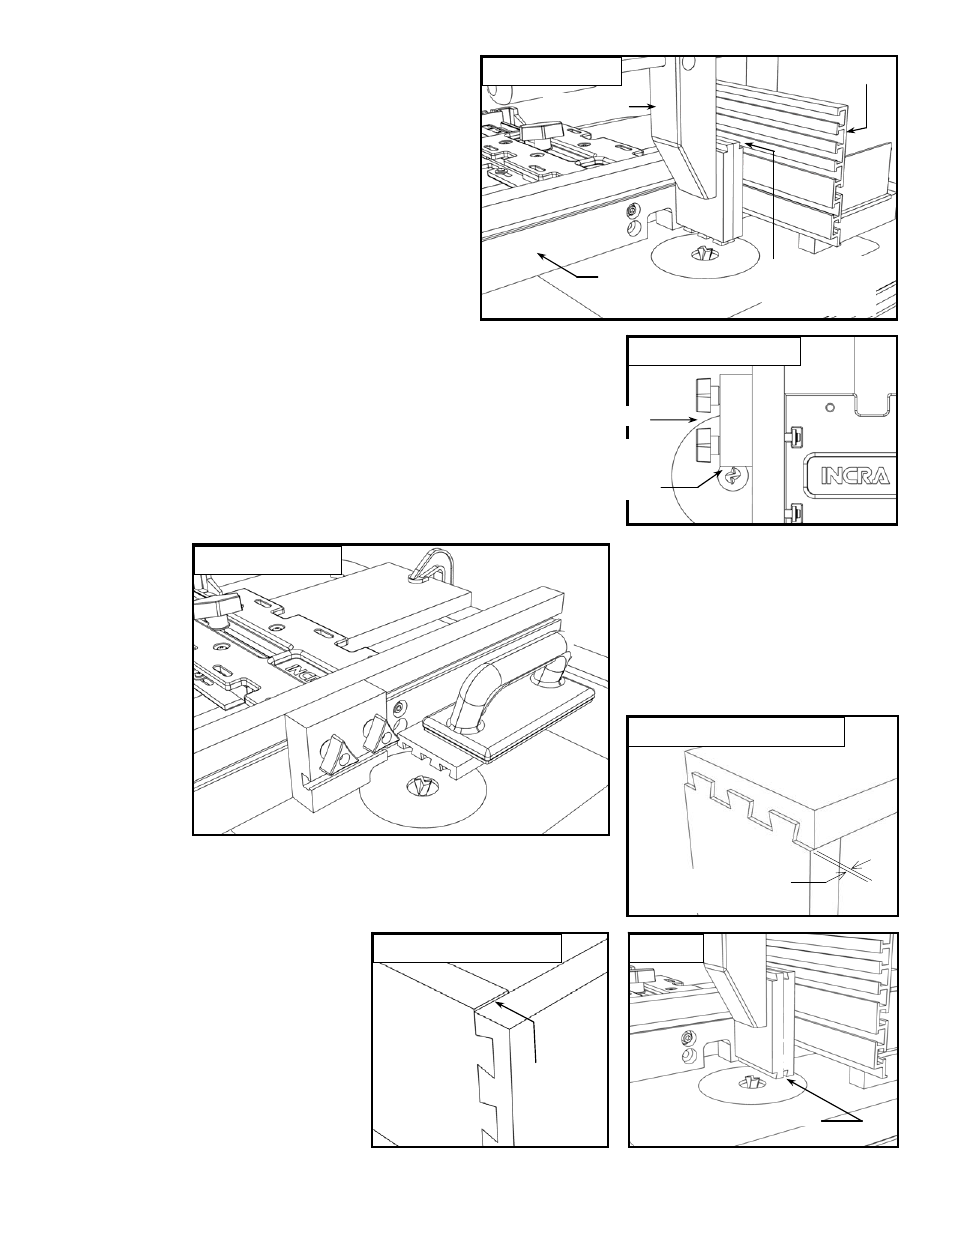
Tip: After making your first series of
pin cuts, check the fit with one of your
tail boards. If the tail board won’t fit
all the way into the pin board, just
measure the distance it protrudes,
Fig 38A. This is the distance you
need to move the stop away from the
bit to achieve a flush fit.
Pin Cuts
Move the INCRA Jig to the first pin cut on the template that will position the
cutter outside the fence. Since the pin sockets are stopped cuts, bring the
stop positioner just up to the outside diameter of the cutter and clamp in
place, Fig. 37. This stop setup will always (and intentionally) produce a
socket that is just a little short, so we’ll only cut one end of one piece
at this time, then adjust as necessary. Using a rubber soled push
block, move the stock into the cut until you just touch the stop. Don’t
force the material against the stop. Now move the fence from one pin
cut to the next until you have cut across the full width of your material, Fig.
38. After making the cuts, check the fit between this board and one of the
tail boards. Adjust
the stop position
as necessary to
control the socket
length for a
perfect, flush fit
(See Tip and Fig.
38A at right).
Now make the
final pin cuts on
both ends of both
boards.
Fig. 36
Cut the tails
Fence
Right angle fixture
Handscrew clamp
Fig. 37
Set stop positioner
Position stop as close as
possible to the outfeed
side of the bit
Stop positioner
Clamp two tail boards
with rabbets facing
outward as shown
Tail Cuts - Continued
Now, clamp the two tail boards to your Right Angle
Fixture as shown in Fig. 36 and make the tail series of
cuts. The first cut for any tail board will always remove
the edge of the stock. To keep this first cut clean and
splinter-free, it’s a good idea to return to a 1/32” scoring
pass, then sneak up to the first visible mark on the
template in one or two passes. The first visible mark
determines which cut lines to use on the template for the
remainder of the tail cuts. If the first mark is a “B” cut for
example, simply move the INCRA Jig from one “B” cut to
the next “B” cut until you have cut across the full width of
your material. After completing the cuts, flip the boards
end for end and repeat.
Tail board
Pin board
Fig. 38A
Pin cuts - final adjustment
Move stop block this far back
to achieve a flush fit
Beginner’s Tip
After making a half blind dovetail, you may notice that the joint looks
symmetrical, but the edges of the two boards do not align flush, Fig. 39. This
simply means that when you centered your material as described on page 8,
you were close but not quite perfect. Of
course practice DOES make perfect, but
there is another method for cutting the tail
boards that will ensure a flush alignment
regardless of how well your board was
centered. Just make sure when you clamp
the tail boards to the Right Angle Fixture
that the dovetail shaped rabbets on all of
the boards face the cutter, Fig. 40. That’s
all it takes! Remember that even if you use
this procedure, you should still center first to
ensure a symmetrical looking joint.
Boards not flush
Fig. 39
Tail cuts - beginner’s tip
Fig. 40
Dovetail shaped rabbets face cutter
Fig. 38
Pin cuts - final