User made accessories - fence, Making and attaching your fence, Fig. 4 – INCRA Jig User Manual
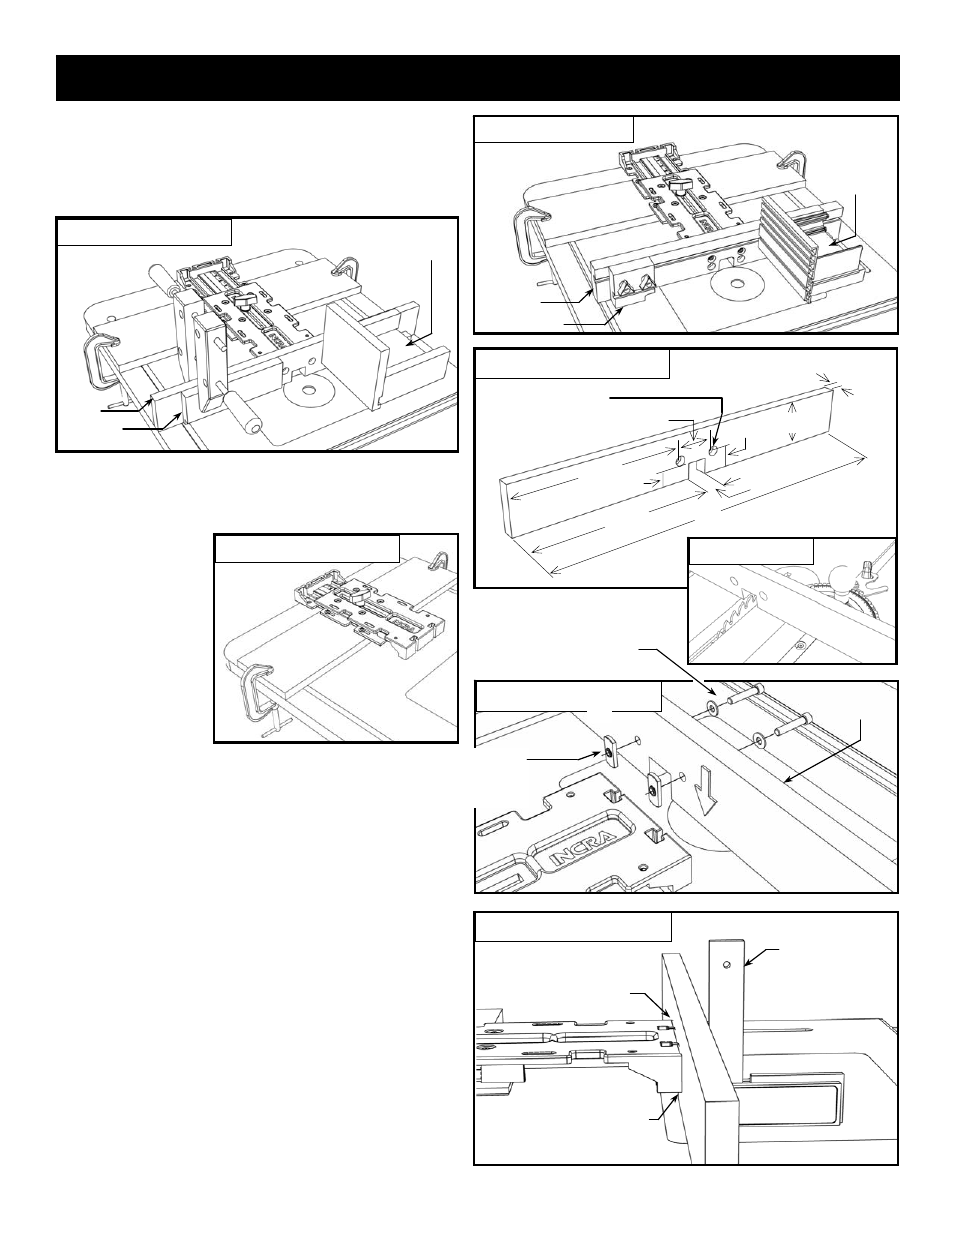
Page 3: Fig. 5, Fig. 6, Fig. 6a, Fig. 9, Fig. 8, Important, Fig. 7
3
Making and attaching your fence.
Begin by making the fence as dimensioned in Fig 6.
Use a straight piece of 3/4” MDF, hardwood or plywood.
Layout the position
for the notch, then
cut the waste away
with multiple side-by-
side passes at the
table saw using a
miter gauge to guide
the material, Fig. 6A.
Note:
If you have purchased the factory INCRA Fence
System shown in Fig. 4 (recommended), use the
instructions included with that product to assemble and
attach to your INCRA Jig. Follow the instructions below
if you would prefer to make your own, Fig. 5.
Fig. 4
Factory Accessories
User Made Accessories - Fence
T-slot fence
INCRA
Right angle
fixture
Stop positioner
Fig. 5
User made accessories
Right angle
fixture
Fence
Stop
2 1/2”
24”
1 5/16”
10 3
/4”
3”
3/4”
1”
Fig. 6
User made fence dimensions
Fig. 6A
Cut notch
1/4-20 x 7/8 socket head cap
screw and washer (2)
Fig. 9
Square Fence to router table
Place shim between top of jig and
fence to decrease angle
Place shim between bottom of jig
and fence to increase angle
Square
Fig. 8
Attach fence to INCRA Jig
5/16” diameter through hole
with 5/8” diameter by 3/8” deep
counter bore (2)
11 3
/8”
1 1/4
”
Fence
IMPORTANT:
Before attaching the
fence, the INCRA Jig
must first be securely mounted to a 3/4”
wooden base panel and the base panel must
be clamped to your router table. Also make
sure that the INCRA Jig’s clamping knob is
securely tightened, Fig. 3 & Fig. 7.
Attach the fence to your INCRA Jig front end using the
1/4-20 x 7/8” socket head fasteners with washers and
rectangular nuts from hardware pack D-02.
CAUTION: The raised rim on the two rectangular
nuts MUST FACE AWAY from the fence as shown in
Fig. 8. Now slide the rectangular nuts into the T-slots
located at the front end of the INCRA Jig’s top body half
and tighten the fasteners to secure.
After attaching your fence, check for squareness with
your router table top. If any adjustment is necessary,
loosen the mounting screws and insert a paper or plastic
shim between the INCRA Jig and the rear of the fence,
Fig. 9. A shim placed below the fasteners will increase
the angle between the fence and table; a shim placed
above the fasteners will decrease the angle. Tighten the
fasteners to secure the fence.
Fig. 7
Clamp INCRA Jig to table
1/4-20 rectangular nut (2).
Raised rim MUST face AWAY
from the fence