Device repair – Det-Tronics C7051B, C UV Flame Detector User Manual
Page 24
DEVICE REPAIR
For devices or components in need of repair, contact
your local source or return the equipment transportation
prepaid to:
Detector Electronics Corporation
Returned Goods Department
6901 West 110th Street
Minneapolis, Minnesota 55438 U.S.A.
22
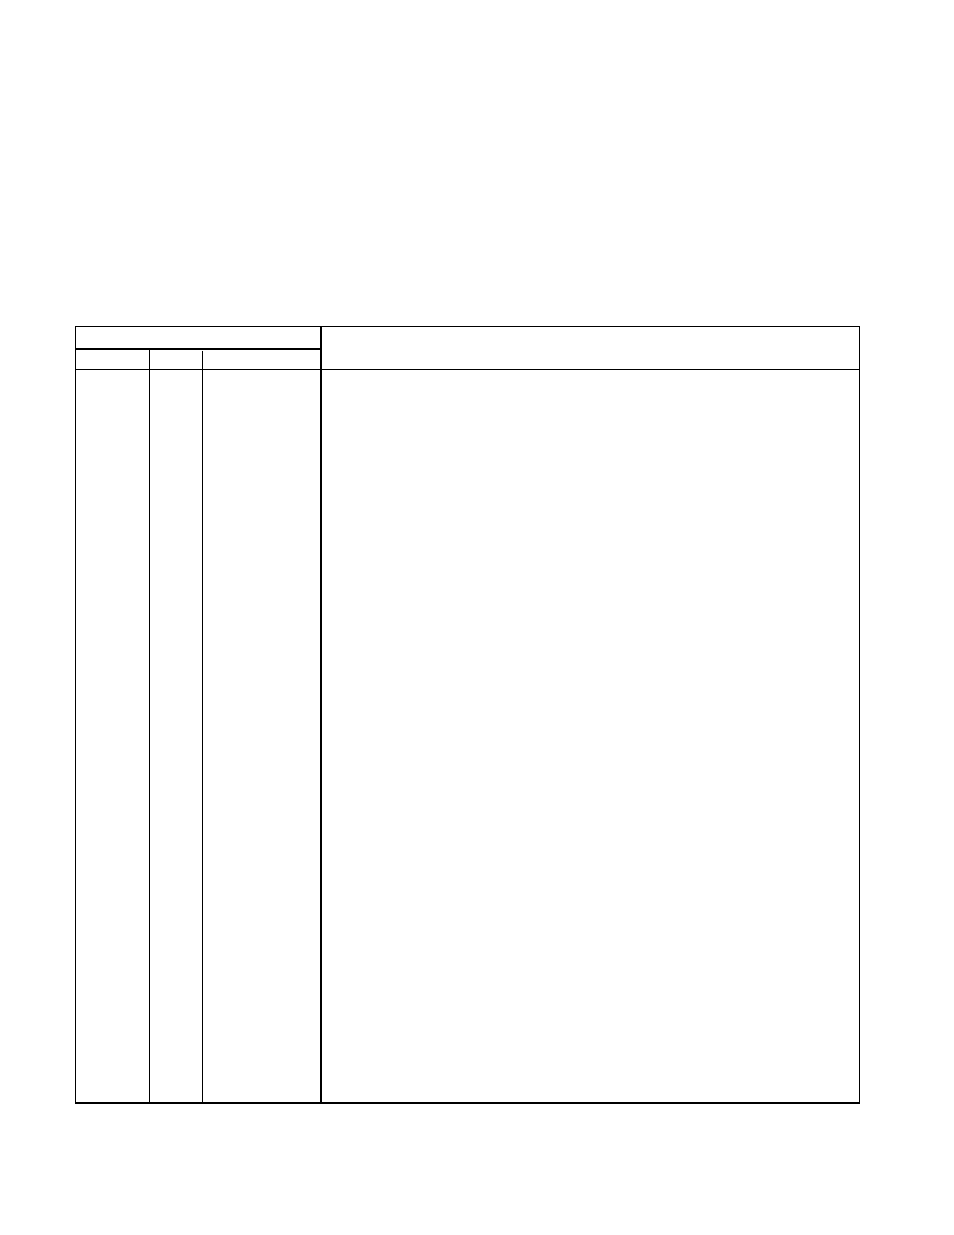
Upper Displays
Lower Display
Description
Detector
Zone
Status
0
0
0
Keylock switch is in RESET position, or the external inhibit is activated.
(Outputs inhibited, except Status outputs.)
0
1 - 8
1
Keylock switch is in TEST position. (Outputs inhibited, except Status outputs.)
0
1 - 8
2
oi fault - the oi ring and/or the window of the detector indicated in the upper ZONE
display is dirty, or the detector module has lost sensitivity, or there is an open wire
between the detector and the controller.
0
1 - 8
3
Zones 1-4: Count rate has exceeded 50% of sensitivity setting. A separate output
is activated, and no fault output is activated.
Zones 5-8: Runaway detector – fault output activated. (This can be checked by
using the count mode test of the controller as described in the “Checkout” section.)
0
0
4
Low +290 vdc caused by a shorted A-lead or controller malfunction.
0
0
5
High +290 vdc caused by a failure in the regulating network in the controller.
0
1 - 4
6
Fire Output signal - blinking ZONE OUTPUT LED indicates fire location. Steady
ZONE OUTPUT LED indicates that the detectors in that zone have responded to a
UV signal, but are no longer responding. This is not a fault condition.
0
1 - 8
7
Count Subtraction Lockout. Surveillance detector module or modules are discharg-
ing at their maximum rate and the controller is subtracting the maximum signal from
the fire detector module’s signal. The system is thus “saturated,” and effectively
“locked-out,” i.e. there will be no false actuation of the system due to interference
signals, but the system is incapable of responding if a fire should occur at this time.
A separate output is activated when the system enters “lock-out.”
0
1 - 8
8
Controller has been placed in “count” mode (see “Checkout” section). Pushing and
releasing both SELECT and TEST/ACCEPT buttons at the same time while the key-
lock switch is in the TEST position changes the lower display to a numeral “8” - the
count mode for checking the count rate of each zone.
Blank
Blank
9
Data Link Failure – slave controller is not receiving data, or is receiving incorrect
data from the master controller.
Blank
Blank
Blank
FAULT LED on. There is a problem in the R7404 microprocessor circuitry. Place key-
lock switch in RESET, push and release LAMP TEST pushbutton and return the key-
lock switch to NORMAL. If operation does not return to normal, replace the entire
unit. Make sure the new R7404 is programmed the same as the one being replaced.
Blank
Blank
Blank
No LEDs on or displays on. Check input power to controller or blown fuse in con-
troller.
Table 5—Status Codes - Nuclear Surveillance Controller