Leverless bead lifter adjustment procedure – COATS Kit 85606689 Leverless Bead Lifter User Manual
Page 7
Important: Always read and follow the instructions.
• 7
Leverless Bead Lifter
Adjustment Procedure
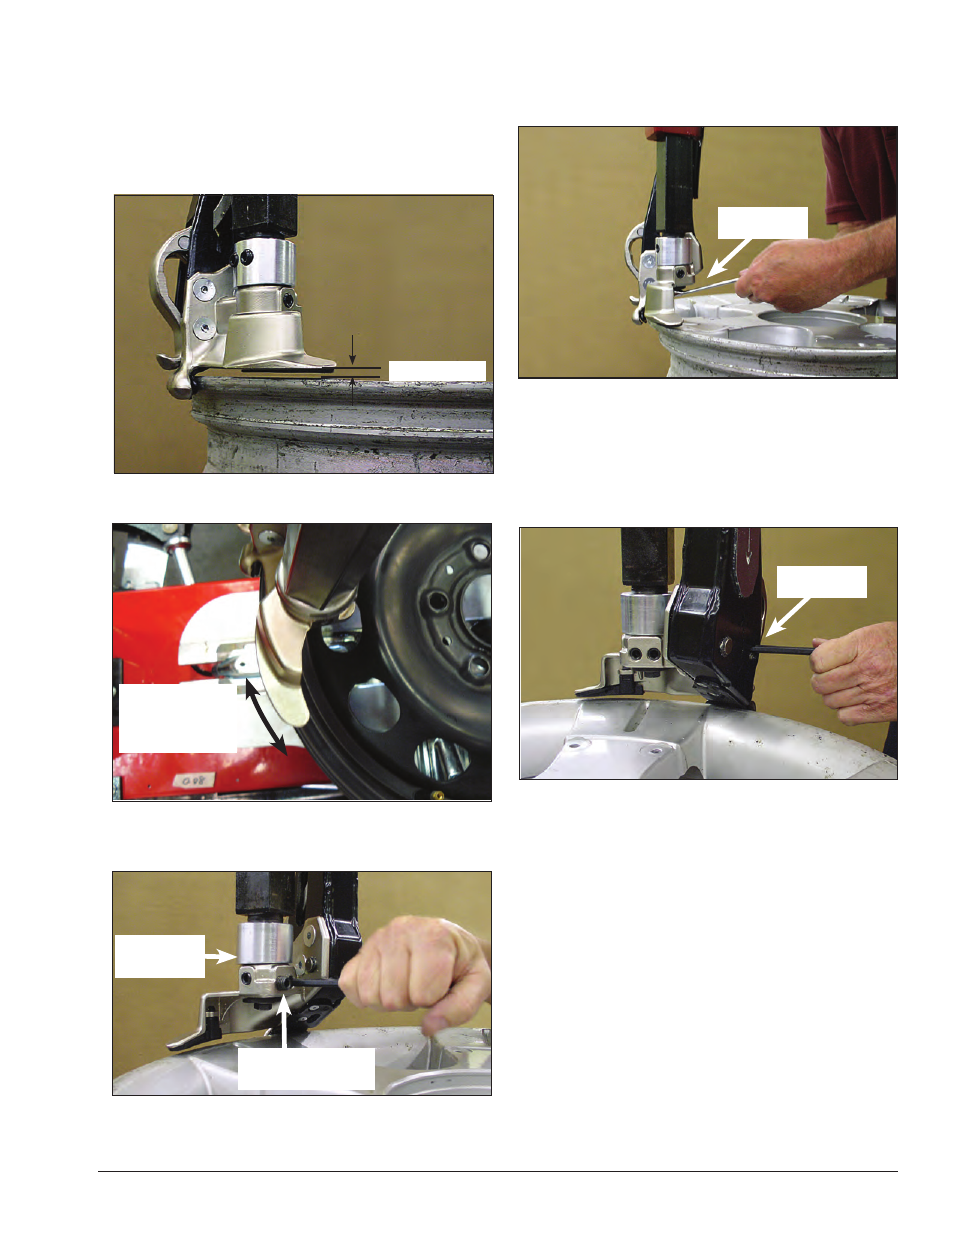
1.
Use a 17-inch diameter wheel for adjustments.
This covers the normal range of 14 to 21-inch wheels.
2.
Set mount/demount head to 1/8 to 3/16-inch
above wheel.
3.
Align mount/demount head to match curvature of
wheel.
4.
Snug (2) set screws in adapter. Then snug (2) set
screws in mount/demount head making sure mount/
demount head to wheel relationship doesn’t change.
5.
Loosen (2) set screws on adapter 1/4 turn.
6.
Tighten screw holding leverless bead lifter assem-
bly to vertical shaft; torque to 20-26 ft-lbs.
7.
Tighten set screws (4) — (2) on adapter and (2) on
mount/demount head.
8.
Tighten (1) set screw on side of mount/demount
head
9.
Tighten (1) set screw through access hole on
leverless bead lifter.
1/8" to 3/16"
(2) Adapter
Set Screws
(2) Mount/Demount
Head Set Screws
Torque To
20-26 ft-lbs.
Tighten Set
Screw
Align Mount/
Demount Head
With Wheel
Curature
- 16 Bit PCB & Metal Arm Temporary (4 pages)
- 520 Wheel Lift (12 pages)
- 700 Decal Location (1 page)
- AirNut (12 pages)
- Application Chart, Balancing Solutions (12 pages)
- Autoflate Nitrogen (1 page)
- Balancer Adapter Wall Storage Board Kit (1 page)
- Balancer Adapter, 5 lug x 135mm Bolt Pattern (1 page)
- Balancer Adapter, 5 lug x 150mm Bolt Pattern (1 page)
- Balancer Adapter, 5 lug x 4.750 Bolt Pattern (1 page)
- Balancer Adapter, 5 lug x 5.5 Bolt Pattern (1 page)
- Balancer Adapter, 6 lug x 150mm Bolt Pattern (1 page)
- Balancer Adapter, 6 lug x 5.5 Bolt Pattern (1 page)
- Balancer Adapter, 8 lug x 170mm Bolt Pattern (1 page)
- Balancer Adapter, 8 lug x 180mm Bolt Pattern (1 page)
- Balancer Adapter, 8 lug x 6.5 Bolt Pattern (1 page)
- Conversion Instructions (1 page)
- Extended Balancer Stub Shaft (1 page)
- Fixed Finger Plates (2 pages)
- Hood Installation (1 page)
- Hood Installation Instruction (1 page)
- Hood Installation Sheet (1 page)
- Hood Installation Tip (1 page)
- Hubnut Removal (1 page)
- Side Accessory Tray (1 page)
- Kit 1.125-inch, Kit 40 mm, Light Truck Cone (1 page)
- Kit 1.125-inch, Kit 40 mm, XL Pressure Drum (1 page)
- Kit 8111177 Three Phase to Single Phase Conversion (1 page)
- Kit 8111864 Motorcycle Wheel Adapter (4 pages)
- Kit 8111935 Light Truck Back Cone Spacer (1 page)
- Kit 8112877 Touch Panel Replacement (2 pages)
- Kit 8113082 40mm Conversion Shaft (1 page)
- Kit 8113223 (1.125-inch), Kit 8113228 (40 mm), VW/Porsche Adapter (1 page)
- Kit 8113592, Wheel Lift Link (1 page)
- Kit 8113645 Radial Runout Sensor Adjustment Kit (2 pages)
- Kit 8113860 Splash Guard (1 page)
- Kit 8113881 Printer Serive (1 page)
- Kit 8113883 Printer Bracket Serive (1 page)
- Kit 8113887 XR 1800 Upgrade to XR 1850 (2 pages)
- Kit 8113893 Lateral Run Out Service (1 page)
- Kit 8113900 Monitor Replacement (1 page)
- Kit 8113932 16 Bit PCB & Metal Arm (1 page)
- Kit 8114025 PCB Assembly (1 page)
- Kit 8114105 PCB Assembly Kit (1 page)
- Kit 8114155 Serial Loader (4 pages)