Pausing operation, Cancelling operation, Microcombi, gentle / microcombi, intensive – Neff C67P70N3GB User Manual
Page 11: Microcombi, gentleà, Note, Microcombi, intensiveá, Setting procedure, Change the cooking time using the rotary selector, Press the ƒ button, The cooking time has elapsed
11
Pausing operation
Press the
„
button briefly.
ƒ
flashes. The oven is paused.
Press the
ƒ
button again to continue operation.
Cancelling operation
Switch off the oven using the operating mode selector.
Notes
■
If you also set a cooking time, the operation which you have
set will automatically switch off at the end of this time. See the
section Electronic clock.
■
If you enter a cooking time and end time, the operation which
you have set will automatically switch on and off. See the
section Electronic clock.
MicroCombi, gentle / MicroCombi, intensive
For these types of heating, a microwave power setting is
automatically switched on. You simply need to set the
temperature specified in the recipe and halve the cooking time.
MicroCombi, gentle
à
MicroCombi, gentle is suitable for cakes in tins, such as
■
Sponge cake, e.g. marble cake, fruit loaf, fruit flan
■
Short-crust pastry with moist filling, e.g. apple pie,
cheesecake
■
Cakes made from baking mixtures
■
Yeast cake, e.g. with currants
■
For roasting, the cooking time can also be halved with this
type of heating.
Note: Use dark metal baking tins or else plastic "FlexiForm"
bakeware. For joints, a heat-resistant glass dish with or without
a lid is suitable.
MicroCombi, intensive
á
This type of heating is suitable for
■
poultry, e.g. chicken
■
baked casseroles, e.g. pasta bake
■
gratins, e.g. potato gratin
■
grilled fish, fresh and frozen
Note: Use heat-resistant containers made of glass or ceramic.
Setting procedure
If there is information in the recipe for different types of heating,
take the setting for Top/bottom heating. The cooking time
specified in the recipe should not be less than 30 minutes.
Place your food in the cold cooking compartment. Place the
ovenware in the centre of the wire rack at level 1.
1.
Using the rotary selector, set the “MicroCombi, gentle” or
“MicroCombi, intensive” heating type.
A preset cooking time of
x
20:00 minutes is suggested.
2.
Use the temperature selector to set the temperature.
3.
Press the clock function button
Ã
repeatedly until the
KJ
and
x
symbols light up.
4.
Change the cooking time using the rotary selector.
5.
Press the
ƒ
button.
Appliance operation begins.
The cooking time has elapsed
A signal sounds. Operation has finished. You can stop the
audible signal by pressing the
Ã
button. The clock display
shows
y
0:00.
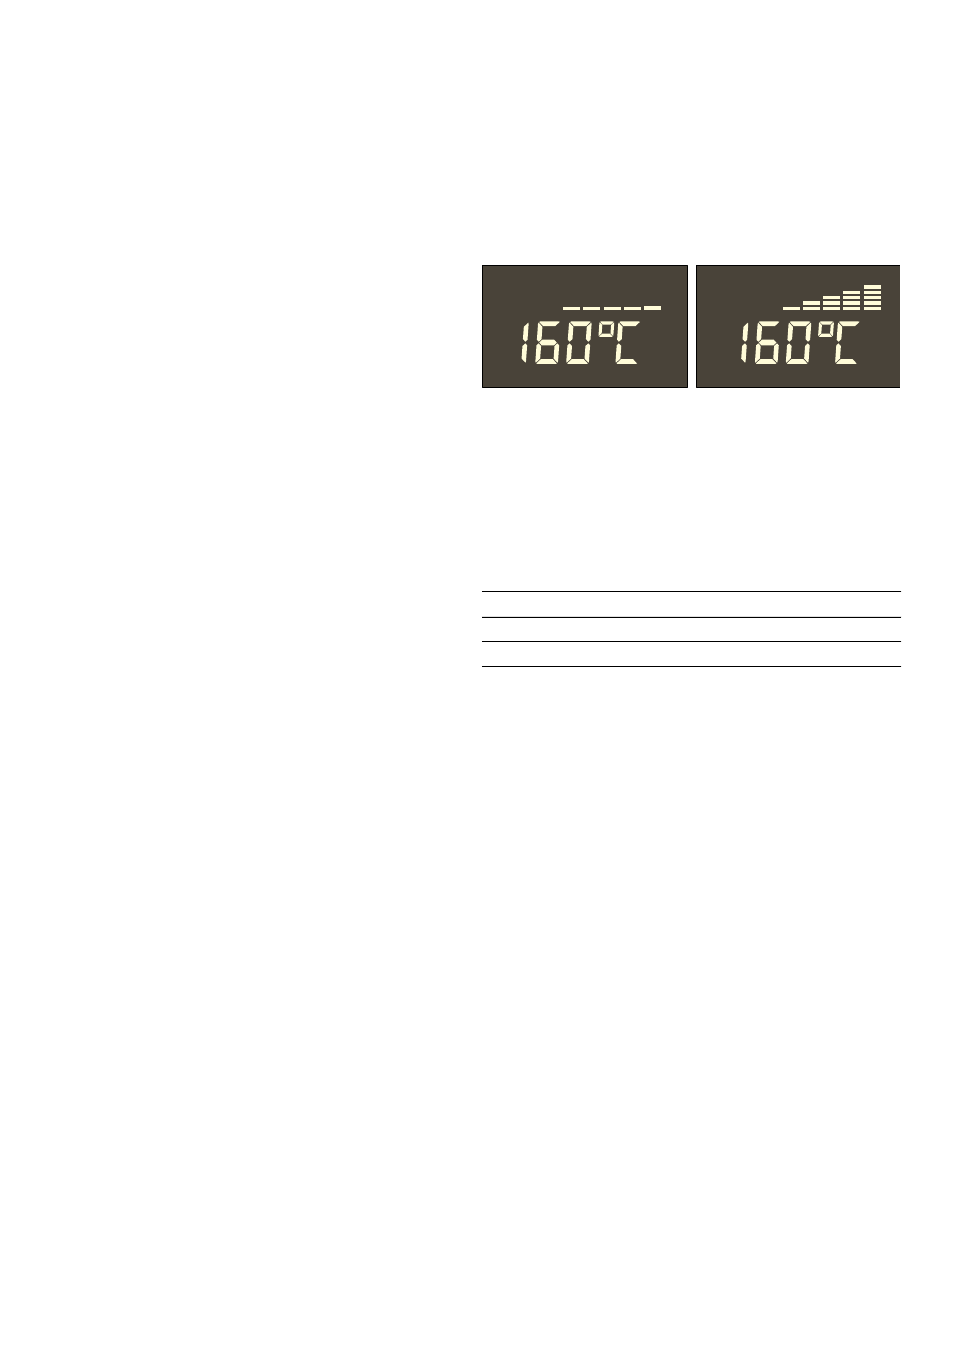
Heating indicator
The five bars in the heating indicator show the heating phase
and the residual heat in the cooking compartment.
Current temperature
Press the
±
button. The current temperature is displayed for
3 seconds.
Heating phases
When the oven is started, five bars appear in the status bar.
The set temperature has been reached when the last bar is
filled.
If you have selected a grill setting or the microwave, the bars
do not appear.
You can use the
±
button to check the current heating
temperature while the oven is heating up. Due to thermal
inertia, the temperature displayed may differ slightly from the
actual temperature in the cooking compartment.
Residual heat indicator
You can see in the temperature display whether there is high or
low residual heat in the cooking compartment.
Setting rapid heating
The rapid heat up function is not suitable for all operating
modes.
Suitable operating modes
■
3
Hot air
■
2
Hot air plus and
■
%
Top/bottom heat
Suitable temperatures
Rapid heating will not work if the temperature is set to less than
100 °C. If the temperature in the cooking compartment is only
slightly less than the temperature you have set, rapid heating is
not necessary. It will not switch on.
Setting rapid heating
Condition: a suitable operating mode and temperature must
have been set.
1.
Set the operating mode and temperature.
2.
Repeatedly press the clock function button until the
KJu
and
f
symbols light up and
Œ
appears on the clock
display.
Temperature display
Text display
•
Residual heat high
œ
Residual heat low