Myron L 729II User Manual
Page 18
controller set point until the alarm/piezo sounds off. If
controller is not yet connected to a functioning sensor, it
may be necessary to press and hold the ZERO test
switch.
The black button on the front of the RA will mute the
piezo alarm for approximately three minutes or until you
improve the water quality (readjust controller set point).
The piezo alarm will continue to sound off every three
minutes until the user has improved the alarm condition
inside the controller. If three minutes muting is fine for
your application, skip to step 9.
8. If three minutes is too long or too short, adjust time delay
control inside RA until desired mute time is achieved
(adjustable from approximately 6 seconds to 10
minutes).
9. Replace the bottom of the RA, and secure RA to the
surface you have selected for its installation.
NOTE: If the RA does not sound off;
1. Check the polarity of the extension wire connections.
2. Be sure the controller is actually switching (relay will
click).
c. Connect to your own alarm
Use the following as guidelines.
Connector is a standard 2 wire Methode* style
connector. Connector with 8” wires, part #RAH, is
available from the Myron L Company.
Ensure your requirements do not exceed the 24 VDC
Unregulated 30mA maximum.
Ensure the polarity is correct (RED is positive), see
figure V.A.1.
Attach wires to RA.
Attach connector to controller connector (RA) per figure
V.A.1.
*Methode is registered trademark of Methode Electronics, Inc.
5. ALARM/CONTROL RELAY CONNECTIONS
Myron L Company Monitor/controllers are equipped with a “Dry
Contact” relay which is designed to energize/de-energize when
the set point is crossed. (See section IV.C.3 for set point
adjustment procedure) The relay energizes on increasing or
decreasing readings as set by the user, see section IV.C.1.
When energized (above set point), the Common (CM) will
disconnect from the Normally Closed (NC) contact and connect to
the Normally Open (NO) contact. Devices may be operated using
either the Normally Open contact or Normally Closed contact; or
both relay contacts may be used to control two devices of the
same voltage.
NOTE: A flow switch may be installed (electrically connected)
utilizing one of two convenient methods; the 3S connection, see
figure II.E.2, (remove jumper and connect flow switch across
terminals - 8” harness (RAH) available from the Myron L
Company), or inline with either relay connection, see figure II.E.3
or II.E.4.
WARNING: CONNECTING BOTH POWER SOURCE
LEADS
TO
THE
RELAY
TERMINAL
BLOCK
CONNECTORS WILL DAMAGE THE CIRCUIT BOARD
AND MAY CAUSE PERSONAL INJURY.
1. Place the user supplied Alarm relay interface cable and
watertight cable restraint into the enclosure’s
appropriate access hole. Skip for OEM.
2. Neatly connect the relay interface cable wires to the
Monitor/controller’s terminal block connectors, see
figures II.E.1, II.E.4 or II.E.5.
CAUTION: The connectors require only a small screwdriver or a
pen to push on the release levers. The release levers may be
broken or damaged if not pushed straight toward the circuit board.
DO NOT push the release levers sideways.
The easiest method of connecting the relay is shown in figures
II.E.1, and II.E.3. These show how the dry contact relay can use
incoming power to activate a controlled device (alarm, solenoid
valve, etc.) of 10 amps or less.
For 24 VAC applications, the Myron L Company offers a 115 VAC
to 24 VAC transformer, Model #VR, see figure II.E.4. Other
voltages must be user-supplied.
6. CONNECTING DISPLAY HARNESS TO DISPLAY
If the installation required the removal of the display harness from
the display (OEM installation requires connection), the following
procedure will ensure it is reinstalled without damaging the
display.
WARNING: THE DISPLAY WILL BE IRREPARABLY
DAMAGED IF THE HARNESS IS INSTALLED UPSIDE-
DOWN OR MISALIGNED. THE HARNESS MUST BE
INSTALLED AS SHOWN IN FIGURE II.E.5.
14
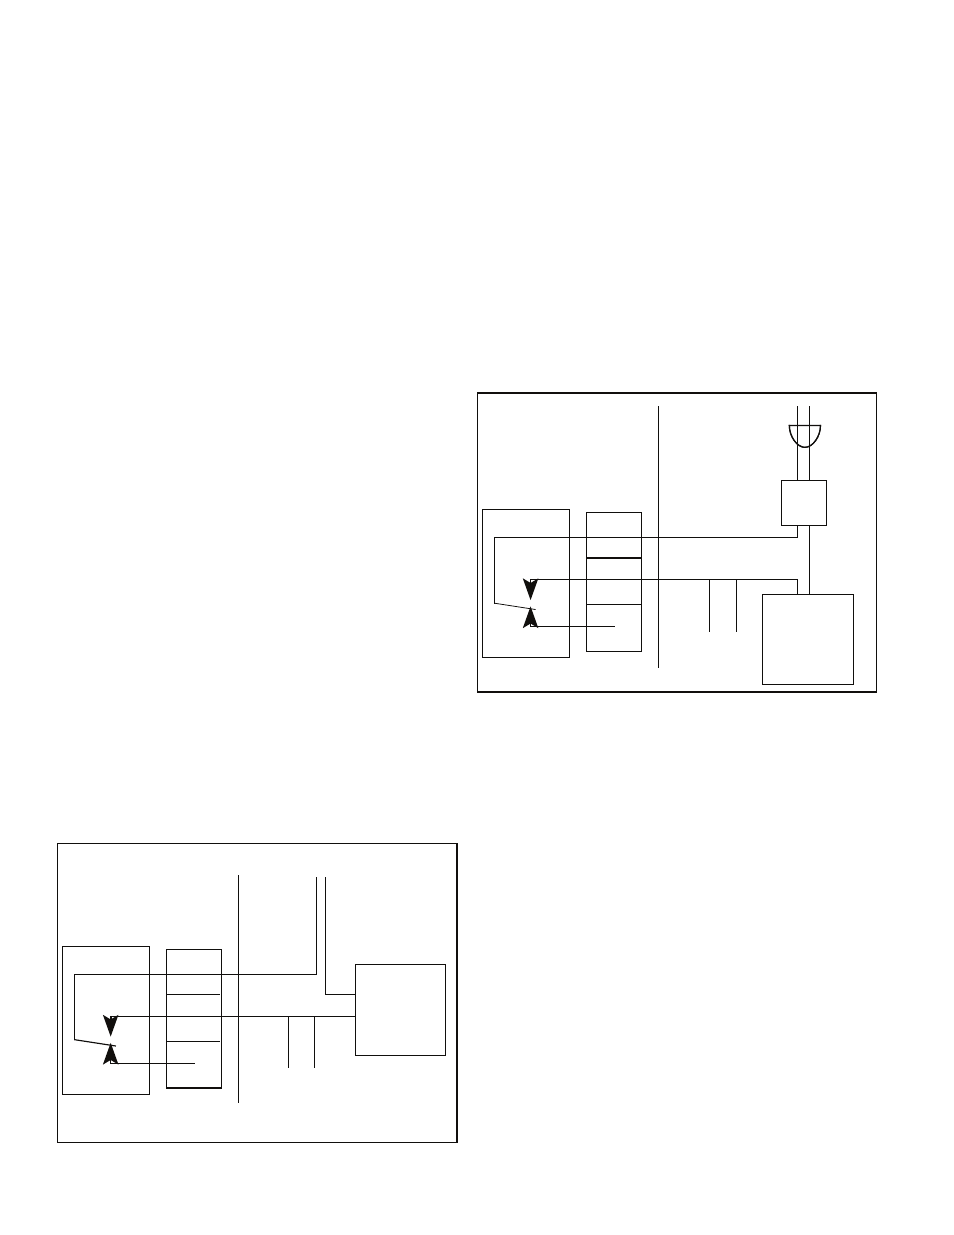
Figure II.E.3
DEVICE
TO BE
CONTROLLED
POWER
SOURCE
COM
NO
CM
NO
NC
RELAY
RELAY
TERMINAL BLOCK
MONITOR/CONTROLLER
CIRCUIT BOARD
OPT.
FLOW
SWITCH
X
Figure II.E.4
DEVICE
TO BE
CONTROLLED
COM
NO
115VAC
POWER
SOURCE
CM
NO
NC
RELAY
VR
RELAY
TERMINAL BLOCK
115 to 24VAC
TRANSFORMER
MONITOR/CONTROLLER
CIRCUIT BOARD
OPT.
FLOW
SWITCH
X