Physical transmitter adjustments, Mode conversion, Adjust stick tension – Spektrum SPM18100 DX18 User Manual
Page 41: Control stick length adjustment, Throttle ratchet strip installation, Adjust throttle friction straps
41
SPEKTRUM DX18 • TRANSMITTER INSTRUCTION MANUAL
EN
Mode Conversion
You can perform mode changes in the System Settings screen.
However, if you desire to change modes between 1 and 2 or
between 3 and 4, please contact Horizon Hobby for assistance due
to requirements for changing gimbals.
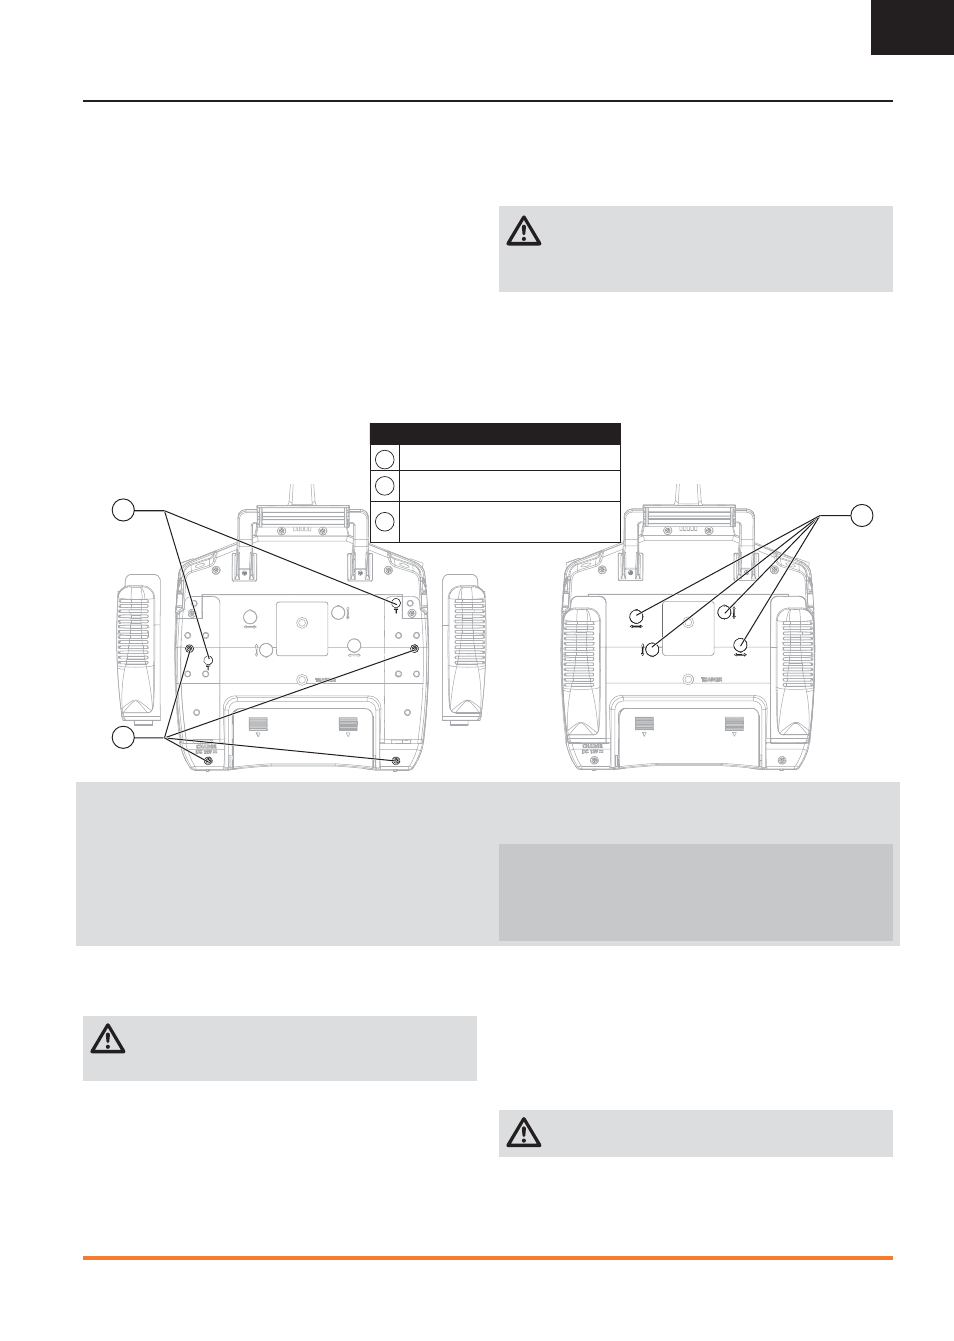
Adjust Stick Tension
Adjust stick tension using the screws on the stick gimbals through
holes in the back of the transmitter.
1. Remove rubber plugs from holes marked with a vertical arrow
or a horizontal arrow.
2. Turn the screws in these holes a small amount using a small
Phillips screwdriver to adjust tension on the vertical and
horizontal gimbals.
NOTICE: Always do a test of stick tension while turning these
screws to ensure stick tension is not too loose or too tight.
Tightening a screw too much can damage a spring. Loosening a
screw too much can let a spring fall off and cause a short-circuit
in the transmitter.
CAUTION: Always power off the transmitter, disconnect
and remove the battery before adjusting stick tension or
friction straps. Not doing so could result in property damage or
injury.
Control Stick Length Adjustment
1. Adjust control stick length using a 2mm Allen wrench.
2. Turn the setscrew in the stick counterclockwise to loosen it.
Make the stick shorter by turning it clockwise or longer by
turning it counterclockwise.
3. After adjustment of stick length, tighten the setscrew.
PHYSICAL TRANSMITTER ADJUSTMENTS
Throttle Ratchet Strip Installation
The transmitter is manufactured with a smooth friction strip and
the included optional ratchet strip may be installed if desired.
CAUTION: Always power off the transmitter, disconnect
and remove the battery before opening the transmitter
case. Not doing so could result in property damage or injury.
1. Remove the battery door and disconnect the battery from your
transmitter.
2. Carefully pull up the top of the left and right rear hand grips on
the back of the transmitter to expose the 2 case screws.
Tip: Only the top portion of the grip needs to be pulled back,
the entire grip does not need to be removed to access
the case screws.
3. Carefully remove and keep 4 screws from the back of the trans-
mitter (2 in lower corners and 2 under the back hand grips).
4. Carefully open the transmitter case so no wires are stretched
or pulled.
5. Remove and keep 2 screws from the installed throttle ratchet
strip.
6. Do not remove grease from plastic part under the strip.
7. Attach the strip to the gimbal using the 2 screws.
8. Tighten the spring tension screw to get desired stick tension.
CAUTION: Make sure no wires or components are
pinched or damaged while installing the back cover.
9. Carefully close the transmitter case using the 4 screws
and re-install the hand grips.
10. Connect the battery to your transmitter.
Adjust Throttle Friction Straps
• Pull up the top of the rear grip on the back of the transmitter
to adjust the friction strip on the throttle gimbal. Only the top of
the grip must be pulled up to access the adjustment screw, the
entire grip does not need to be removed.
• Use a small Phillips screwdriver to tighten or loosen the screw
for friction strip.
• Reinstall the top of the rear grip after completing the
adjustment as desired.
NOTICE: Always do a test of stick tension while turning these
screws to ensure stick tension is not too loose or too tight.
Tightening a screw too much can damage a spring. Loosening a
screw too much can let a spring fall off and a cause short-circuit
in the transmitter.
3
2
1
Function
1
Throttle friction strip tension screws
2
Gimbal spring covers
3
Friction straps access screws
(Throttle Ratchet Strip installation)