Care of your product, Precautions – CDN INTP626X - ProAccurate® Infrared/Thermocouple Probe Thermometer EN User Manual
Page 3
thermometer is exposed to rapid changes
in the ambient temperature.
2.)
ER3 is displayed when the ambient
temperature exceeds -32°F/0°C OR
+122°F/+50°C.
c. For all other error messages it is necessary
to reset the thermometer.
1.) Wait for the thermometer to power off.
2.) Remove the battery and wait for a
minimum of one minute.
3.) Reinstall the battery (see
Battery
Installation).
4.) Press the SCAN button to turn the
thermometer on.
5.) If the error message remains, please
contact CDN for further assistance.
C. Thermocouple Probe
Important: The probe may be damaged if measurement
temperature is lower than -67°F/-55°C OR higher than
+626°F/+330°C.
1. Flip down the probe until fully extended.
2. Insert the probe at least 1"/2.5 cm into the food.
3. Press the PROBE button to continuously display
the temperature for up to 4 minutes before the
unit automatically powers off.
Note:
Pressing the PROBE button may interrupt the last
infrared HOLD reading. Press the PROBE button again to
return to infrared scanning.
4. Wearing a heat resistant glove, flip the probe
back into the case when finished.
Important: Do not twist the probe or rotate it in wrong
direction. Exceptional stress on probe may cause it to break.
CAUTION:
Probe may be
HOT
after use. Always wear a
heat resistant glove to touch the stainless steel probe or
sensor cable during or just after cooking.
Do not touch
with bare hands.
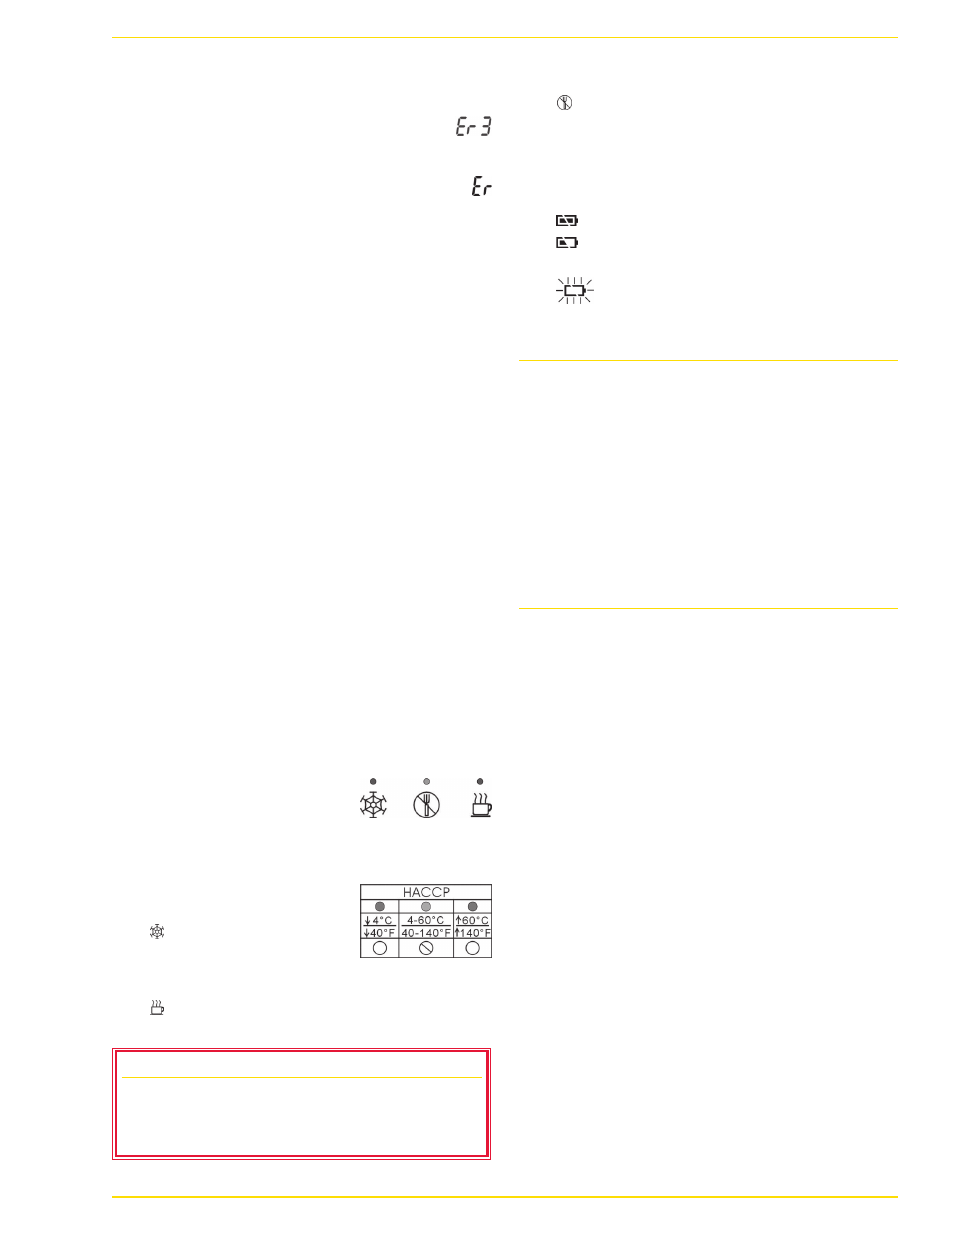
D. HACCP Check
Integrated HACCP check lights
and icons instantly show if
temperatures are within HACCP
guidelines for safe food temperatures.
Note:
The GREEN and RED lights will always be lit
before power off.
1. A
GREEN light above the
SNOWFLAKE icon
( ) indicates a safe cool
or frozen condition below
40°F/4°C.
2. A
GREEN light above the HOT CUP icon
( ) indicates a safe holding temperature above
140°F/60°C.
3. A
RED light above the DON’T EAT icon
( ) indicates that the temperature is within
the
HACCP Danger Zone of 40 to 140°F/
4 to 60°C.
E. Battery Status
The thermometer incorporates visual battery
status indication:
1.
Battery OK: measurements are possible
2.
Battery Low: replace battery with two 1.5V
AAA Alkaline cells; measurements are possible
3.
Battery Exhausted: replace battery;
measurements are not possible
Care of Your Product
•
The sensor lens is the most delicate part of the
thermometer and should be kept clean at all
times. Take care when cleaning the lens. Use only
a soft cloth or cotton swab with water or rubbing
alcohol. Allow the lens to dry fully before using the
thermometer.
•
Do not submerge any part of the thermometer in
water. Wipe clean with a damp cloth.
•
Store the thermometer at room temperature
between -4 to +149°F/–20 to +65°C.
Precautions
•
Dispose of used battery promptly and keep away
from children.
•
Always wear a heat resistant glove to touch the
stainless steel probe during or just after cooking.
Do not touch with bare hands.
•
Keep the batteries, stainless steel probe and sensor
cable away from children.
•
Clean the probe and dry thoroughly after use.
•
Do not clean the case with abrasive or corrosive
compound, which may scratch the plastic and
corrode the electronic circuits.
•
Do not subject the unit to excessive force shock,
dust, temperature or humidity, which may result in
malfunction, shorter electronic life span, damaged
battery and distorted parts.
•
Do not tamper with the unit’s internal components.
Doing so will invalidate the warranty on the unit
and may cause unnecessary battery damage and
distorted parts.
•
Do not subject the unit to excessive exposure to
direct sunlight.
The unit is not waterproof — do
not immerse it into water or expose to heavy rain.
•
To avoid deformation, do not place the unit in
extreme temperatures. Never burn the probe
directly over the fire. Do not use the probe when
the temperature is above 626°F/330°C. Doing so
will deteriorate the probe.
EMC/RFI
Readings may be affected if the unit is operated within a radio
frequency electromagnetic field strength of approximately
3 volts per meter, but the performance of the instrument will
not be permanently affected.