Dwyer GFM4 User Manual
Page 6
5.3.3 - GFM3/4 Main Menu
Pressing of the ( ) [Esc] button from the main screen will switch the display to the
Main Menu. The following screen will appear:
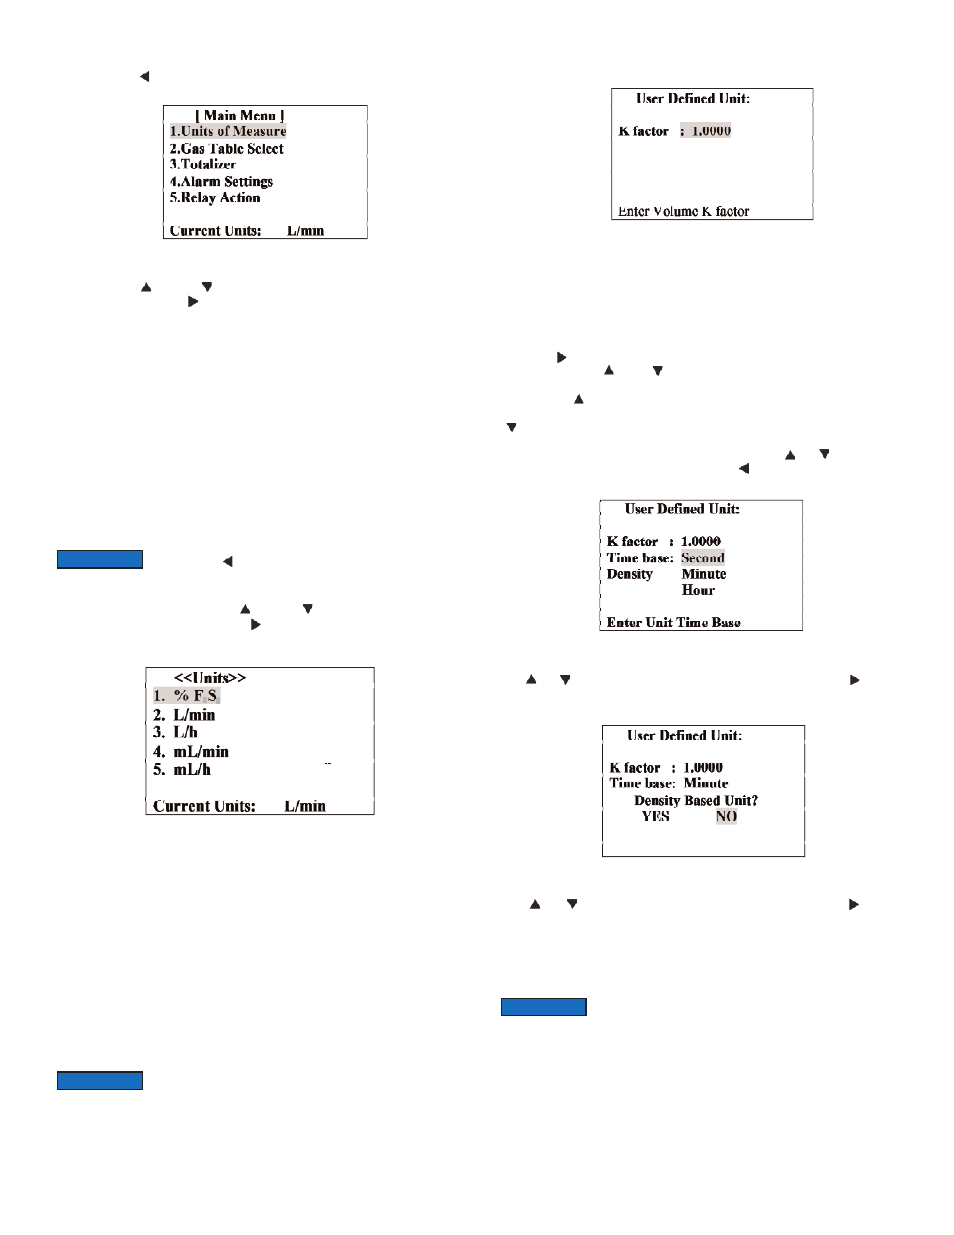
Figure b-3, GFM3/4 Main Menu Screen
Pressing of the ( ) [Up] or ( ) [Dn] buttons allows the user to scroll up or down
the menu options. Press ( ) [Enter] button to select the highlighted option of the
menu.
The following menu options are available:
1. Units of Measure - View or Change the Units of Measure for Flow process
variable.
2. Gas Table Select - View or Change the Gas Table.
3. Totalizer - View or Change settings for Totalizer.
4. Alarm Settings - View or Change settings for Flow, Pressure and Temperature
Alarm.
5. Relay Action - View or Change settings for each of two available Relays.
6. K Factors - View or Change settings for User defined or Internal K Factors.
7. Zero Calibration - Initiate Automatic Sensor Zero Calibration.
8. Flow Conditions - Allows the user to set the Actual or Standard Flow conditions.
9. BackLight Timer - Allows the user to turn On/Off the Energy-saving for LCD
backlight.
10.Exit - Returns to the Main Screen with process variables reading.
5.3.4 Gas Flow Engineering Units Settings
While in the Main Menu scroll with ( ) [Up] or ( ) [Dn] button to highlight the
Units of Measure option and press the ( ) [Enter] button. The following screen will
appear.
Figure b-4, GFM3/4 Units of Measure Screen
The following Engineering Units menu options are available:
1. % FS - percent of full-scale.
2. L/min - Liters per minute.
3. L/h - Liters per hour.
4. mL/min - milliliters per minute.
5. mL/h - milliliters per hour.
6. SCFH - cubic feet per hour.
7. SCFM - cubic feet per minute.
8. LbPH - pounds per hour.
9. LbPM - pounds per minute.
10. User - User defined Unit of Measure.
11. Exit - Exit to Main Menu
Selecting option 1 to 9 sets the corresponding Unit of Measure and switches the
LCD back to Main Menu.
If the User defined Unit of Measure option is selected the following screen will
appear:
Figure b-5, User Defined Unit of Measure Screen (K factor)
In order to specify the User Defined Unit of Measure user has to set three key
parameters:
K factor - Conversion factor relative to L/min unit of measure.
Time base - Hours, Minutes, or Seconds.
Density - Use density (YES / NO).
Press the ( ) [Enter] button to move the flashing cursor to the digit that has to be
adjusted. Pressing ( ) or ( ) will increment or decrement a particular digit
respectively. The numbers will change from 0 to 9 and next to the decimal point (.).
Pressing the ( ) button one more time will change the digit on the highlighted
position of the cursor back to 0. The same is true in reverse when pressing the
( ) button. Only one decimal point is allowed. If changing position of the decimal
point is required, change decimal point to any desired digit then move the cursor to
the required position and adjust it to the decimal point with ( ) or ( ) button. When
complete with K-factor value settings, press the ( ) [Esc] button to move in to the
Time base settings screen. The following screen will appear:
Figure b-6, User Defined Unit of Measure Screen (Time base)
Use ( ) or ( ) buttons to highlight desired time base option. Press the ( ) [Enter]
button to set the Time base and move in to the density settings screen. The
following screen will appear:
Figure b-7, User Defined Unit of Measure Screen (Density)
Use ( ) or ( ) button to highlight desired density option. Press the ( ) [Enter]
button when done. The LCD will display the Units of Measure Screen and new
settings will be reflected at the bottom status line.
5.3.5 - Gas Table Settings
The GFM3/4 Mass Flow Meter is capable to store calibration data for up to 10
different gases.
i
i
Once Flow Unit of Measure is changed the Totalizer's Volume
based Unit of Measure will be changed automatically.
NOTICE
By default the GFM3/4 is shipped with at least one valid
calibration table (unless optional additional calibrations were
ordered). If instead of the valid Gas Name (for example NITROGEN) the main
creen displays Gas designator as "Uncalibrated", then the user has chosen the
gas table which was not calibrated. Using an Uncalibrated Gas Table will result in
erroneous reading.
NOTICE
Pressing the ( ) [Esc] button from any level of the Menu will
switch the menu to one level higher (up to Main Screen).
NOTICE
Page 6