Foredom Duplex Spring Connection User Manual
Duplex spring connection, Foredom
FOREDOM
®
Duplex Spring Connection
9.
Lubrication:
•
Apply a light film of Foredom Grease to
the new duplex spring.
•
Apply one drop of Foredom Oil to
the axle.
10.
Reassemble by reversing procedures
in steps 2 through 5 on opposite page.
11.
Attach handpiece to flexible shaft and
sheath being sure to align shaft tip with
slot in handpiece shaft connector. Run
handpiece at low speed for one or two
minutes to spread out grease and oil.
Part No.
Description
HP76
Duplex Inner Spring
HP75
Duplex Axle
HP73 (H.8D, H.9D, H.15D, H.18D,
H.52D, H.55D, H.56D)
Duplex
HP73-1 (H.7AD), or
}
Cover
HP74 (H.7D, H.10D, H.20D)
Assembly
HP47
Washer
HP10531
Retaining Ring
HP46
Slotted Shaft Connector
HP42
Q.D. Connector
MS10005
Foredom Motor & Handpiece
Oil in hypodermic dispenser
MS10010
Foredom Motor & Handpiece
Oil in 2 oz. container
MS10006
Foredom Flexible Shaft
Grease in 1 oz. container
Caution: To avoid frequent breakage or
kinking of springs, Do Not subject this
connection to unnecessarily sharp bends
of more than a 45° angle. Do Not exert
excessive pressure on work, but let the
speed of the tool accomplish the
desired result.
Avoid jamming of bur, stone, drill, or other
cutting tool in a cavity, slot, groove, or
hole in workpiece.
The duplex spring is a replacement
part that is not covered by the
handpiece warranty.
FOREDOM
®
The Foredom Electric Company
Bethel, CT USA 06801
www.foredom.com
Form 1253 n 3/10
Printed in USA
FOREDOM
®
Duplex Spring Connection
Duplex Springs provide extra flexibility to a
handpiece when more precise control for
delicate work is required. The spring drive is
made of special steel, double wound, tubular
construction with a protective flexible
spring cover.
Duplex Springs are subject to breakage and
are not covered by warranty. We recommend
that only experienced users of flex shaft tools
and/or those whose work demands added
flexibility consider this style handpiece.
The duplex spring component requires
periodic lubrication.
FOREDOM
®
Duplex Spring Connection
Directions for Replacing Duplex Springs:
You will need: 2 pair of pliers, 1/16
″ diameter
pin, and a 3/16
″ open end wrench or needle
nose pliers.
1. Remove handpiece from sheath. This can be
done with a sharp pull.
2. Unscrew the QD Sheath Connector from
Duplex Cover Assembly using two pairs of pliers
at points A and B, turning counterclockwise. This
exposes the Slotted Shaft Connector.
3. Insert a 1/16
″ pin through the hole in the
Duplex Axle. Holding pin, unscrew Slotted Shaft
connector from axle, using a pair of pliers at
point C turning counterclockwise.
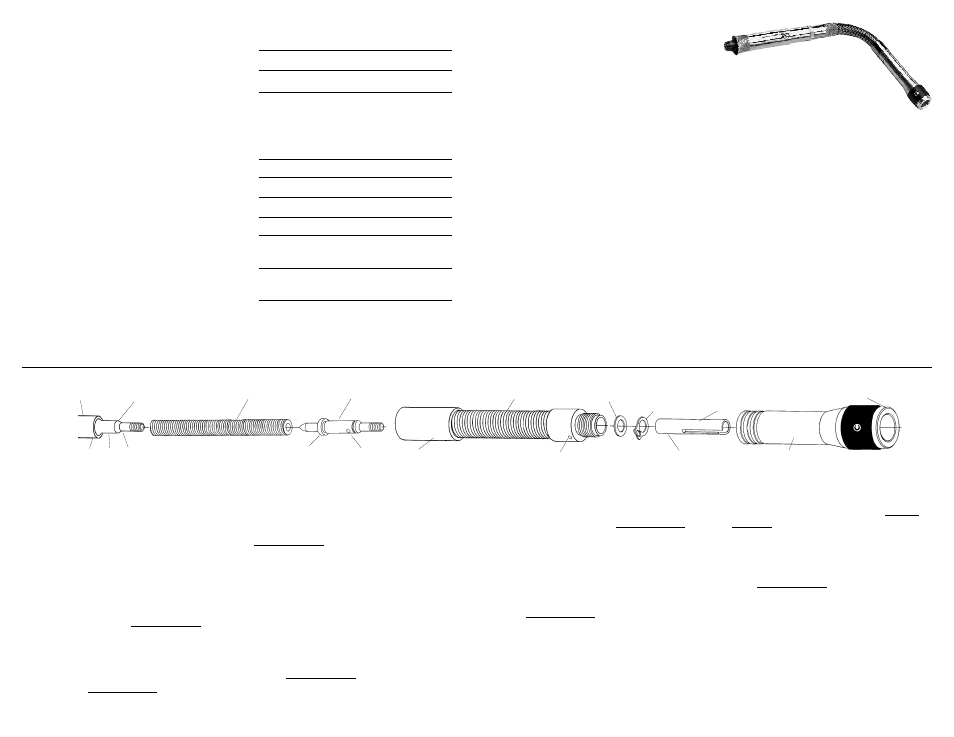
Handpiece Shaft
or Spindle
Handpiece Housing
Duplex Spring
Duplex Axle
D
F
H
G
Hole for
1/16
″ Pin
E
A
C
B
Duplex Cover
Washer
Slotted Shaft
Connector
QD Sheath Connector
Retaining
Ring
4. Remove Retaining Ring from axle with needle
nose pliers. Remove Washer.
5. Unscrew Duplex Cover from handpiece using
two pairs of pliers at points E and D, turning
counterclockwise. This exposes the damaged
Duplex Spring.
6. To remove the damaged spring:
Inspect Handpiece Shaft at point F (or point D for
the H.18D handpiece only). Depending on your
handpiece model:
Follow this if you have a crosshole (Handpieces
H.7D, H.15D, H.9D, and H.18D): Insert a 1/16
″ pin
through crosshole in spindle to hold it. Take a pair
of pliers to hold damaged spring, and pull while
turning counterclockwise to remove it.
Follow this if you have wrench flats (Handpiece
H.10D): Using a 4.5mm(3/16
″) open end wrench to
hold spindle, take a pair of pliers to hold damaged
spring, and pull while turning counterclockwise to
remove it.
Follow this if you do not have a crosshole or
wrench flat (Handpiece H.7AD, H.8D, H.52D,
H.55D, and H.56D): Hold spindle on point F using a
narrow pair of pliers above spring. With a second
pair of pliers hold damaged spring, and pull while
turning counterclockwise to remove it.
7. To remove axle from damaged spring:
Insert a 1/16
″ pin through crosshole in axle.
Remove spring as in Step 6 using a pair of pliers.
8. To install new spring:
Put the new spring on the duplex axle first by
pushing and turning it with the pliers counter-
clockwise. Be sure that the spring goes all the
way to the shoulder of the axle (Point G).
Holding the spindle as described in Step 6,
(depending on your model), install the spring on
the spindle by pushing and turning it with the
pliers counterclockwise.
Be sure that the spring goes all the way to
the shoulder of the spindle (Point H).
IMPORTANT
Be sure to follow lubrication
instructions on reverse side.