Foredom H.56D User Manual
Important instructions
Instructions for Handpieces H.55A, H.56A, H.55D, and H.56D
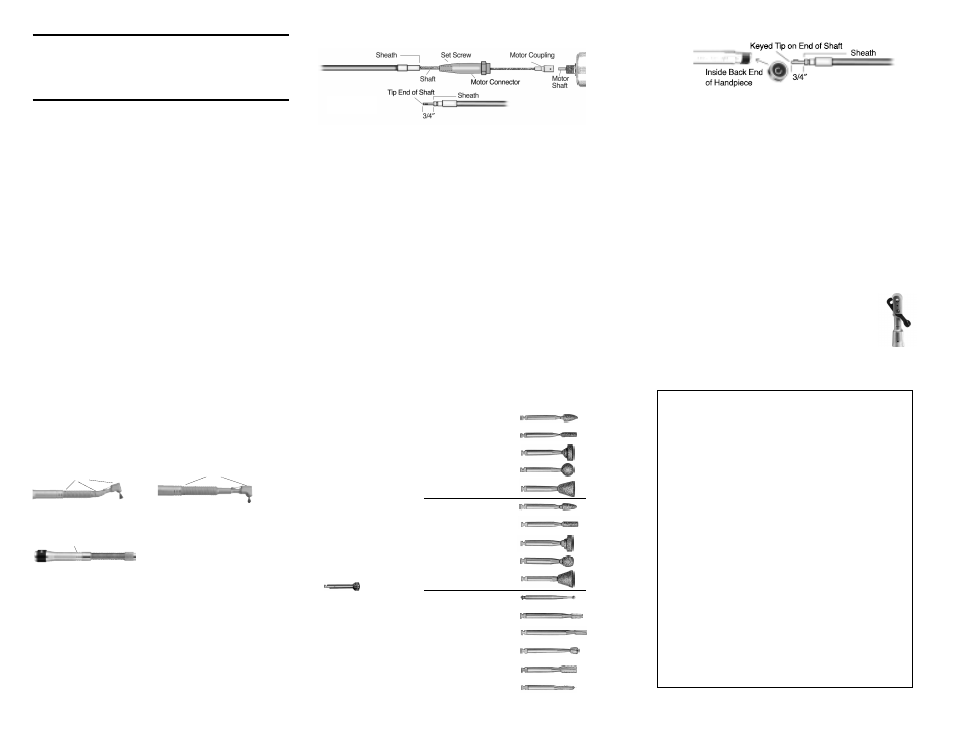
Shaft and Sheath Adjustment
It is important to check the sheath and shaft tip and properly adjust
them before you attach this handpiece to your Foredom flexible shaft
tool. The tip of the flexible shaft should extend 3/4
″ beyond the end
of the sheath and no more than 7/8
″ or less than 5/8″ (see Figure 1).
On Foredom machines with standard shaft and sheath, this
adjustment is made by loosening the set screw in the motor connector
and moving the sheath in or out while the motor and shaft/sheath
assembly are fully extended and straight while hanging or on a flat
surface. When the correct adjustment is made, tighten the set screw in
the motor connector.
For More Information:
For more information on Foredom machines, handpieces,
or accessories, contact your local dealer. If no local dealer is
available, contact: The Foredom Electric Company,
16 Stony Hill Road, Bethel, CT USA 06801,
tel.: 203-792-8622, fax: 203-796-7861
e-mail: [email protected], or visit our web site:
www.foredom.com.
Always wear proper eye protection
while using this handpiece.
Form 1254 n 5/08
Printed in USA
Please read instructions before
attaching this handpiece.
See your power tool owner’s manual for complete
instructions on use, care, and maintenance.
IMPORTANT INSTRUCTIONS
Foredom
®
Handpieces H.55A, H.56A, H.55D,
and H.56D
LIMITED WARRANTY
The Foredom Electric Co. warrants its product to be free of defects
in material or workmanship for a period of 90 days after purchase.
During the warranty period, the defective product will be repaired or
replaced without charge or, at our option, the purchase price will be
refunded. This warranty does not cover damage caused in transit or
by accident, misuse, or ordinary wear. ALL IMPLIED WARRANTIES,
INCLUDING BUT NOT LIMITED TO WARRANTIES OF FITNESS AND
MERCHANTABILITY, ARE HEREBY LIMITED IN DURATION TO A
PERIOD ENDING 90 DAYS FROM DATE OF PURCHASE, AND WE
WILL NOT BE LIABLE OR RESPONSIBLE FOR ANY SPECIAL OR
CONSEQUENTIAL DAMAGES. Repair or replacement will be made
at our option if the product is returned post-paid to:
The Foredom Electric Company
16 Stony Hill Road, Bethel, CT USA 06801
All warranty repairs must be done at the factory at the above
address. We will not pay any shipping or transportation charges.
The HP76 Duplex Spring is not covered by this warranty since it is
especially sensitive to the pressure and stress variables of each
individual operator. This warranty only covers the original purchaser
of the product. Some states do not allow limitations on how long an
implied warranty lasts, so the above limitations may not apply to
you. This warranty gives you specific legal rights, and you may also
have other rights which vary from state to state.
Note: This illustration
does not apply to slip
joint connections.
Figure 1
Figure 2
Attaching the Handpiece to Flexible Shaft
Attach the handpiece by pushing it on the grooved QD (quick
disconnect) fitting on the sheath. Be sure that the keyed tip of the
flexible shaft is properly lined up with the slot in the handpiece shaft
connector by looking into the rear of the handpiece before pushing
it on. If it is not in line, turn the handpiece to the correct position.
Operation and Use
Foredom angle handpieces contain small right angle gears in their
heads. The H.55A and H.55D also have gears in the front portion of
the handpiece body. the teeth on these gears can be stripped if
excessive pressure is applied to the accessory. let the speed of the
accessory, not pressure do the work. Do not use grinding stones or
discs over 3/4
″ in diameter. These handpieces are intended for
doing intricate, light duty work in hard to reach spots. To reduce
risk of spring breakage or overheating, avoid using a sharp bend in
the duplex spring connection in the H.55D and H.56D handpieces.
Attaching Latch-type Accessories
Push the latch in the head of the handpiece to the right
to open and insert accessory. Push latch to the left to
lock the accessory. (Right and left are defined as you
face the back of the handpiece head.)
left right
A-M-10 Mandrel
3/32
″ dia. shank
1/16
″ arbor hole
7/8
″ long
A
lu
m
in
u
m
O
x
id
e
(R
e
d
)
S
il
ic
o
n
C
a
rb
id
e
(G
re
e
n
)
V
a
n
a
d
iu
m
S
te
e
l
Latch Type
Accessories for
Angle Handpieces
H.55A, H.55D,
H.56A, and H.56D
Standard
Latch Type Mounted
Abrasive Points
and Steel Burs
Maximum
Speed Rating
35,000 RPM
Part
No.
A-RA1
A-RA3
A-RA11
A-RA12
A-RA21
A-RA31
A-RA33
A-RA41
A-RA42
A-RA51
A-RA11R
A-RA44
A-RA62
A-RA88
A-RA563
A-RA850
Head
Dia.
1/8
″
3/32
″
1/4
″
3/16
″
1/4
″
1/8
″
3/32
″
1/4
″
3/16
″
1/4
″
7/64
″
3/64
″
5/64
″
3/32
″
5/64
″
3/32
″
Head
Length
1/4
″
9/32
″
7/64
″
3/16
″
5/16
″
1/4
″
9/32
″
7/64
″
3/16
″
5/16
″
7/64
″
13/64
″
15/64
″
7/64
″
15/64
″
15/64
″
Maintenance and Lubrication
It is important to regularly lubricate the gears and spindle of
the 55A and 56A. The 55D and 56D require lubrication of the
gears, spindle, and duplex spring connection drive axle.
Apply one drop of Foredom handpiece oil (P/N MS10005) in
oil holes shown below every one hour of continuous use.
oil
H.55A/H.55D
H.56A/H.56D
Duplex Spring Connection
oil
oil
For more information, request:
Handpiece Parts Lists
H.55A/H.55D —Form No. 1140
H.56A/H.56D —Form No. 1141