2 dip-switch settings, Switch function setting description – Controlled Products Systems Group 9050-080 User Manual
Page 23
9050-065-M-3-11
21
7-OFF
7-OFF
7-ON
7-ON
8-OFF
8-ON
8-OFF
8-ON
Gate Close
Back-Off
Position
Gate Open
Back-Off
Position
Normal Setting. Gate fully opens.
Gate stops short 1” from full open position. Used for a reversing edge device.
Gate stops short 2” from full open position. Used for a reversing edge device.
Gate stops short 3” from full open position. Used for a reversing edge device.
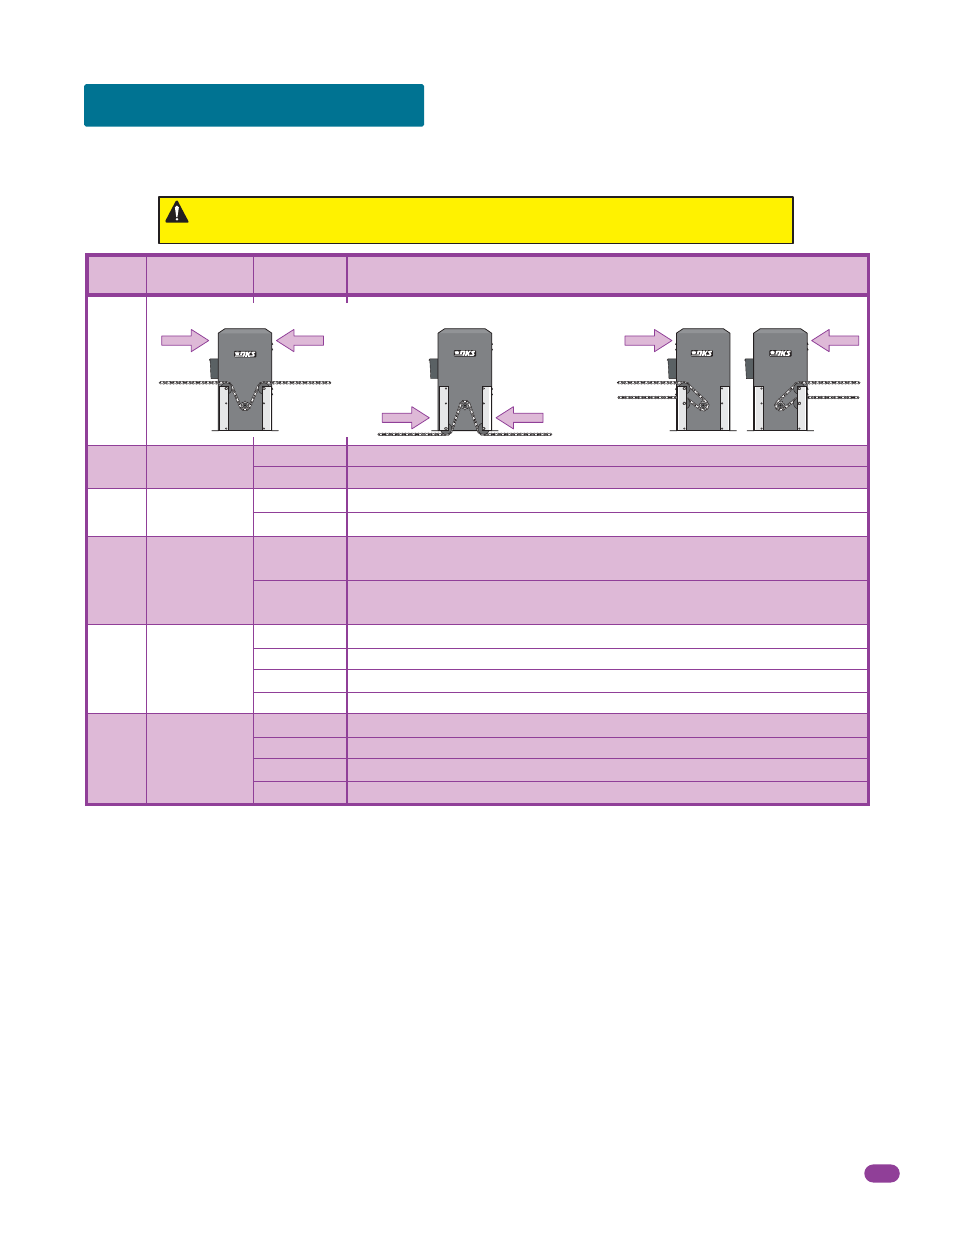
3.2 DIP-Switch Settings
The DIP-switches located on the circuit board are used to program the operator to operate in various modes and to turn on or
off various operating features. Whenever a switch setting is changed, power to the operator must be turned OFF and then turned
back on for the new setting to take affect. Check and review ALL switch settings prior to applying power to the operator.
Switch 1
Must OPEN the gate upon initial AC power up and open command. If the first open command begins to close the gate,
turn AC power off and reverse this switch. Opening direction will vary depending on the chain setup position (See above).
Switch 2
Turns the auto-close timer on or off. Can be adjusted from 1 to 23 seconds to close gate.
Switch 3
This switch determines when the relay on the board will be activated. This relay can be used as a switch for various
functions such as illuminating a warning light when the gate is not closed, or turning on a green light when the gate is full open.
Switch 4
This switch determines the operation of the built-in solenoid lock. The OFF setting is the factory setup. Caution: Do not
set this switch to ON unless the 2600-862 fail-secure manual release kit has been installed in the operator. Changing this
switch to the ON setting without installing the lock kit will damage the operator. See pages 33 and 34 for more information
about Fail-Safe vs. Fail-Secure release systems.
Switches 5-6
These work in conjunction with each other and determine if the operator will stop the gate at the full open
position, or if the gate should stop 1, 2 or 3 inches short of the full open position. Needed only when using a reversing edge
entrapment protection device on the opening edge of the gate with an end post as the physical stop.
Switches 7-8
These work in conjunction with each other and determine if the operator will stop the gate at the full close
position, or if the gate should stop 1, 2 or 3 inches short of the full close position. Needed only when using a reversing edge
entrapment protection device on the closing edge of the gate with an end post as the physical stop.
Switch
Function
Setting
Description
OFF
ON
5-OFF
5-OFF
5-ON
5-ON
6-OFF
6-ON
6-OFF
6-ON
Auto-Close
Timer
2
1
Relay
OFF
ON
3
4
5 and 6
7 and 8
Relay is activated when gate is full open.
Relay is activated when gate is not closed.
Auto-close timer is OFF. Manual input required to close gate.
Auto-close timer is ON. Adjustable from 1-23 seconds to close gate.
OFF
ON
Built-In
Solenoid Lock
Normal Setting. Fail-Safe (Factory Set). Lock engages only when an attempt is
made to manually force the gate open.
Fail-Secure. Lock engages after each cycle. CAUTION: Do not use this setting unless
the 2600-862 manual release kit has been installed or damage will occur to operator.
Normal Setting. Gate fully closes.
Gate stops short 1” from full close position. Used for a reversing edge device.
Gate stops short 2” from full close position. Used for a reversing edge device.
Gate stops short 3” from full close position. Used for a reversing edge device.
Changes the direction the operator will open/close the gate depending on the different chain configurations.
Opening
direction
using OFF
setting.
Opening
direction
using ON
setting.
Mount
Front
Opening
direction
using ON
setting.
Opening
direction
using OFF
setting.
Post
Mounts
Center or
Opens
with
OFF
setting.
Mounts
Right
All Rear
Opens
with
ON
setting.
Mounts
Left
All Rear
Every time the operator is powered up, the First open command will automatically run “Multiple
gate cycles” that will locate and remember the gate’s open and close positions (See next page).