Pg 2 of 2 – Draw-Tite 59722 ROOF RACK User Manual
Page 2
59722, 59723,
59724
PART No:
CARRYING CAPACITY:
Pg 2 of 2
50Kgs/
110 Lbs
Printed in China
A number of accessories for carrying special loads are available.
Ensure bars are parallel and straps are tightened against
the side rails. Perform a check by tugging on the cross bars.
REGULARLY CHECK THE TIGHTNESS OF CROSS BAR ATTACHMENTS.
Loads should be evenly distributed and secured
.
Check the function of all doors and sunroof before driving
.
Any weight carried on the vehicle will adversely affect its handling particularly in cornering or in a cross wind and the vehicle
should therefore be driven with increased caution.
For lost key replacement or other service items call customer service: 1-800-632-3290 or visit:
.
Please have lock core number or part numbers available.
Only use NON-STRETCH tie down straps.
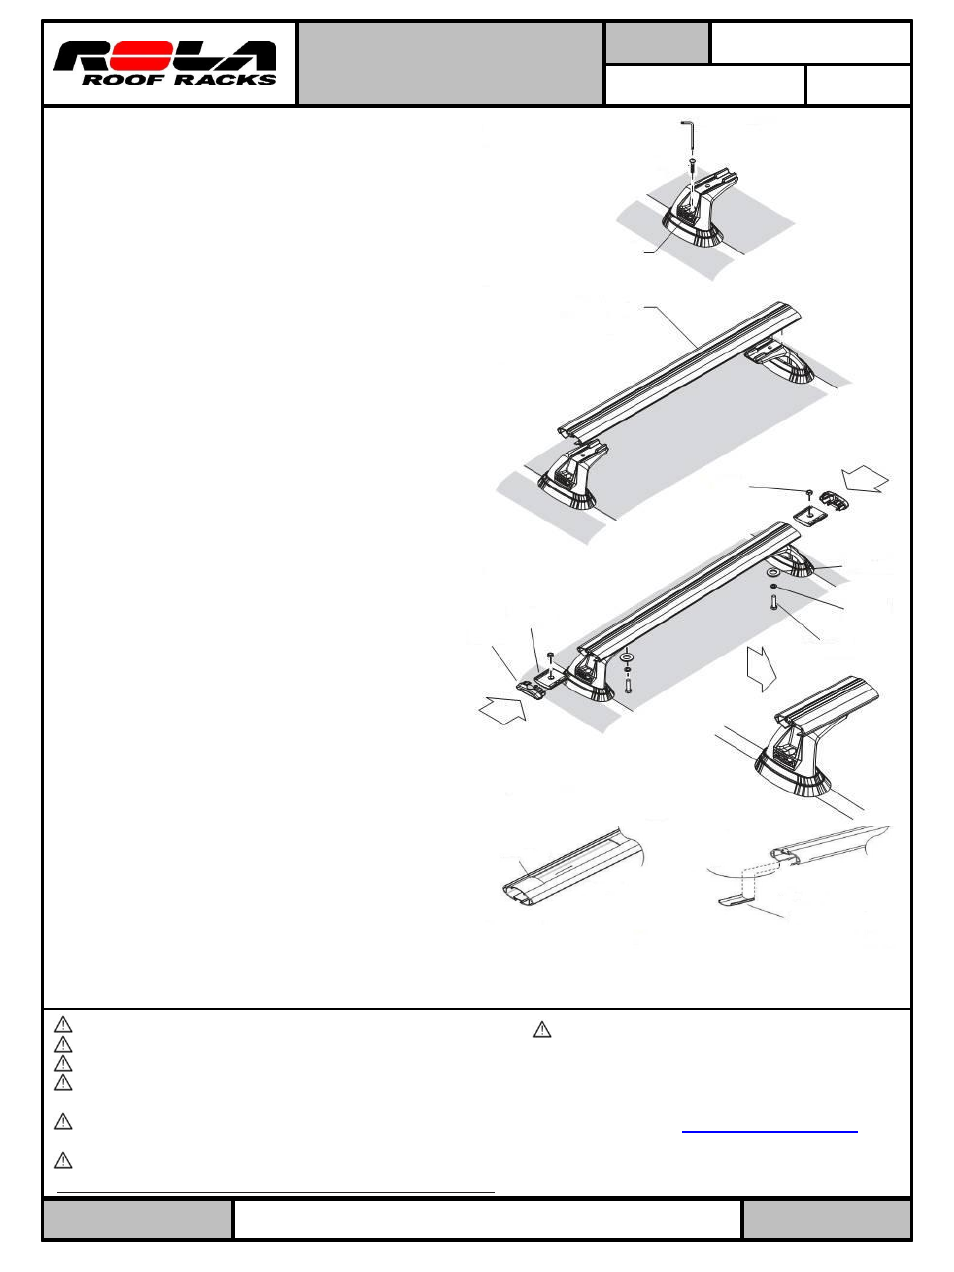
Step 3: Fitting Cross Bars to the vehicle
A.
Place an end support into the plastic adaptor and
loosely bolt down by inserting the M6 mounting bolt
into the anchor point threads and turning approx 2-3
turns with the L wrench security key. Do not tighten
yet, repeat for the opposite side. (fig. 4)
B.
Place the cross bar onto the end supports ensuring
that the end support tabs are located into the cutouts
on the underside of the bar. Check that the cross bar
has equally distanced overhang on either side of the
end supports. (fig. 5)
C.
Insert the M8 hex nut into the clamp plate. Insert the
clamp plate into the end of the cross bar and align it
so that the nut and the end support’s bolt hole align.
D.
Secure the cross bar to the end support by screwing
the M8 x 20mm bolt with washer and spring washer
through the end support hole and into the clamp
plate nut. (fig. 6)
E.
Using a 13mm or adjustable wrench fully tighten the
bolt on the underside of the support. Now using the
security key finish tightening the 45mm bolts to 5Nm
(44 in/ lbs) or to a firm hand tightness.
Anchor hole
M8 bolt
Spring washer
M8 washer
M8 nut
L wrench- security key
End cap
Cross Bar
Clamp plate
Step 4: Installing Under Cover strips
Mark on bars with a pencil the length of Under
Cover strips needed.
Remove bars, measure length of Under Cover strips
to fill slot. Cut Under Cover strips using scissors
or a blade. Slide inner most Under Cover strip into
position on the bars and re-assemble bars onto
vehicle. Add the outer Under Cover strip piece
once bars are attached. (fig. 7)
Step 5: Install end caps
Locking end caps can now be installed into the ends of
the cross bars. Remove keys and keep in a safe place.
To load accessories into the cross bar accessory
channel remove end cap, cut buffer strips as needed.
Once accessories have been loaded, re-insert the end
caps and lock. Additional buffer strips may be
purchased from ROLA if needed.
Slide to end
Caution sharp
edges
Inner Under
Cover strip
Outer Under
Cover strip
Cross Bar shortened for
illustrative purposes
M6 mounting
bolt
Fig. 4
Fig. 7
Fig. 6
Fig. 5
Fitting Instructions
APE (Anchor Point Extended)
Cross Bar Kits with Adapter
Bracket
59722-3-4N Rev 2-20-12