Draw-Tite 20251 4-FLAT WIRING KIT User Manual
English, Français
Installation Instructions
Directives de Montage
Instrucciones de Instalación
18251-037
Rev. A
06/25/04
ENGLISH
For Vehicles With Separate Turn / Stop Lights
and NO Factory Wiring Harness.
WIRING
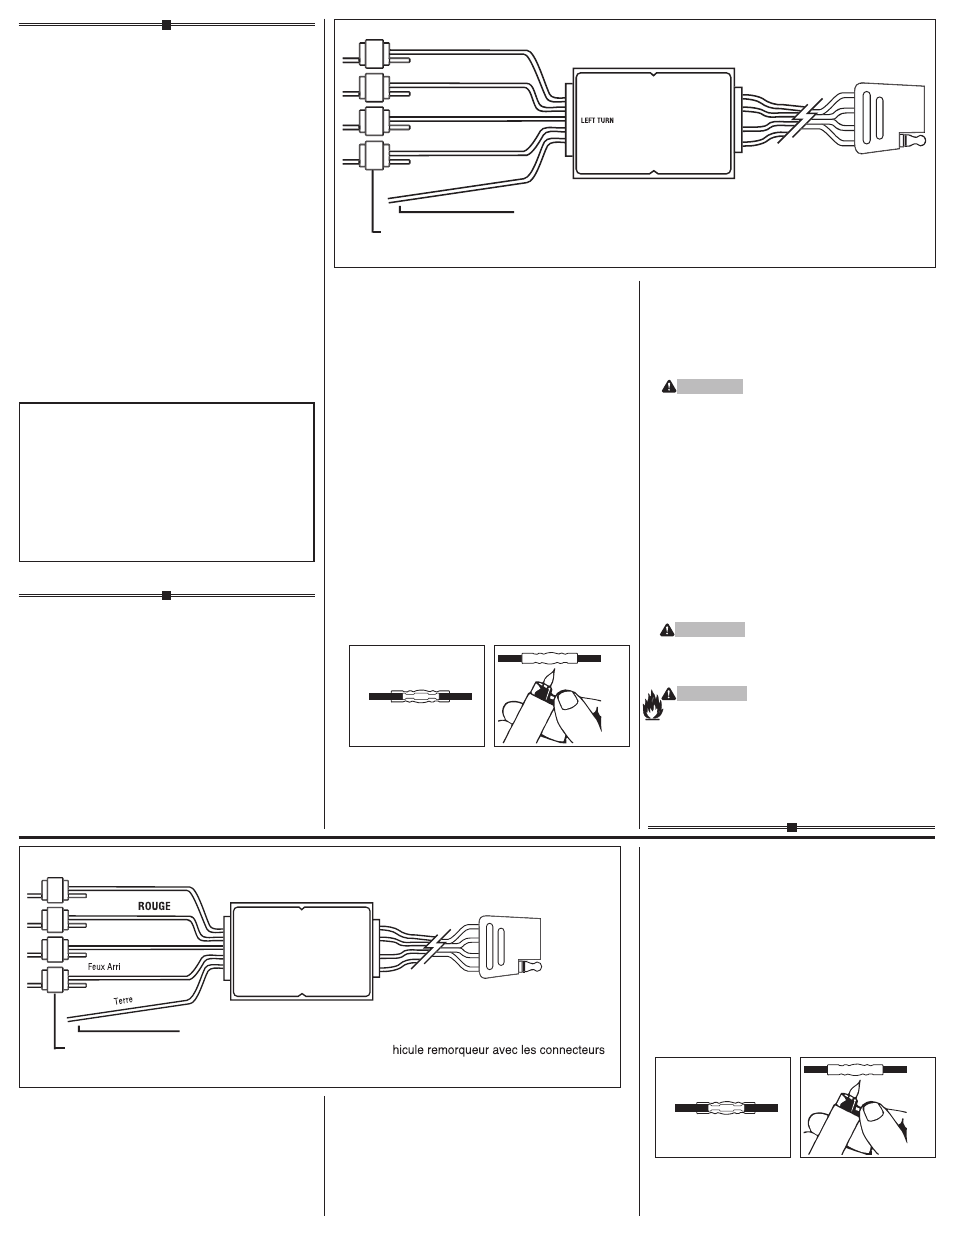
Match the color-coded wires from the tail light
converter to the appropriate vehicle wires as
shown. Always use a circuit tester to identify
each of the vehicle lighting circuits.
CAUTION: When using a circuit tester,
carefully probe one wire at a time. Do not
probe across two wires or across wire and
vehicle structure. Damage to electronic
components may result.
Green - Right Turn
Red - Stop Lights
Yellow - Left Turn
Brown - Tail Lights
White - Ground (Vehicle Structure)
Insulated Butt Connector Installation - Make
sure the wire end is properly seated, make the
crimp connection using a tool designed for
insulated splices.
Apply heat directly to the splice, working from
the center out to the edges, using a hot air gun
or other source, until the tubing recovers and
the adhesive flows. Allow to cool before
inspecting splice and checking integrity.
READ THIS FIRST:
Read and follow all instructions carefully before
beginning installation.
LISEZ CECI EN PREMIER:
Lire et suivre toutes les instructions
attenrivement avant le montage.
LEA ESTO PRIMERO:
Lea y siga todas las instrucciones
cuidadosamente antes de iniciar la instalación.
MOUNTING
Permanently mount the converter unit in a
spot where it will not be damaged. A tie strap
may be inserted through the center mounting
hole to secure unit or drill a 3/32" hole and
mount unit using screw provided.
CAUTION
Verify what is behind any surface prior to
drilling to avoid damage to the vehicle and/or
personal injury. Do not drill into any exposed
surfaces.
TESTING
NOTE: With the ground wire connected all
circuits can be attached and tested
individually.
Attach the ground lead of a test light to the
exposed terminal of the 4-flat plug. Activate
the tow vehicle’s left turn, right turn, tail and
stop lights one at a time. Probe the three
receptacles of the 4-flat plug to confirm
proper functions.
WARNING
All connections must be complete to function
properly. Test and verify installation with a
test light or trailer once installed.
WARNING
Overloading circuit can cause fires. DO
NOT exceed lower of towing manufacturer
rating or:
• Max. stop/turn light: 1 per side (2.1 amps)
• Max. tail lights: (4.2 amps)
Read vehicle’s owners manual and
instruction sheet for additional
information.
Right Turn
Stop Lights
Left Turn
Tail Lights
GREEN
RED
YELLOW
WHITE
BROWN
Ground Circuit
Ground white wire of tail light converter to vehicle structure
Connect wires of converter to existing circuits of tow vehicle with blue tap connectors or
insulated butt connectors.
RIGHT
TURN/STOP
LEFT
TURN/STOP
TAIL
GROUND
RIGHT TURN
STOP
TAIL
GROUND
Clignotant Droit
VERT
Feux d’Arrêt
Clignotant Gauche
JAUNE
ère
BRUN
Branchez le fil blanc du convertisseur de feux arrières à la structure du véhicule.
Branchez les fils du convertisseur aux circuits existants du vé
volants bleus.
Mise à
BLANC
FRANÇAIS
Pour les véhicules avec des clignotants / feux
d'arrêt distincts et SANS harnais de fillage
d'origine.
BRANCHEMENT
Faites correspondre les fils de couleur du con-
vertisseur de feux arrière aux fils du véhicules
appropriés comme montré. Utilisez toujours
un vérificateur de circuit pour identifier chacun
des circuits de lumières du véhicule.
ATTENTION: Lorsque vous utilisez un
vérificateur de circuit, sondez soigneusement
un fil à la fois. Ne permettez pas que la sonde
entre en contact avec un autre fil ou la
structure du véhicule. Il pourrait en résulter
de dommages aux composantes électron-
iques.
Vert - Clignotant droit
Rouge - Feux d’arrêt
Jaune - Clignotant gauche
Brun - Feux arrière
Blanc - mise à terre (structure du véhicule)
Installation du raccord isolé - S’assurer
que l’extrémité du fil est bien en place.
Effectuer une connexion sertie à l’aide d’un
outil conçu pour le sertissage de fil isolé.
À l’aide d’un pistolet à air chaud ou d’une
autre source, appliquer la chaleur directe-
ment sur la connexion sertie en travaillant