Front mounted receiver installation instructions, Ford econoline, Part numbers – Draw-Tite 65053 FRONT MOUNT RECEIVER User Manual
Page 4
Front Mounted Receiver
Installation Instructions
Ford Econoline
Part Numbers:
65053
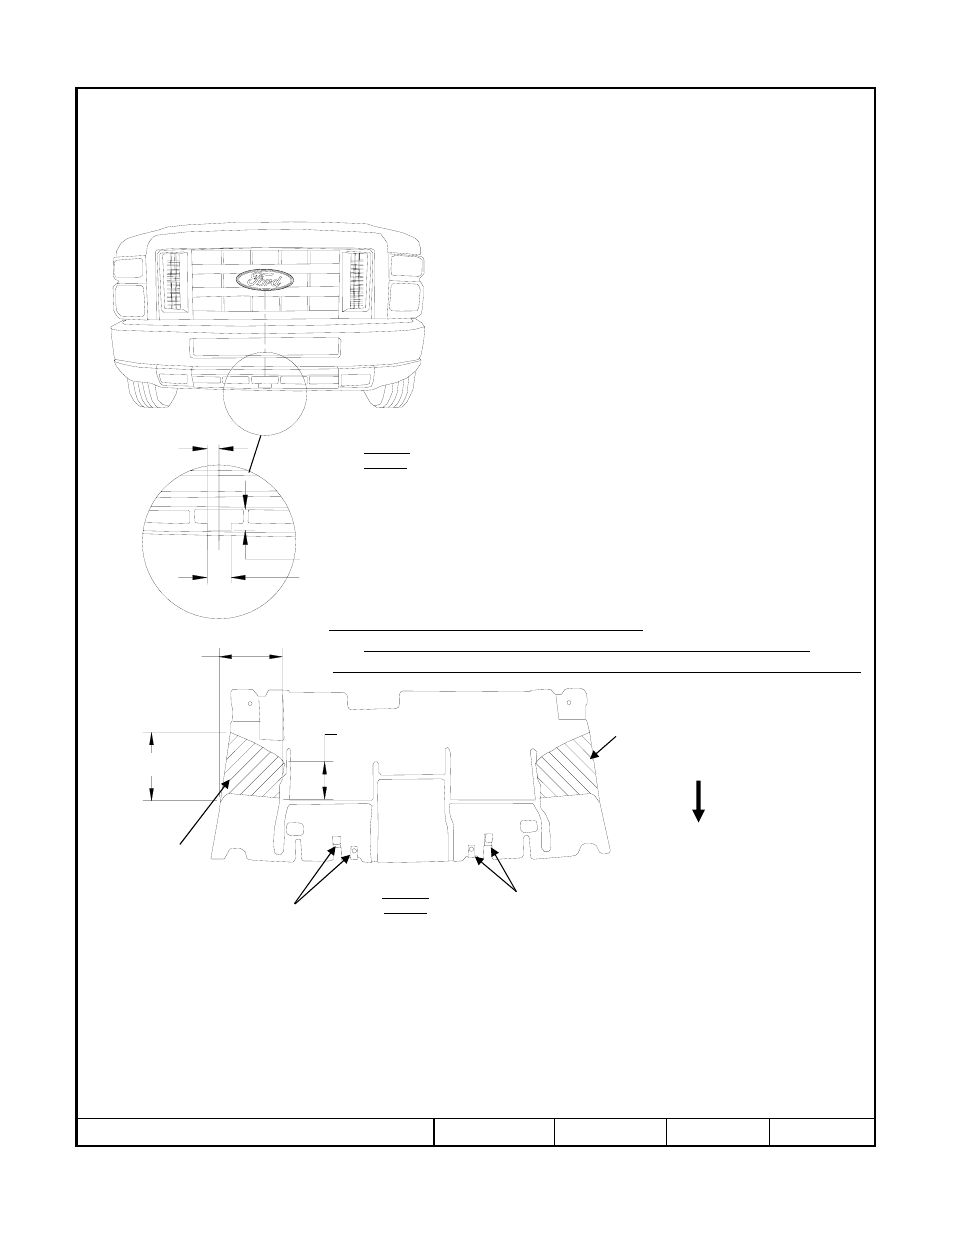
4. Trim lower fascia as shown in Figure 4.
a. Locate the center of the fascia from left to right and mark
1-1/2” each side. ( 3” square)
b. Then mark 3” down from existing opening to create a
square cut-out
c. Drill (2) 3/8” hole in corners.
d. Carefully cut the 3” hole from the fascia.
Tighten all 1/2 GR5 fasteners with torque wrench to 75 Lb.-Ft (102 N-m).
Rev. B
11-10-08
65053N
Sheet 4 of 4
z
2008 Cequent Towing Products
Note: check hitch frequently, making sure all fasteners and ball are properly tightened. If hitch is removed, plug all holes in trunk pan or other body panels to
prevent entry of water and exhaust fumes. A hitch or ball which has been damaged should be removed and replaced. Observe safety precautions when working
beneath a vehicle and wear eye protection. Do not cut access or attachment holes with a torch.
This product complies with safety specifications and requirements for connecting devices and towing systems of the state of New York, V.E.S.C. Regulation V-5
and SAE J684.
1.50 [38.1]
3.00 [76.2]
3.00 [76.2]
Figure 4.
Figura 4
Note:CONSULT VEHICLE OWNER BEFORE TRIMMING.
Remarque : CONSULTER LE PROPRIÉTAIRE DU VÉHICULE AVANT DE DÉCOUPER.
Nota: CONSULTE CON EL PROPIETARIO DEL VEHÍCULO ANTES DE HACER EL RECORTE.
6.00 [152.4]
3.00 [76.2]
5.50 [139.7]
Metal clips "U" Nuts
Écrous métalliques en « U »
Ganchos metálicos Tuercas en "U"
Figure 5.
Figura 5
Splash guard
Garde-boue
Protector de salpicaduras
Trimming recommended.
Rognage recommandé
Se recomienda recortar.
Forward
Avant
Delantero
Area to be trim.
Zone à rogner
Área a recortar
Trimming typical both sides of splash guard.
Rogner en général les deux côtés du garde-boue
Recorte igual en ambos lados del protector de salpicaduras
.
Metal clips "U" Nuts
Écrous métalliques en « U »
Ganchos metálicos Tuercas en "U"
Area to be trim.
Zone à rogner
Área a recortar
4.
Rogner la carrosserie inférieure comme illustré sur la figure 4.
a. Localiser le centre de la carrosserie en partant de la gauche et
marquer 1-1/2” de chaque côté. ( 3” carré)
b. Puis marquer 3” vers le bas à partir de l'orifice existant pour
créer une découpe carrée
c. Percer des trous (2) 3/8” dans les coins.
d. Découper soigneusement le trou 3” dans la carrosserie.
4.
Recorte la placa protectora inferior como se muestra en la Figura 4.
a. Localice el centro de la placa protectora de izquierda a derecha
y marque 1-1/2” en cada lado. (3” aproximadamente).
b. Luego marque 3” hacia abajo desde la abertura existente para
crear un corte cuadrado.
c. Perfore (2) orificios de 3/8” en las esquinas.
d . Con cuidado corte el orificio de 3” desde la placa protectora.