Eave detail gable detail valley detail – ATAS Advanta Shingle User Manual
Page 2
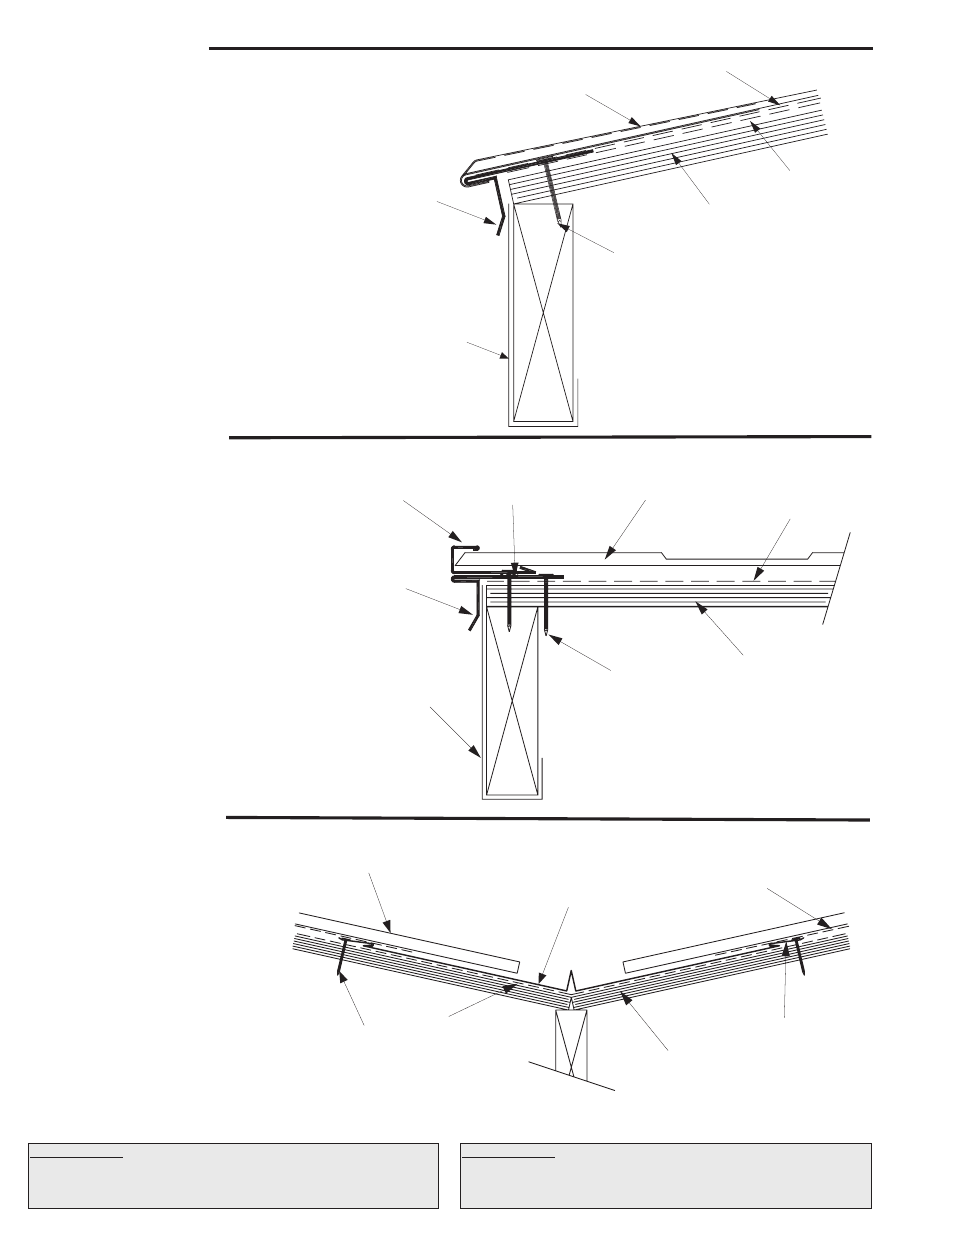
Eave Detail
Gable Detail
Valley Detail
1. In re-roofing applications: cut back and remove
existing shingles and drip edging to be flush with
the eave and gable lines.
2. In all applications: apply ATA-Shield** along eave
and up the roof to a point at least 24” beyond
outside face of exterior wall.
3. Install drip edge against fascia trim. Space
fasteners at a maximum of 12” o.c. Overlap drip
edge a minimum of 3”.
4. Beginning on top of drip edge install ATA-Guard*
to roof.
5. Refer to gable and/or valley details as required
before installing panels.
6. Attach the lower flanged edge of the shingle over
the drip edge. Square the panel in the channel
trim at the gable edge and fasten with a ring shank
grommeted nail. (See panel installation section.)
1. Apply drip edge over ATA-Shield at gable. Make
sure to overlap the drip edge at the eave line.
2. Apply butyl caulk tape to drip edge.
3. Lay the channel trim over drip edge as shown.
Overlap channel trim a minimum of 3”.
4. Align the first shingle into the channel trim and
snap a line across the roof plane.
(See panel installation section.)
Note: Notch bottom flange of panel as needed to
allow for proper drainage at eave/gable juncture
and other similar conditions.
Underlayments: ATA-Shield** is the recommended self adhesive
underlayment for eaves, sidewall and any critical areas exposed to ice
damming and extensive water run off. Available in 65’-8” x 39 3/8” rolls
(200 sq. ft. per roll).
Underlayments: ATA-Guard* is a polyolefin based, 100% asphalt free,
high strength reinforced roofing underlayment for use beneath
metal roofing on steep slope applications. 1000 sq. ft. per roll at 48”
wide.
ATA-Guard*
Advanta Shingle
ATA-Shield**
Roof Deck
2” Ring Shank
Grommetted Nail
Fascia
Drip Edge
HSA114
Advanta Shingle
ATA-Shield**
Roof Deck
2” Ring Shank
Grommetted Nail
Fascia
Drip Edge
HSA114
HSA201
Channel Trim
Expandable
Sealant Tape
1. Install ATA-Shield** 18” up both sides
of the valley line.
2. Install the valley pan and clip fasten
through the substrate 24” o.c. Overlap
valley pans at a minimum of 6”. Install
ATA-Guard* 6” over edge of valley pan.
3. Lay shingles onto the valley pan
maintaining a 4” clearance from the
valley’s center.
ATA-Guard*
Advanta Shingle
ATA-Shield**
Roof Deck
2” Ring Shank
Grommetted Nail
HSA806
Valley Pan
Valley Clip