Eave detail headwall detail gable detail – ATAS Permashake II User Manual
Page 2
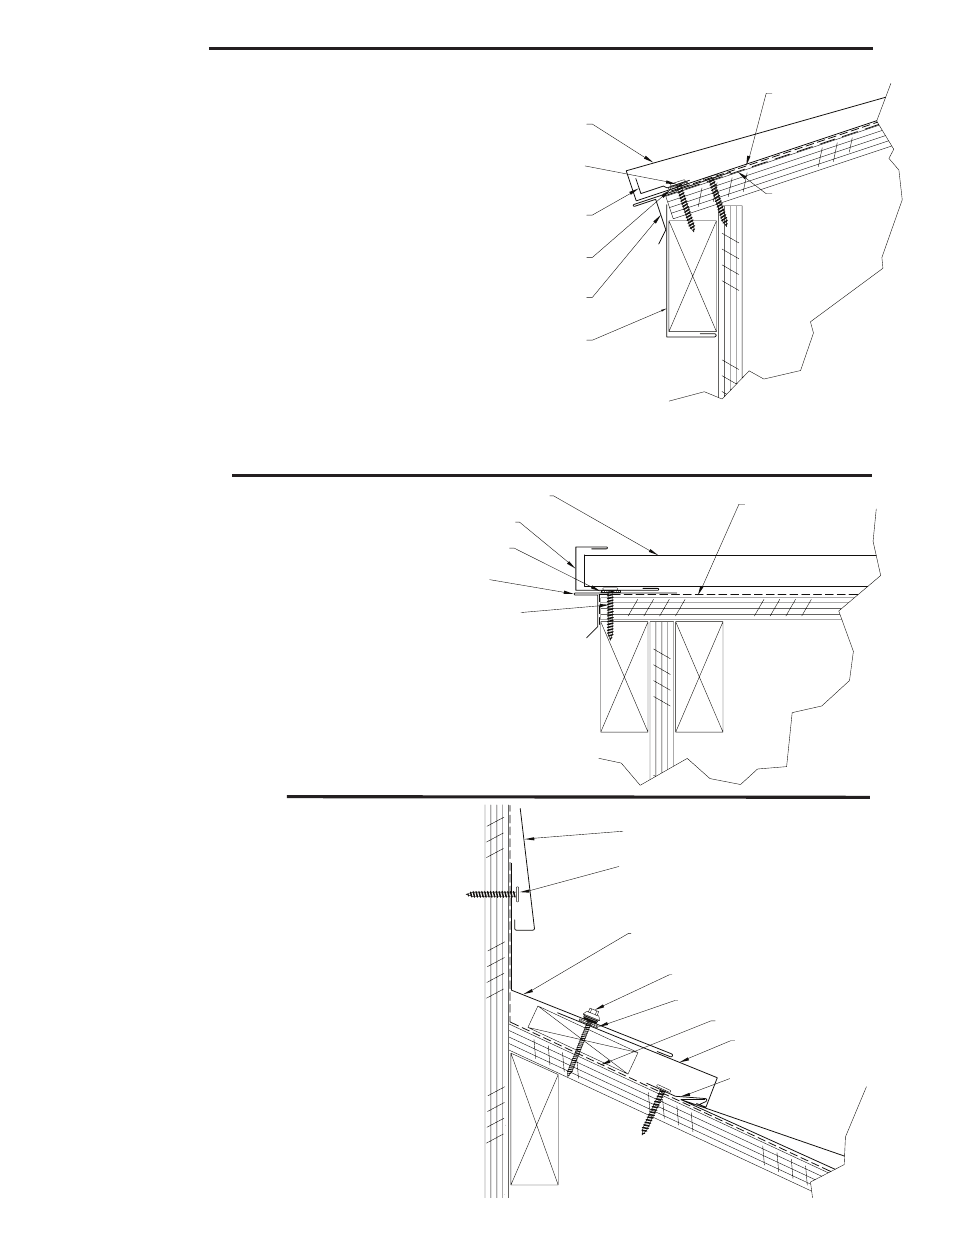
Eave Detail
Headwall Detail
gable Detail
1. When applying a re-roof application, cut back existing
shingles and drip edge as required to apply appropriate
underlaments.
2. Apply self-adhered roofing underlayment on roof deck
areas where ice & water damming can occur. Extend this
underlayment over fascia board. Install drip edge as tight as
possible against the fascia trim. Space fasteners at maximum
of 12” o.c. Overlap eave trim pieces a minimum of 3”.
3. Lay full width of underlayment (roofing felt or equivalent)
on top of the drip edge. Apply butyl tape on top of drip edge
and fasten starter cleat through butyl tape and eave trim into
substrate with front face up as shown at right.
4. Install panel only after the gable closure is installed (see
below). Install by sliding lower flanged edge between starter
cleat and drip edge. Square the panel in the J channel at the
gable edge and fasten with clips and exterior grade #10-16 x
1 ½” wafer head screws.
1. Install metal shingles up to the headwall. Shim the last
row of panels if necessary as shown at right.
2. Lay headwall trim over the shingles while insuring that the
vertical section is flush against the headwall. Use double
sided butyl tape between the panel and trim assemblies.
3. Fasten through butyl tape and shingle into solid substrate.
Use #10 x 2” long gimlet point screw with 5/16” cast zinc
color matched hex washer head and EPDM washer at 24” o.c.
4. Apply wall covering over the headwall trim as required, or
install wall paneling.
1. Install drip edge over underlayment. Overlap on
top of drip edge at the eave.
2. Apply butyl tape along drip edge as shown to
the right. Lay the channel trim along the gable
edge. Overlap channel at a minimum of 2” to 4”
working upward from the eave. Fasten channel as
shown at right.
3. Align the first shingle into the J channel and
snap a line across the roof plane. (See panel
installation section)
WALL COVERING
BUTYL TAPE
ANCHOR CLIP
PERMASHAKE II PANEL
UNDERLAYMENT
2" HEX HEAD SCREW
2
HEADWALL TRIM
APPROPRIATE FASTENER
SELF-ADHERED
ROOFING
UNDERLAYMENT
FASCIA
DRIP EDGE
BUTYL TAPE
1 ½" WAFER HEAD SCREW 1
STARTER CLEAT
PERMASHAKE II PANEL
UNDERLAYMENT
UNDERLAYMENT
1 ½" WAFER
HEAD SCREW
1
DRIP EDGE
BUTYL TAPE
PERMASHAKE II PANEL
CHANNEL TRIM
1 Exterior grade #10-16 x 1 1/2” wafer head screw
2 #10 x 2” long gimlet point screw with 5/16” cast zinc color matched hex washer head and EPDM washer