Step 2: create a new project, Step 2 : create a new project, System 5 ip software setup, cont’d – Extron Electronics System 5 IP Series Setup Guide User Manual
Page 17
System 5 IP Switchers • Software Setup
System 5 IP Software Setup, cont’d
3-4
System 5 IP Switchers • Software Setup
3-5
3a.
From the Available Manufacturers/Device Types box,
choose the required manufacturer(s) from the left window
by clicking its name. For the following exercises, choose
Epson
.
3b.
From the Available Manufacturers/Device Types box,
choose the required device(s) from the right window by
clicking its icon. For the following exercises, choose video
projector
.
4.
Click the Subscribe button
between the two columns.
The selected items appear in the Current Driver
Subscriptions
window.
5
.
Repeat steps 3-5 above, choosing Hitachi as the
manufacturer and DVD/VCR as the device.
6.
Click the Download button to download the drivers under
the Current Driver Subscriptions window.
N
If configuring the System 5 IP on site and the model and
device type are unknown, subscribe to and download
drivers for
all manufacturer and device types prior to
going out to the field.
N
If you wish to unsubscribe to a particular driver, check its
check box and then click the Unsubscribe button .
7.
After all of your drivers are successfully subscribed, click
the OK button. The GC 2 Start Options dialog reappears.
Step 2: Create a New Project
1.
If the GC 2 Start Options dialog is displayed, select the
"Create a New Project" option and click the OK button.
The Project Settings dialog box appears, as shown on the
following page.
N
You can also access the Project Settings dialog box via
the Edit menu.
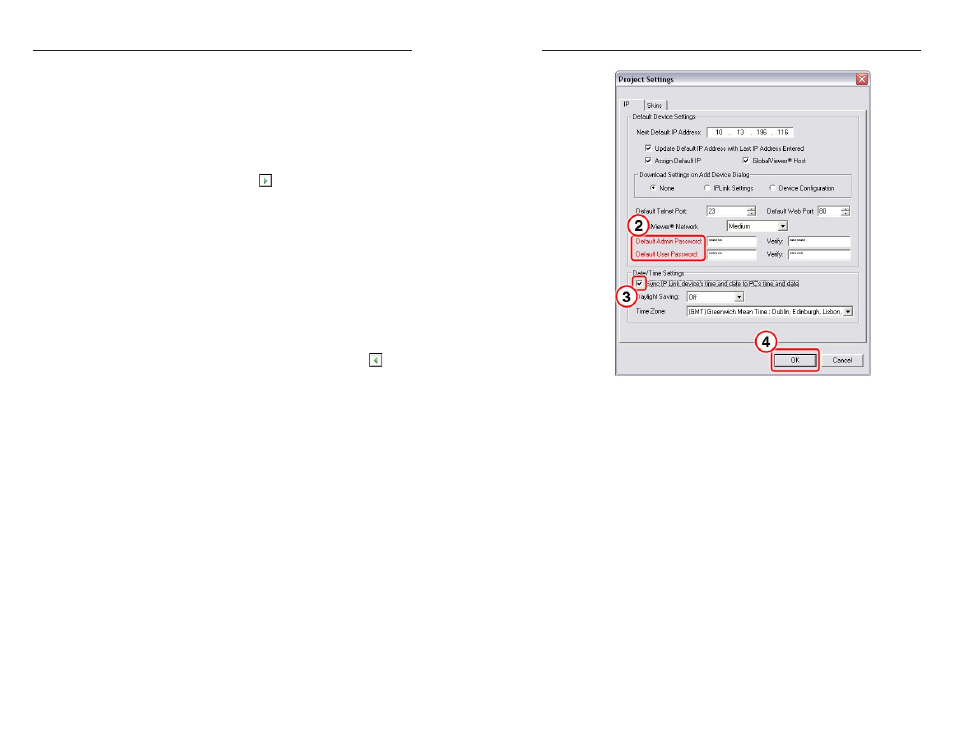
Project Settings dialog box
2.
If passwords have been set on the System 5 IP, enter the
administrator and user passwords. Ensure that both
passwords are repeated in the Verify fields.
N
If a password has been set on the System 5 IP switcher but
none is entered here, you will be unable to upload a new
configuration. By default, there is no password set on the
switcher.
3.
Click the Sync IP Link device’s time and date to PC’s
time and date
check box and fill in the appropriate
Daylight Saving time zone values in the menu drop boxes,
if necessary.
4.
Click the OK button. The Add Device dialog box appears.