Installation instructions (continued) – S&B Filters Cold Air Intake Kit - Cotton Filter 75-5016 User Manual
Page 2
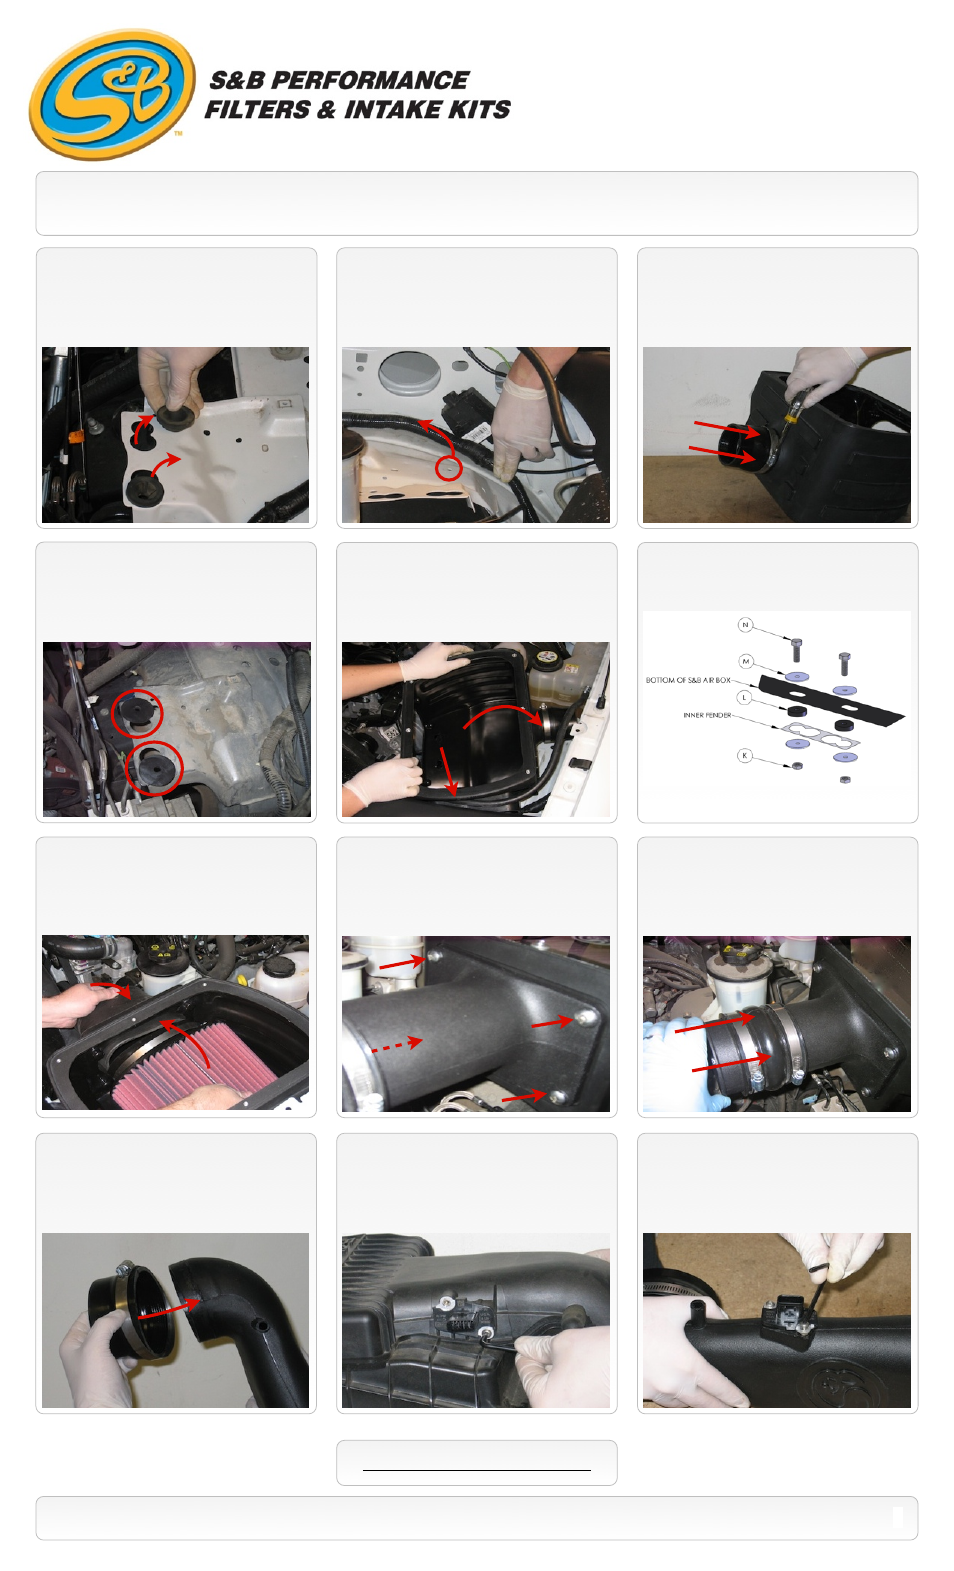
12.
Install the Step Adapter
(P)
on the Air
Box
(O)
fender snout, push on as far as it will
go and secure with a #56 hose clamp
(F)
.
787 S. Wanamaker, Ontario, CA 91761 - Phone: (909) 947-0015 - Fax: (909) 947-0603 -
INSTALLATION INSTRUCTIONS (Continued)
10.
IF EQUIPPED: Remove the OE rubber
grommets from the inner fender on the
Driverʼs side.
13.
Place the Rubber Spacers
(L)
over the
holes on the fender.
17.
Place the Hump Adapter
(H)
and #72
hose clamps
(G)
over the Filter Adapter
(J)
.
Do not tighten at his time.
11.
Relocate the wire loom closer to the
inner fender.
14.
Install the Air Box
(O)
and secure using
the 5/16” Bolts
(N)
, Fender Washers
(M)
,
Rubber Spacers
(L)
and Lock Nuts
(K)
. SEE
THE DIAGRAM TO THE RIGHT
AIR BOX MOUNTING DIAGRAM:
15.
Place the Air Filter
(Q)
inside the Air
Box
(O)
. Offset flange is toward the front of
the vehicle. Snap the Filter Adapter
(J)
into
the Air Filter
(Q)
and secure with #72 Hose
clamp
(G)
.
16.
Secure the Filter Adapter
(J)
to the Air
Box
(O)
using the 4 supplied 5/16” Phillips
head screws
(I)
.
SEE EXPLODED VIEW ON PAGE 4
2
P/N: 75-5016 / 75-5016D
20.
Install the MAF sensor into the Intake
Tube
(C)
, evenly secure using the OE screws.
DO NOT OVER TIGHTEN
18.
Install the Step Adapter
(E)
over the
Intake Tube
(C)
and secure using a #60 hose
clamp
(D)
. Note: You may find it easier to
install the Adapter
(E)
on the throttle body first
then install the Intake Tube
(C)
in Step #21.
19.
Remove the MAF sensor from the OE
air box using the supplied #T-20 Torx wrench.
Note the direction of the sensor related to air
flow.
Remove