Carrier installation, Carrier inst – Spicer Drive Axles Service Manual Wheel Reduction Drive Axles (EA-50) User Manual
Page 32
30
CARRIER INST
CARRIER INST
CARRIER INST
CARRIER INST
CARRIER INSTALLA
ALLA
ALLA
ALLA
ALLATION
TION
TION
TION
TION
AIR PRESSURE METHOD
1. Install the right-side axle shaft through the
clutch collar and into the differential side gear of
the carrier assembly. The axle shaft is used to
align splines of the the differential case half and
clutch collar.
2. Rotate right-side axle shaft until splines of clutch
collar and the differential case half are aligned.
CA
CA
CA
CA
CAUTION: Do no
UTION: Do no
UTION: Do no
UTION: Do no
UTION: Do not use hands t
t use hands t
t use hands t
t use hands t
t use hands to position shift
o position shift
o position shift
o position shift
o position shift
collar while air pr
collar while air pr
collar while air pr
collar while air pr
collar while air preeeeessur
ssur
ssur
ssur
ssure is being applied t
e is being applied t
e is being applied t
e is being applied t
e is being applied to shift
o shift
o shift
o shift
o shift
cylinder
cylinder
cylinder
cylinder
cylinder, injury could r
, injury could r
, injury could r
, injury could r
, injury could reeeeesult.
sult.
sult.
sult.
sult.
3. Connect auxiliary air supply to shift cylinder.
4. Apply and hold air pressure to the shift cylinder.
Applying air will move the shift collar inward
and engage the splines with the differential case
splines locking the assembly.
5. To ensure the clutch collar and differential case
splines have engaged completely, rotate right-side axle
shaft. When fully engaged remove shaft from the
carrier assembly.
IMPOR
IMPOR
IMPOR
IMPOR
IMPORT
T
T
T
TANT
ANT
ANT
ANT
ANT: Hold air pr
: Hold air pr
: Hold air pr
: Hold air pr
: Hold air preeeeessur
ssur
ssur
ssur
ssure on lock
e on lock
e on lock
e on lock
e on locked carrier
ed carrier
ed carrier
ed carrier
ed carrier
aaaaassembl
ssembl
ssembl
ssembl
ssembly until it ha
y until it ha
y until it ha
y until it ha
y until it has been comple
s been comple
s been comple
s been comple
s been completttttel
el
el
el
ely inst
y inst
y inst
y inst
y installed int
alled int
alled int
alled int
alled into
oo
oo
axle housing.
axle housing.
axle housing.
axle housing.
axle housing.
6. Install carrier assembly into axle housing and fasten
using normal installation procedures.
7. Remove auxiliary air supply from shift assembly and
connect the vehicle air line to shift cylinder.
8. Install axle shafts into housing. Use procedures 2 and
3 from the "Inst
"Inst
"Inst
"Inst
"Install Axle Shaft
all Axle Shaft
all Axle Shaft
all Axle Shaft
all Axle Shafts Aft
s Aft
s Aft
s Aft
s After T
er T
er T
er T
er To
oo
oowing"
wing"
wing"
wing"
wing"
section.
9. Remove jack stands from vehicle and lower to shop
floor.
MANUAL ENGAGING METHOD
1. Align the splines of the clutch collar and the
differential case by hand.
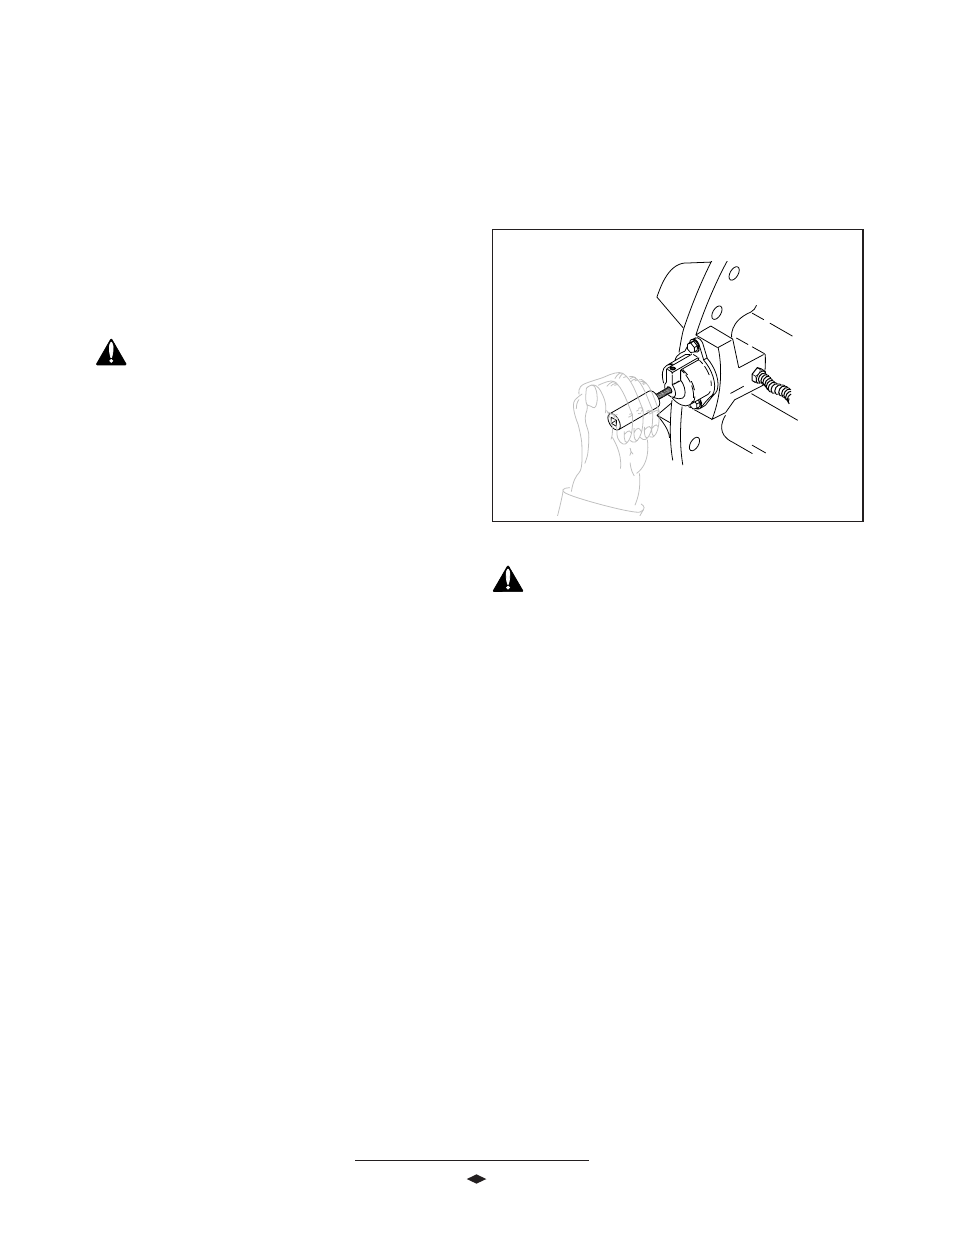
2. Install a M12 X 1.50 bolt into the shift cylinder
air-port to manually engage the lock.
IMPOR
IMPOR
IMPOR
IMPOR
IMPORT
T
T
T
TANT
ANT
ANT
ANT
ANT: Hand tight
: Hand tight
: Hand tight
: Hand tight
: Hand tighten M1
en M1
en M1
en M1
en M12 X 1.5
2 X 1.5
2 X 1.5
2 X 1.5
2 X 1.50 bolt with a
0 bolt with a
0 bolt with a
0 bolt with a
0 bolt with a
sock
sock
sock
sock
sockeeeeet. See F
t. See F
t. See F
t. See F
t. See Figur
igur
igur
igur
igure 1
e 1
e 1
e 1
e 17
7
7
7
7.....
CA
CA
CA
CA
CAUTION: If a high r
UTION: If a high r
UTION: If a high r
UTION: If a high r
UTION: If a high reeeeesist
sist
sist
sist
sistance t
ance t
ance t
ance t
ance to turn is felt
o turn is felt
o turn is felt
o turn is felt
o turn is felt
befor
befor
befor
befor
before full engagement of lock, st
e full engagement of lock, st
e full engagement of lock, st
e full engagement of lock, st
e full engagement of lock, stop turning the bolt.
op turning the bolt.
op turning the bolt.
op turning the bolt.
op turning the bolt.
Ov
Ov
Ov
Ov
Over
er
er
er
er-t
-t
-t
-t
-tor
or
or
or
orquing ma
quing ma
quing ma
quing ma
quing may cause damage t
y cause damage t
y cause damage t
y cause damage t
y cause damage to the shift unit.
o the shift unit.
o the shift unit.
o the shift unit.
o the shift unit.
R
RR
R
Realign spline
ealign spline
ealign spline
ealign spline
ealign splines and contin
s and contin
s and contin
s and contin
s and continue t
ue t
ue t
ue t
ue to tight
o tight
o tight
o tight
o tighten.
en.
en.
en.
en.
3. To ensure lock is fully engaged, rotate the drive
pinion.
4. Install carrier assembly into axle housing and fasten
using normal procedures.
5. Remove manual engaging bolt from shift cylinder,
replace with air shift cylinder plug and torque
20-30 Lb-Ft (27-41 N-m).
6. Connect the vehicle air line to the shift cylinder
assembly.
7. Install axle shafts into the axle housing. Use
procedures 2 and 3 from the "Inst
Inst
Inst
Inst
Install Axle Shaft
all Axle Shaft
all Axle Shaft
all Axle Shaft
all Axle Shaftsssss
Aft
Aft
Aft
Aft
After T
er T
er T
er T
er To
oo
oowing
wing
wing
wing
wing" section, page 26.
8. Remove jack stands from under vehicle and
lower to shop floor.
Carrier inst
Carrier inst
Carrier inst
Carrier inst
Carrier installation complet
allation complet
allation complet
allation complet
allation completeeeee
HAND TIGHTEN M12 X 1.50 BOLT
USING SOCKET
FFFFFigur
igur
igur
igur
igure 1
e 1
e 1
e 1
e 17
7
7
7
7