Pinion assembl – Spicer Drive Axles Service Manual Wheel Reduction Drive Axles (EA-50) User Manual
Page 18
16
PINION ASSEMBL
PINION ASSEMBL
PINION ASSEMBL
PINION ASSEMBL
PINION ASSEMBLY
Y
Y
Y
Y
NO
NO
NO
NO
NOTE: When t
TE: When t
TE: When t
TE: When t
TE: When tor
or
or
or
orque t
que t
que t
que t
que to r
o r
o r
o r
o ro
oo
ootttttaaaaattttte r
e r
e r
e r
e reading doe
eading doe
eading doe
eading doe
eading does no
s no
s no
s no
s not fall
t fall
t fall
t fall
t fall
within allo
within allo
within allo
within allo
within allow
w
w
w
wable limit
able limit
able limit
able limit
able limits, bearing pr
s, bearing pr
s, bearing pr
s, bearing pr
s, bearing preload can be
eload can be
eload can be
eload can be
eload can be
incr
incr
incr
incr
increa
ea
ea
ea
eased b
sed b
sed b
sed b
sed by using a thinner spacer or decr
y using a thinner spacer or decr
y using a thinner spacer or decr
y using a thinner spacer or decr
y using a thinner spacer or decrea
ea
ea
ea
eased b
sed b
sed b
sed b
sed byyyyy
using a thick
using a thick
using a thick
using a thick
using a thicker spacer
er spacer
er spacer
er spacer
er spacer. .00
. .00
. .00
. .00
. .001 in. (.0
1 in. (.0
1 in. (.0
1 in. (.0
1 in. (.02
2
2
2
25 mm) change in
5 mm) change in
5 mm) change in
5 mm) change in
5 mm) change in
pr
pr
pr
pr
preload spacer thickne
eload spacer thickne
eload spacer thickne
eload spacer thickne
eload spacer thickness, change
ss, change
ss, change
ss, change
ss, changes scale r
s scale r
s scale r
s scale r
s scale reading b
eading b
eading b
eading b
eading byyyyy
appr
appr
appr
appr
appro
oo
ooxima
xima
xima
xima
ximatttttel
el
el
el
ely 1
y 1
y 1
y 1
y 10 lbs, .00
0 lbs, .00
0 lbs, .00
0 lbs, .00
0 lbs, .001 in. change in pr
1 in. change in pr
1 in. change in pr
1 in. change in pr
1 in. change in preload
eload
eload
eload
eload
spacer will change t
spacer will change t
spacer will change t
spacer will change t
spacer will change tor
or
or
or
orque t
que t
que t
que t
que to r
o r
o r
o r
o ro
oo
ootttttaaaaattttte b
e b
e b
e b
e by appr
y appr
y appr
y appr
y appro
oo
ooxima
xima
xima
xima
ximatttttel
el
el
el
elyyyyy
3
3
3
3
30 Lb- in. This is onl
0 Lb- in. This is onl
0 Lb- in. This is onl
0 Lb- in. This is onl
0 Lb- in. This is only a guide, individual carrier
y a guide, individual carrier
y a guide, individual carrier
y a guide, individual carrier
y a guide, individual carriers ma
s ma
s ma
s ma
s mayyyyy
vvvvvary slightl
ary slightl
ary slightl
ary slightl
ary slightlyyyyy.....
The pinion bearing spacers are available in the following
thicknesses. Measure spacer with micrometers before
assembly to ensure correct thickness.
Inche
Inche
Inche
Inche
Inchesssss
MM
MM
MM
MM
MM
.893
22.982
.894
22.708
.895
22.733
1
1
1
1
12.
2.
2.
2.
2. Me
Me
Me
Me
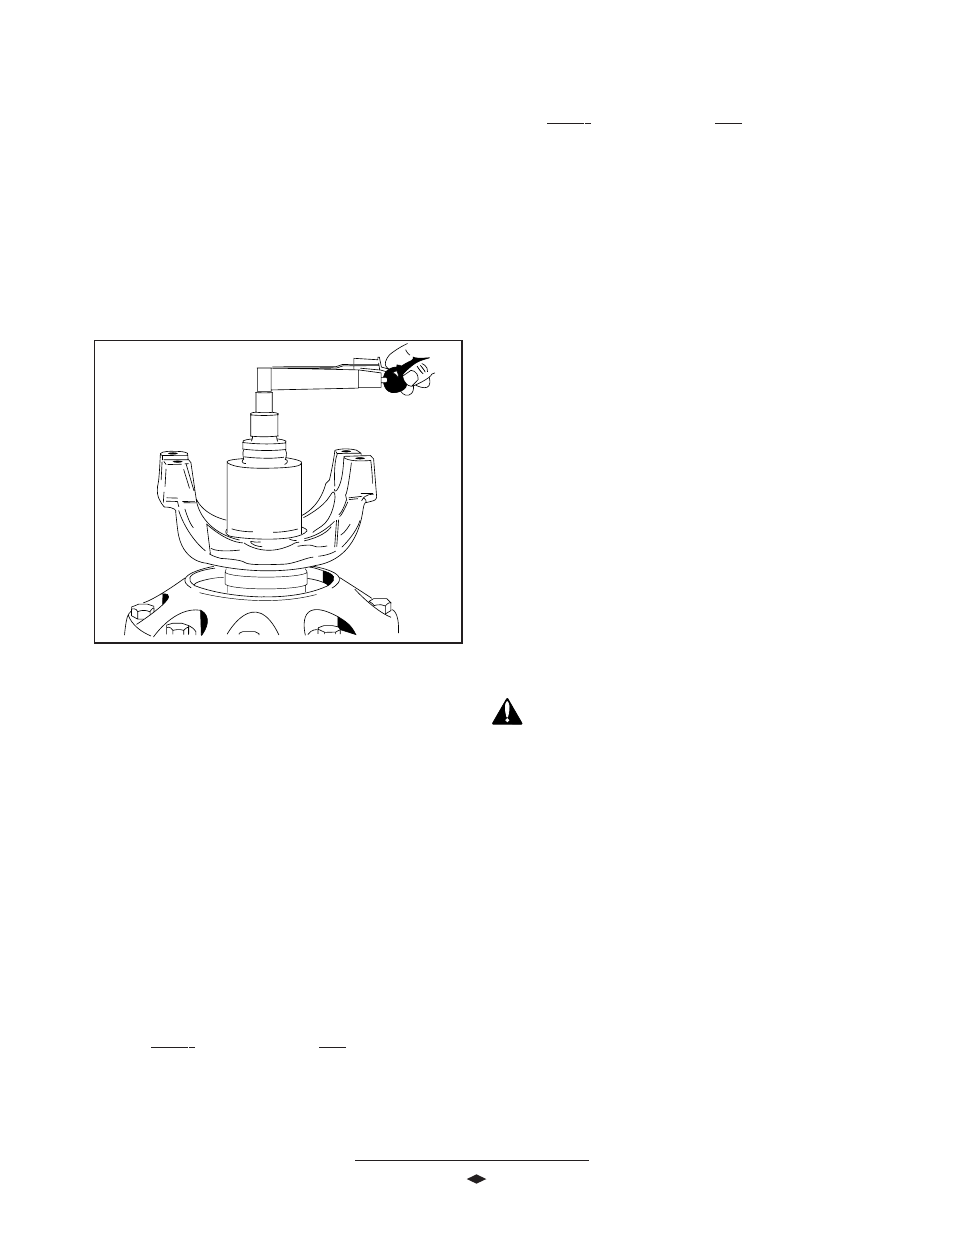
Method B:
thod B:
thod B:
thod B:
thod B: To measure torque to rotate with the
torque wrench, assemble pinion cage into the carrier
housing and install two mounting bolts to anchor
the unit.
Rotate pinion with the torque wrench. See F
See F
See F
See F
See Figur
igur
igur
igur
igure 8
e 8
e 8
e 8
e 8.
Torque measurement will be taken during fourth revolu-
tion and must be between 10-40 Lb-in (1.1-4.5 N-m)
without pinion seal.
Inche
Inche
Inche
Inche
Inchesssss
MM
MM
MM
MM
MM
.896
22.758
.897
22.784
.898
22.809
.899
22.835
.900
22.860
.901
22.885
.902
22.911
.903
22.936
.904
22.962
.905
22.987
.906
23.012
.907
23.038
.908
23.063
.909
23.089
.910
23.114
.911
23.139
.916
23.266
NO
NO
NO
NO
NOTE: Closer adjustment can be made b
TE: Closer adjustment can be made b
TE: Closer adjustment can be made b
TE: Closer adjustment can be made b
TE: Closer adjustment can be made by sanding
y sanding
y sanding
y sanding
y sanding
ne
ne
ne
ne
next thick
xt thick
xt thick
xt thick
xt thicker spacer t
er spacer t
er spacer t
er spacer t
er spacer to de
o de
o de
o de
o desir
sir
sir
sir
sired thickne
ed thickne
ed thickne
ed thickne
ed thickness using emery
ss using emery
ss using emery
ss using emery
ss using emery
clo
clo
clo
clo
cloth on a fla
th on a fla
th on a fla
th on a fla
th on a flat sur
t sur
t sur
t sur
t surface. Sur
face. Sur
face. Sur
face. Sur
face. Surface
face
face
face
faces m
s m
s m
s m
s must be par
ust be par
ust be par
ust be par
ust be parallel t
allel t
allel t
allel t
allel to
oo
oo
each o
each o
each o
each o
each other and squar
ther and squar
ther and squar
ther and squar
ther and square t
e t
e t
e t
e to bor
o bor
o bor
o bor
o bore diame
e diame
e diame
e diame
e diamettttter
er
er
er
er.....
CA
CA
CA
CA
CAUTION: W
UTION: W
UTION: W
UTION: W
UTION: Waaaaash spacer thor
sh spacer thor
sh spacer thor
sh spacer thor
sh spacer thoroughl
oughl
oughl
oughl
oughly of emery
y of emery
y of emery
y of emery
y of emery
cut
cut
cut
cut
cuttings befor
tings befor
tings befor
tings befor
tings before inst
e inst
e inst
e inst
e installing on pinion.
alling on pinion.
alling on pinion.
alling on pinion.
alling on pinion.
1
1
1
1
14.
4.
4.
4.
4. After proper torque to rotate is achieved remove
end yoke.
1
1
1
1
15.
5.
5.
5.
5. Clean and dry threads on pinion.
1
1
1
1
16.
6.
6.
6.
6. Install pinion oil seal with R
RR
R
Recommended Service
ecommended Service
ecommended Service
ecommended Service
ecommended Service
T
T
T
T
Tool
ool
ool
ool
ool. See page 32.
1
1
1
1
17
7
7
7
7..... Install end yoke using yoke installer service tool
DST1007. See F
See F
See F
See F
See Figur
igur
igur
igur
igure 6.
e 6.
e 6.
e 6.
e 6.
1
1
1
1
18.
8.
8.
8.
8. Coat threads with Loctite #680 adhesive
compound.
FFFFFigur
igur
igur
igur
igure 8
e 8
e 8
e 8
e 8
(Continued on Ne
(Continued on Ne
(Continued on Ne
(Continued on Ne
(Continued on Next P
xt P
xt P
xt P
xt Page)
age)
age)
age)
age)