Differential disassembl – Spicer Drive Axles Service Manual Wheel Reduction Drive Axles (EA-50) User Manual
Page 13
11
DIFFERENTIAL DISASSEMBL
DIFFERENTIAL DISASSEMBL
DIFFERENTIAL DISASSEMBL
DIFFERENTIAL DISASSEMBL
DIFFERENTIAL DISASSEMBLY
Y
Y
Y
Y
CORRECT PROCEDURE
Ca
Ca
Ca
Ca
Case
se
se
se
se
Ring Gear
Ring Gear
Ring Gear
Ring Gear
Ring Gear
CA
CA
CA
CA
CAUTION: Alw
UTION: Alw
UTION: Alw
UTION: Alw
UTION: Alwaaaaayyyyys use a soft hammer or H.D.
s use a soft hammer or H.D.
s use a soft hammer or H.D.
s use a soft hammer or H.D.
s use a soft hammer or H.D.
pla
pla
pla
pla
plastic head hammer t
stic head hammer t
stic head hammer t
stic head hammer t
stic head hammer to strik
o strik
o strik
o strik
o strike punch.
e punch.
e punch.
e punch.
e punch.
Ring Gear
Ring Gear
Ring Gear
Ring Gear
Ring Gear
Ca
Ca
Ca
Ca
Case
se
se
se
se
NO
NO
NO
NO
NOTE: Do no
TE: Do no
TE: Do no
TE: Do no
TE: Do not use a chisel t
t use a chisel t
t use a chisel t
t use a chisel t
t use a chisel to r
o r
o r
o r
o remo
emo
emo
emo
emovvvvve riv
e riv
e riv
e riv
e riveeeeet heads,
t heads,
t heads,
t heads,
t heads,
damage t
damage t
damage t
damage t
damage to differ
o differ
o differ
o differ
o differential ca
ential ca
ential ca
ential ca
ential case ma
se ma
se ma
se ma
se may r
y r
y r
y r
y reeeeesult.
sult.
sult.
sult.
sult.
Differ
Differ
Differ
Differ
Differential Disa
ential Disa
ential Disa
ential Disa
ential Disassembly Complet
ssembly Complet
ssembly Complet
ssembly Complet
ssembly Completeeeee
INCORRECT PROCEDURE
NO
NO
NO
NO
NOTE: Inspect all par
TE: Inspect all par
TE: Inspect all par
TE: Inspect all par
TE: Inspect all parttttts, including the machined
s, including the machined
s, including the machined
s, including the machined
s, including the machined
sur
sur
sur
sur
surface
face
face
face
faces of the ca
s of the ca
s of the ca
s of the ca
s of the case half
se half
se half
se half
se half.....
If an
If an
If an
If an
If any gear
y gear
y gear
y gear
y gears ar
s ar
s ar
s ar
s are t
e t
e t
e t
e to be r
o be r
o be r
o be r
o be replaced, the
eplaced, the
eplaced, the
eplaced, the
eplaced, they m
y m
y m
y m
y must be
ust be
ust be
ust be
ust be
rrrrreplaced in ma
eplaced in ma
eplaced in ma
eplaced in ma
eplaced in matched se
tched se
tched se
tched se
tched settttts. Inspect thrust w
s. Inspect thrust w
s. Inspect thrust w
s. Inspect thrust w
s. Inspect thrust waaaaasher
sher
sher
sher
shersssss
for scoring and e
for scoring and e
for scoring and e
for scoring and e
for scoring and exxxxxce
ce
ce
ce
cessiv
ssiv
ssiv
ssiv
ssive w
e w
e w
e w
e wear
ear
ear
ear
ear. R
. R
. R
. R
. Replace all w
eplace all w
eplace all w
eplace all w
eplace all worn
orn
orn
orn
orn
or damaged par
or damaged par
or damaged par
or damaged par
or damaged parttttts.
s.
s.
s.
s.
NO
NO
NO
NO
NOTE: Ring gear bolt kit
TE: Ring gear bolt kit
TE: Ring gear bolt kit
TE: Ring gear bolt kit
TE: Ring gear bolt kits ar
s ar
s ar
s ar
s are a
e a
e a
e a
e avvvvvailable a
ailable a
ailable a
ailable a
ailable as a r
s a r
s a r
s a r
s a replace-
eplace-
eplace-
eplace-
eplace-
ment for ring gear riv
ment for ring gear riv
ment for ring gear riv
ment for ring gear riv
ment for ring gear riveeeeettttts, see P
s, see P
s, see P
s, see P
s, see Par
ar
ar
ar
arttttts List man
s List man
s List man
s List man
s List manual for
ual for
ual for
ual for
ual for
par
par
par
par
part n
t n
t n
t n
t number informa
umber informa
umber informa
umber informa
umber information.
tion.
tion.
tion.
tion.
7
7
7
7
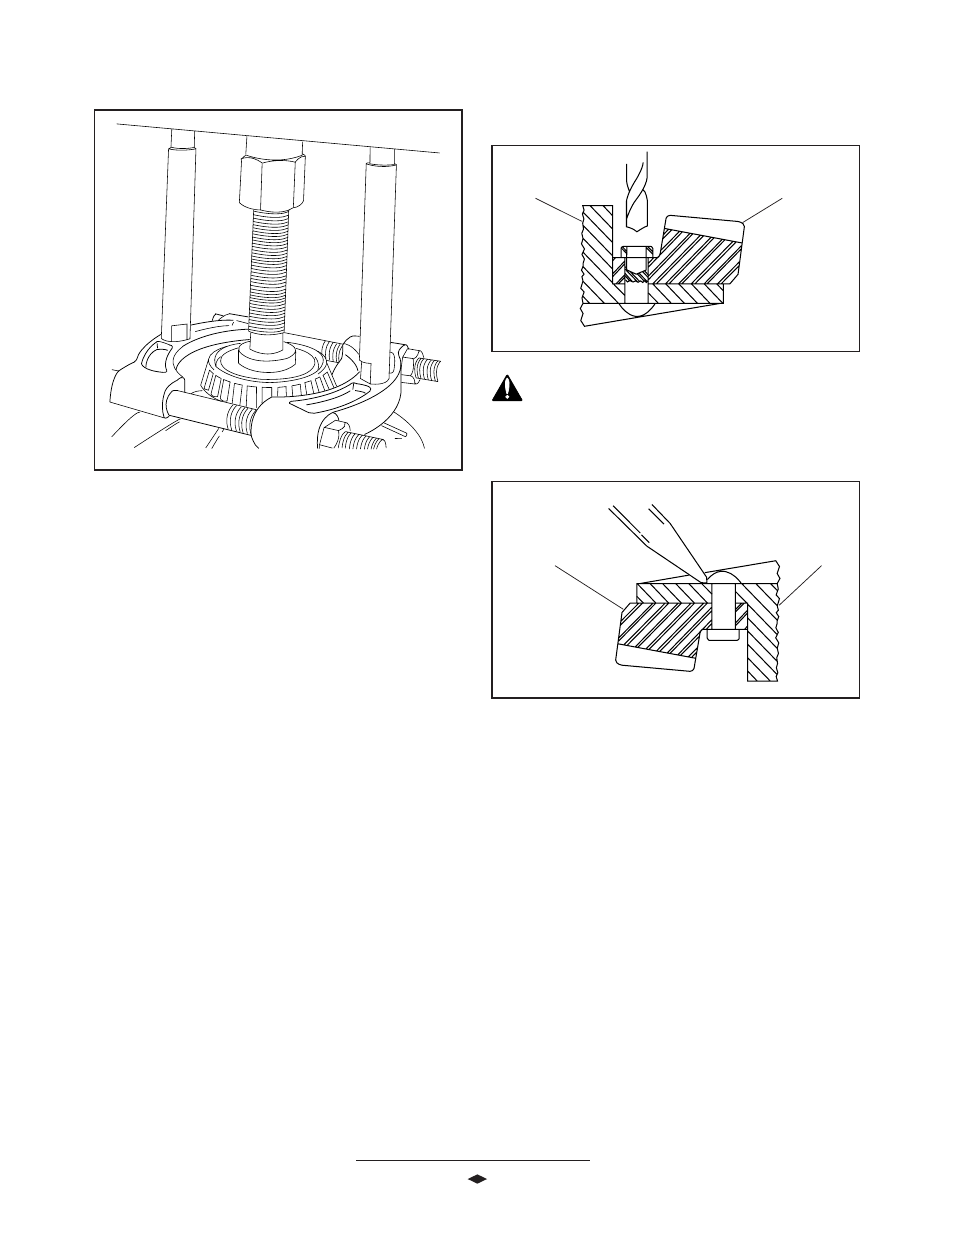
7..... When it is necessary to remove ring gear from the
differential case, carefully center punch each rivet
head. Use a 9/16 inch drill bit. Drill through rivet
heads to depth shown. Next, use a rounded type
punch to drive out remaining portion of the rivet.
FFFFFigur
igur
igur
igur
igure 4
e 4
e 4
e 4
e 4