Pinion assembl – Spicer Drive Axles Service Manual Wheel Reduction Drive Axles (EA-50) User Manual
Page 17
15
PINION ASSEMBL
PINION ASSEMBL
PINION ASSEMBL
PINION ASSEMBL
PINION ASSEMBLY
Y
Y
Y
Y
Me
Me
Me
Me
Method A
thod A
thod A
thod A
thod A uses a pull scale and a strong cord approxi-
mately 8 ft. long. (See Item 11). Me
Me
Me
Me
Method B
thod B
thod B
thod B
thod B uses a Lb-in
torque wrench. Both methods measure torque to rotate.
(See Item 12).
1
1
1
1
11.
1.
1.
1.
1. Me
Me
Me
Me
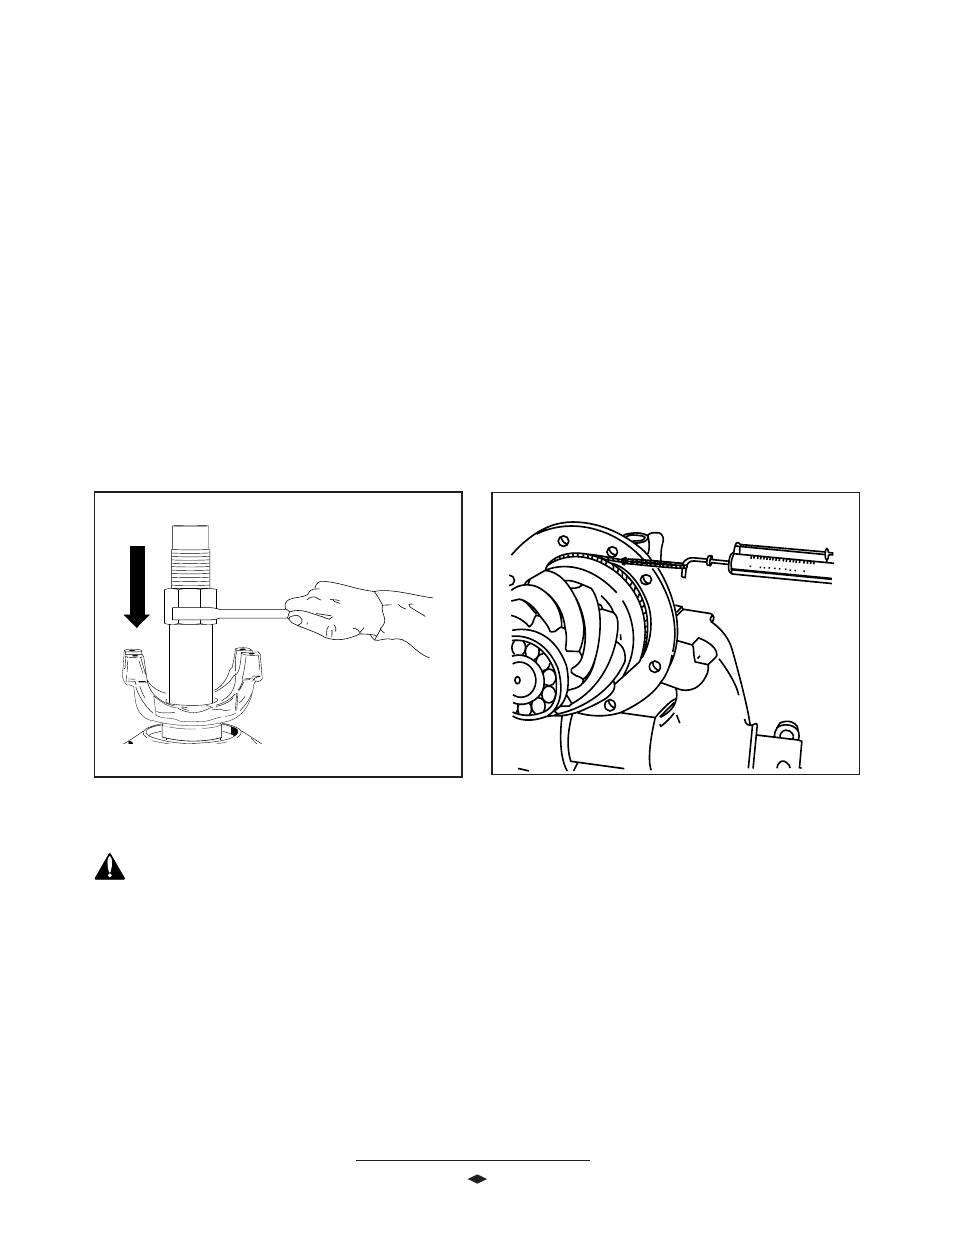
Method A:
thod A:
thod A:
thod A:
thod A: To measure torque-to-rotate with the
spring scale, clamp the end yoke horizontally in a
soft-jawed vise. Attach one end of the cord to a bolt
hole in the pinion cage, wrap cord around pinion
cage and attach the outer end of the cord to the
spring scale. Rotate pinion cage by pulling scale.
Read scale during fourth revolution. Scale reading
must be between 3-10 Lbs (1.4-4.5 Kg) See
See
See
See
See
FFFFFigur
igur
igur
igur
igure 7
e 7
e 7
e 7
e 7.....
8.
8.
8.
8.
8. Place pinion bearing cage onto inner pinion
bearing.
9.
9.
9.
9.
9. Install the outer pinion bearing cone onto pinion.
1
1
1
1
10.
0.
0.
0.
0. Without installing seal, install end yoke onto pinion
using yoke installer service tool. See F
See F
See F
See F
See Figur
igur
igur
igur
igure 6.
e 6.
e 6.
e 6.
e 6. This
will allow proper setting of pinion preload. Secure
yoke with a Yoke and Flange Holding Bar or an
equivalent tool. Install pinion nut and washer.
Torque pinion nut to 900-1,200 Lb-Ft (1,220-
1,627 N-m).
NO
NO
NO
NO
NOTE: Inspect end y
TE: Inspect end y
TE: Inspect end y
TE: Inspect end y
TE: Inspect end yok
ok
ok
ok
oke seal sur
e seal sur
e seal sur
e seal sur
e seal surface for gr
face for gr
face for gr
face for gr
face for groo
oo
oo
oo
oovvvvveeeeesssss
caused b
caused b
caused b
caused b
caused by lip of seal. If gr
y lip of seal. If gr
y lip of seal. If gr
y lip of seal. If gr
y lip of seal. If groo
oo
oo
oo
oovvvvveeeees can be de
s can be de
s can be de
s can be de
s can be detttttect
ect
ect
ect
ected with
ed with
ed with
ed with
ed with
fingernail, it should be r
fingernail, it should be r
fingernail, it should be r
fingernail, it should be r
fingernail, it should be replaced.
eplaced.
eplaced.
eplaced.
eplaced.
CA
CA
CA
CA
CAUTION: The pinion cage should be r
UTION: The pinion cage should be r
UTION: The pinion cage should be r
UTION: The pinion cage should be r
UTION: The pinion cage should be ro
oo
ootttttaaaaattttted
ed
ed
ed
ed
periodicall
periodicall
periodicall
periodicall
periodically while tight
y while tight
y while tight
y while tight
y while tightening the pinion n
ening the pinion n
ening the pinion n
ening the pinion n
ening the pinion nut t
ut t
ut t
ut t
ut to sea
o sea
o sea
o sea
o seattttt
and align the pinion bearings.
and align the pinion bearings.
and align the pinion bearings.
and align the pinion bearings.
and align the pinion bearings.
There are two methods of measuring pinion bearing
preload and both are acceptable. Mechanic's preference
and available tools should determine which method
is used.
(Continued on Ne
(Continued on Ne
(Continued on Ne
(Continued on Ne
(Continued on Next P
xt P
xt P
xt P
xt Page)
age)
age)
age)
age)
FFFFFigur
igur
igur
igur
igure 6
e 6
e 6
e 6
e 6
FFFFFigur
igur
igur
igur
igure 7
e 7
e 7
e 7
e 7