Removal of carrier from housing, Remov – Spicer Drive Axles Service Manual Wheel Reduction Drive Axles (EA-50) User Manual
Page 10
8
IMPOR
IMPOR
IMPOR
IMPOR
IMPORT
T
T
T
TANT
ANT
ANT
ANT
ANT: If the v
: If the v
: If the v
: If the v
: If the vehicle is equipped with driv
ehicle is equipped with driv
ehicle is equipped with driv
ehicle is equipped with driv
ehicle is equipped with driver
er
er
er
er
contr
contr
contr
contr
controlled differ
olled differ
olled differ
olled differ
olled differential lock, see instructions begining
ential lock, see instructions begining
ential lock, see instructions begining
ential lock, see instructions begining
ential lock, see instructions begining
on page 2
on page 2
on page 2
on page 2
on page 24. T
4. T
4. T
4. T
4. To t
o t
o t
o t
o to
oo
oow a v
w a v
w a v
w a v
w a vehicle with driv
ehicle with driv
ehicle with driv
ehicle with driv
ehicle with driver contr
er contr
er contr
er contr
er controlled
olled
olled
olled
olled
differ
differ
differ
differ
differential lock, see instructions on page 2
ential lock, see instructions on page 2
ential lock, see instructions on page 2
ential lock, see instructions on page 2
ential lock, see instructions on page 26.
6.
6.
6.
6.
NO
NO
NO
NO
NOTE: St
TE: St
TE: St
TE: St
TE: Steam clean axle a
eam clean axle a
eam clean axle a
eam clean axle a
eam clean axle assembl
ssembl
ssembl
ssembl
ssemblyyyyy.....
1.
1.
1.
1.
1. Block wheels.
2.
2.
2.
2.
2. Remove axle housing drain plug and drain lubricant.
3.
3.
3.
3.
3. Disconnect drive shafts at the rear U-joint.
NO
NO
NO
NO
NOTE: If end y
TE: If end y
TE: If end y
TE: If end y
TE: If end yok
ok
ok
ok
oke and/or seal is t
e and/or seal is t
e and/or seal is t
e and/or seal is t
e and/or seal is to be r
o be r
o be r
o be r
o be replaced,
eplaced,
eplaced,
eplaced,
eplaced,
loosen y
loosen y
loosen y
loosen y
loosen yok
ok
ok
ok
oke n
e n
e n
e n
e nut a
ut a
ut a
ut a
ut at this time.
t this time.
t this time.
t this time.
t this time.
4.
4.
4.
4.
4. Remove axle shaft flange nuts.
5.
5.
5.
5.
5. Hold a large brass drift or a brass hammer against
the center of the axle shaft flange. Strike the drift
with sharp blows from a large hammer or sledge
until the axle shaft separates from the hub.
CA
CA
CA
CA
CAUTION: Do no
UTION: Do no
UTION: Do no
UTION: Do no
UTION: Do not strik
t strik
t strik
t strik
t strike the flange dir
e the flange dir
e the flange dir
e the flange dir
e the flange directl
ectl
ectl
ectl
ectlyyyyy
with a st
with a st
with a st
with a st
with a steel hammer or sledge. This ma
eel hammer or sledge. This ma
eel hammer or sledge. This ma
eel hammer or sledge. This ma
eel hammer or sledge. This may cr
y cr
y cr
y cr
y crack and
ack and
ack and
ack and
ack and
splint
splint
splint
splint
splinter ma
er ma
er ma
er ma
er mattttterial, possibl
erial, possibl
erial, possibl
erial, possibl
erial, possibly causing serious or fa
y causing serious or fa
y causing serious or fa
y causing serious or fa
y causing serious or fatttttal
al
al
al
al
injury
injury
injury
injury
injury. Do no
. Do no
. Do no
. Do no
. Do not pry or chisel axle flange a
t pry or chisel axle flange a
t pry or chisel axle flange a
t pry or chisel axle flange a
t pry or chisel axle flange aw
w
w
w
waaaaay fr
y fr
y fr
y fr
y from h
om h
om h
om h
om hub
ub
ub
ub
ub
or damage t
or damage t
or damage t
or damage t
or damage to sealing sur
o sealing sur
o sealing sur
o sealing sur
o sealing surface
face
face
face
faces could occur
s could occur
s could occur
s could occur
s could occur.....
6.
6.
6.
6.
6. Remove axle shafts.
7
7
7
7
7.....
Support the differential carrier assembly on a roller
jack. Secure as necessary to prevent it from
falling off the jack when removed from the housing.
REMOV
REMOV
REMOV
REMOV
REMOVAL OF DIFFERENTIAL
AL OF DIFFERENTIAL
AL OF DIFFERENTIAL
AL OF DIFFERENTIAL
AL OF DIFFERENTIAL
CARRIER FROM AXLE HOUSING
CARRIER FROM AXLE HOUSING
CARRIER FROM AXLE HOUSING
CARRIER FROM AXLE HOUSING
CARRIER FROM AXLE HOUSING
8.
8.
8.
8.
8. Use a breaker bar to loosen the differential carrier-
to-housing mounting bolts. Remove all bolts except
top two. These two bolts will prevent the carrier
assembly from falling.
9.
9.
9.
9.
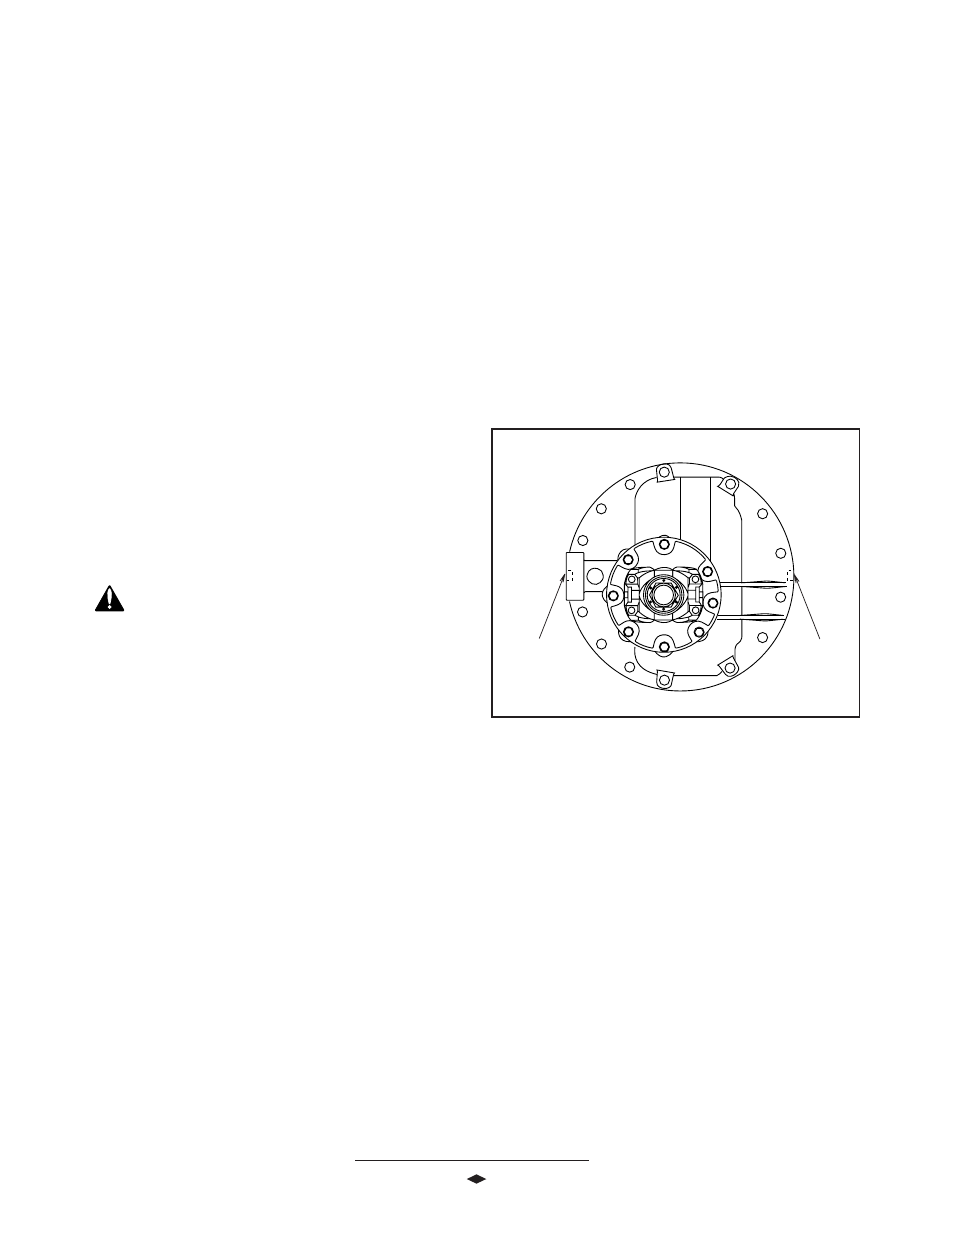
9. Separate differential carrier from the housing using
removal slots. See F
See F
See F
See F
See Figur
igur
igur
igur
igure 1.
e 1.
e 1.
e 1.
e 1. Be certain carrier is
balanced properly on jack, and remove top two
carrier-to-housing mounting bolts. Remove
differential carrier assembly from the axle housing.
FFFFFigur
igur
igur
igur
igure 1
e 1
e 1
e 1
e 1
R
R
R
R
Remo
emo
emo
emo
emovvvvval slot
al slot
al slot
al slot
al slot
R
R
R
R
Remo
emo
emo
emo
emovvvvval slot
al slot
al slot
al slot
al slot
1
1
1
1
10.
0.
0.
0.
0. Mount carrier assembly in a suitable rebuild stand.
(Refer to R
RR
R
Recommended Service T
ecommended Service T
ecommended Service T
ecommended Service T
ecommended Service Tools
ools
ools
ools
ools, pg. 32).
Differ
Differ
Differ
Differ
Differential Carrier R
ential Carrier R
ential Carrier R
ential Carrier R
ential Carrier Remo
emo
emo
emo
emovvvvval Complet
al Complet
al Complet
al Complet
al Completeeeee