Bosch GPL 3 Professional User Manual
Page 10
10 | English
1 609 929 S08 | (13.3.12)
Bosch Power Tools
f
Do not subject the measuring tool to extreme tempera-
tures or variations in temperature. As an example, do
not leave it in vehicles for long time. In case of large varia-
tions in temperature, allow the measuring tool to adjust to
the ambient temperature before putting it into operation.
In case of extreme temperatures or variations in tempera-
ture, the accuracy of the measuring tool can be impaired.
f
Avoid heavy impact or falling of the measuring tool. Af-
ter heavy exterior impact on the measuring tool, an accura-
cy check should always be carried out before continuing to
work (see “Levelling Accuracy”).
f
Switch the measuring tool off during transport. When
switching off, the levelling unit, which can be damaged in
case of intense movement, is locked.
Switching On and Off
To switch on the measuring tool, push the On/Off switch 4
upward so that “I” is indicated on the switch. Immediately af-
ter switching on, the measuring tool sends a laser beam out of
each exit opening 1.
f
Do not point the laser beam at persons or animals and
do not look into the laser beam yourself, not even from
a large distance.
To switch off the measuring tool, push the On/Off switch 4
downward so that “0” is indicated on the switch. When
switching off, the levelling unit is locked.
Setting the Automatic Switch-off
By default, the measuring tool automatically shuts off
20 minutes after being switched on.
The automatic switch-off can be set from 20 minutes to
8 hours. For this, switch the measuring tool on, then immedi-
ately off, and then on again within 4 s. To confirm the change,
all laser beams will flash quickly for 2 s after switching on the
second time.
f
Do not leave the switched on measuring tool unattend-
ed and switch the measuring tool off after use. Other
persons could be blinded by the laser beam.
When switching on the measuring tool the next time, the auto-
matic switch-off is set to 20 minutes again.
Working with Automatic Levelling
Position the measuring tool on a level and firm support, attach
it to the holder 8 or to the tripod 18.
After switching on, the automatic levelling function automati-
cally compensates irregularities within the self-levelling range
from ±5° (longitudinal axis) and ±3° (lateral axis). The level-
ling is finished as soon as the laser points do not move any
more.
If the automatic levelling function is not possible, e.g. be-
cause the surface on which the measuring tool stands devi-
ates by more than 5° or 3° from the horizontal plane, the laser
beams flash rapidly. In this case, bring the measuring tool to
the level position and wait for the self-levelling to take place.
As soon as the measuring tool is within the self-levelling range
of ±5° or ±3° respectively, all laser beams light up continu-
ously again.
In case of ground vibrations or position changes during
operation, the measuring tool is automatically levelled in
again. To avoid errors by moving the measuring tool, check
the position of the laser beams with regard to the reference
points upon re-levelling.
Levelling Accuracy
Influences on Accuracy
The ambient temperature has the greatest influence. Espe-
cially temperature differences occurring from the ground up-
ward can divert the laser beam.
As thermal fluctuation is largest close to the ground, the
measuring tool, if possible, should be mounted on a commer-
cially available tripod and placed in the centre of the working
area.
Apart from exterior influences, device-specific influences
(such as heavy impact or falling down) can lead to deviations.
Therefore, check the accuracy of the measuring tool each
time before starting your work.
Should the measuring tool exceed the maximum deviation
during one of the tests, please have it repaired by a Bosch af-
ter-sales service.
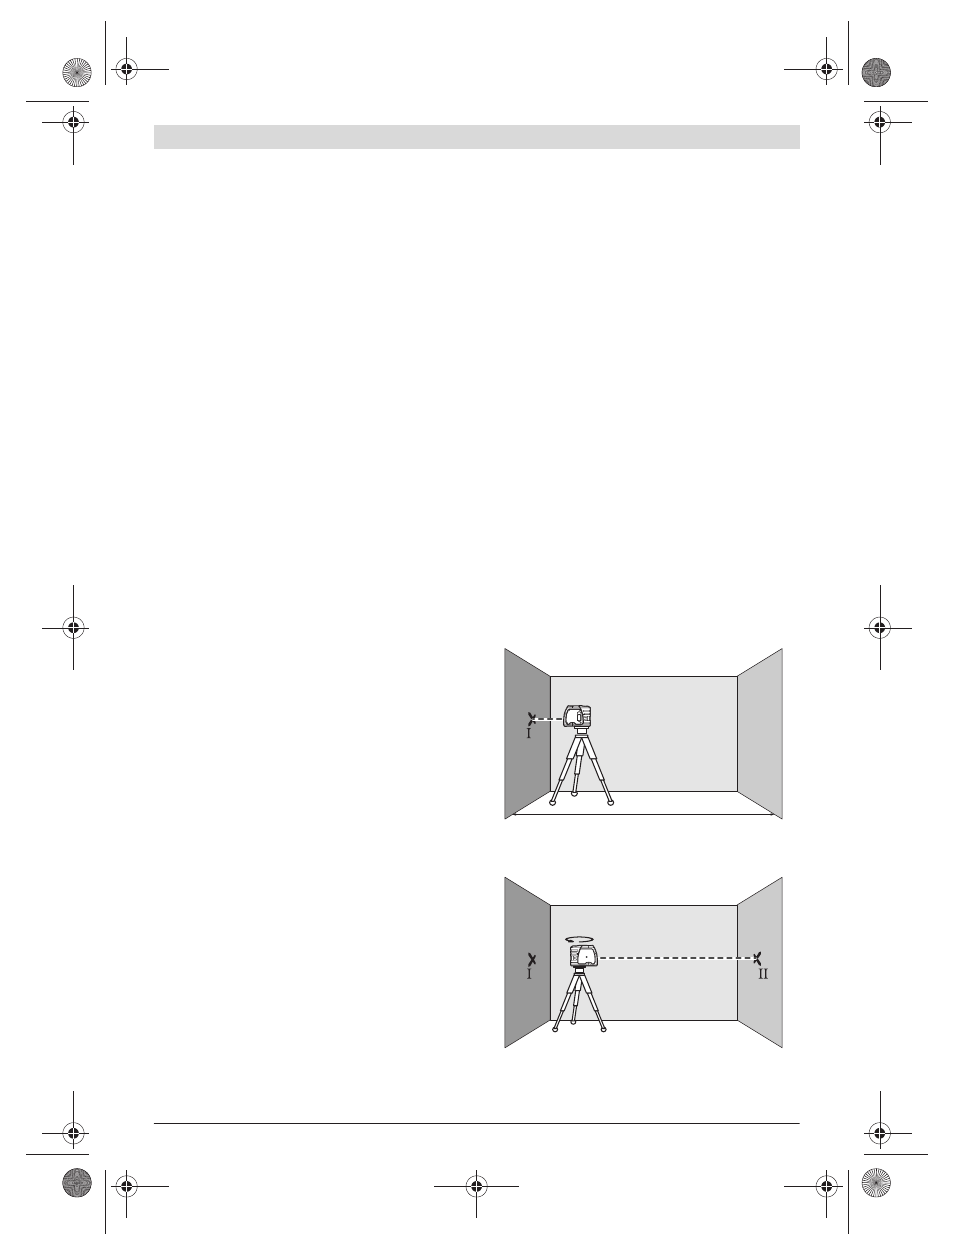
Checking the Horizontal Levelling Accuracy
A free measuring distance of 20 m on a firm surface between
two walls A and B is required for the check.
– Mount the measuring tool onto the holder or a tripod, or
place it on a firm and level surface close to wall A. Switch
the measuring tool on.
– Direct the horizontal laser beam against the close wall A
and allow the measuring tool to level in. Mark the centre of
the laser beam on the wall (point I).
– Turn the measuring tool around by 180°, allow it to level in
and mark the centre point of the laser beam on the oppo-
site wall B (point II).
A
B
20 m
A
B
180˚
OBJ_BUCH-807-003.book Page 10 Tuesday, March 13, 2012 9:26 AM