Veemux installation, Nti veemux audio/video matrix switch via cat5 8, Rne tw ork te ch no log ie s i nc – Network Technologies SM-nXm-C5AV-LCD User Manual
Page 12: Rear view) st-c5va-600 remote unit, Ac adapter power cord, Iec connector, Ac adapter, Vga multi-scan monitor
NTI VEEMUX AUDIO/VIDEO MATRIX SWITCH VIA CAT5
8
VEEMUX INSTALLATION
1.
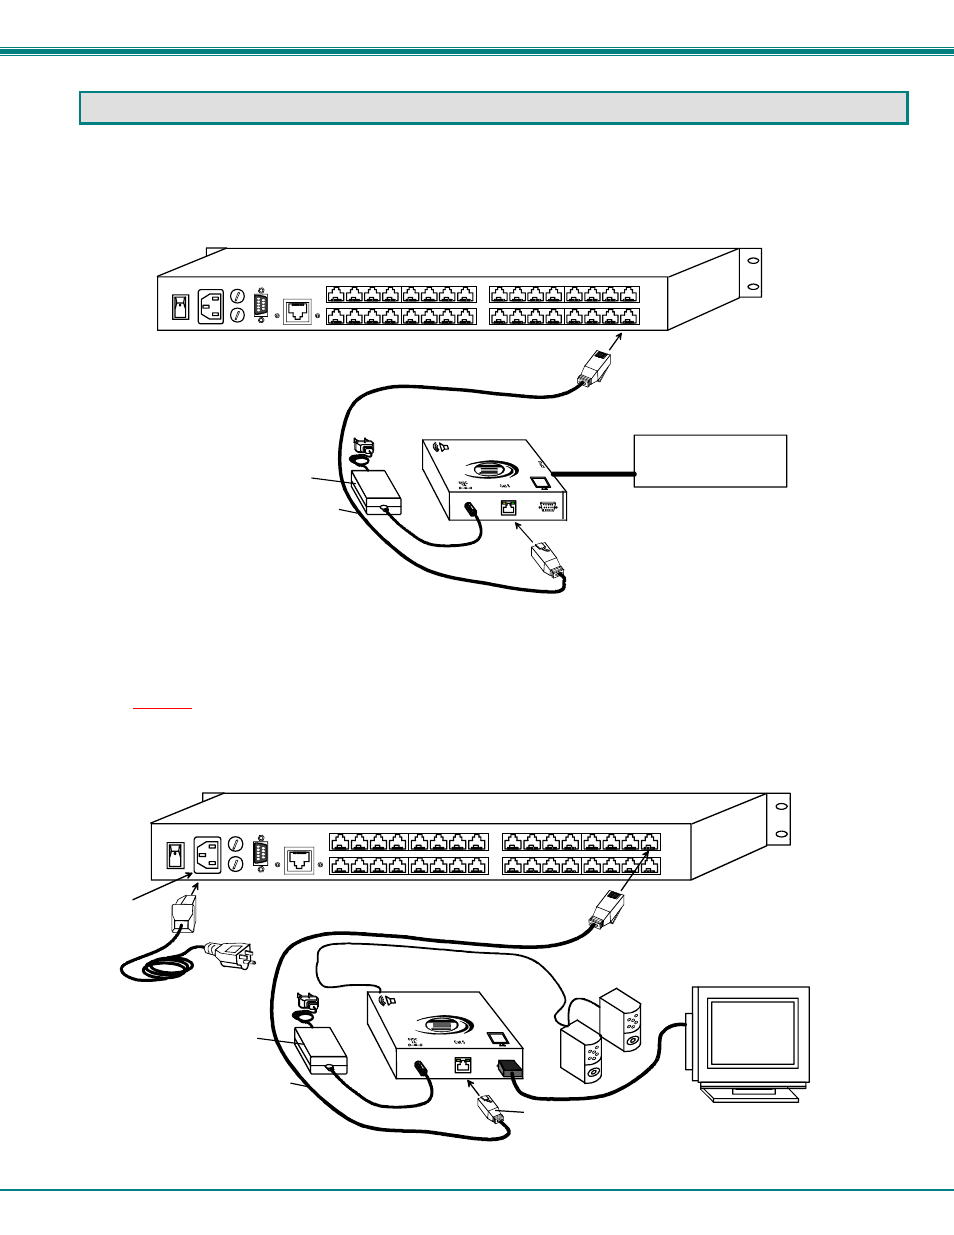
Connect an ST-C5VA-600 Local Unit to an audio/video source as described on pages 4-5.
2.
Connect a CAT5 cable (wired as specified on page 27) between the ST-C5VA-600 Local Unit and VEEMUX connector
"AV IN 1".
Figure 5- Attach ST-C5VA-600 Local Unit to VEEMUX
3.
Connect a CAT5 cable (wired as specified on page 27) between an ST-C5VA-600 Remote Unit and VEEMUX connector
"AV OUT 1".
Note: Shielded CAT 5,5e, or 6 cable must be used to connect to LOCAL and REMOTE units in order to meet CE emission
requirements.
4.
Connect a monitor and stereo speakers to the ST-C5VA-600 Remote Unit as described on page 6.
5.
Connect the powercord as shown in Fig. 6.
Figure 6- Attach ST-C5VA-600 Remote Unit to VEEMUX
Rear View of SM-16X16-C5AV-LCD
9
10
11
12
13
14
15
16
AV OUT
AV IN
AV OUT
9
10
11
12
13
14
15
16
1
2
3
4
5
6
7
8
1
2
3
4
5
6
7
8
R
S
2
3
2
ETHERNET
F
U
S
E
S
NTI
R
Ne tw
ork
Te
ch
no
log
ie
s I
nc
XTEN
DEX
-
+
ST-C5VA-600 Local Unit
(Rear View)
Audio/Video Source
(CPU, VCR, DVD
Player, etc)
RJ45 Male Connector
RJ45 Male Connector
CAT5 Cable
9 VDC
AC
ADAPTER
AC Adapter
-
+
NTI
R
Netw
o rk
T ec
hno
logi
es
In
c
XT
ENDE
X
(Rear View)
ST-C5VA-600 Remote Unit
VGA
Multi-Scan
Monitor
Rear View of SM-16X16-C5AV-LCD
Stereo
Speakers
RJ45 Male Connector
CAT5 Cable
RJ45 Male Connector
9 VDC
AC
ADAPTER
AC Adapter
Power Cord
9
10
11
12
13
14
15
16
AV OUT
AV IN
AV OUT
9
10
11
12
13
14
15
16
1
2
3
4
5
6
7
8
1
2
3
4
5
6
7
8
R
S
2
3
2
ETHERNET
F
U
S
E
S
IEC
Connector