Sub-Zero ICBBI-36RG User Manual
Page 16
16
C O M P L E T I N G T H E I N S TA L L AT I O N
D O O R A D J U S T M E N T
The doors for Built-In side-by-side models and
the upper door on over-and-under models can
be adjusted in three ways: In and out, side to
side tilt, and up and down (except over-and-
under models).
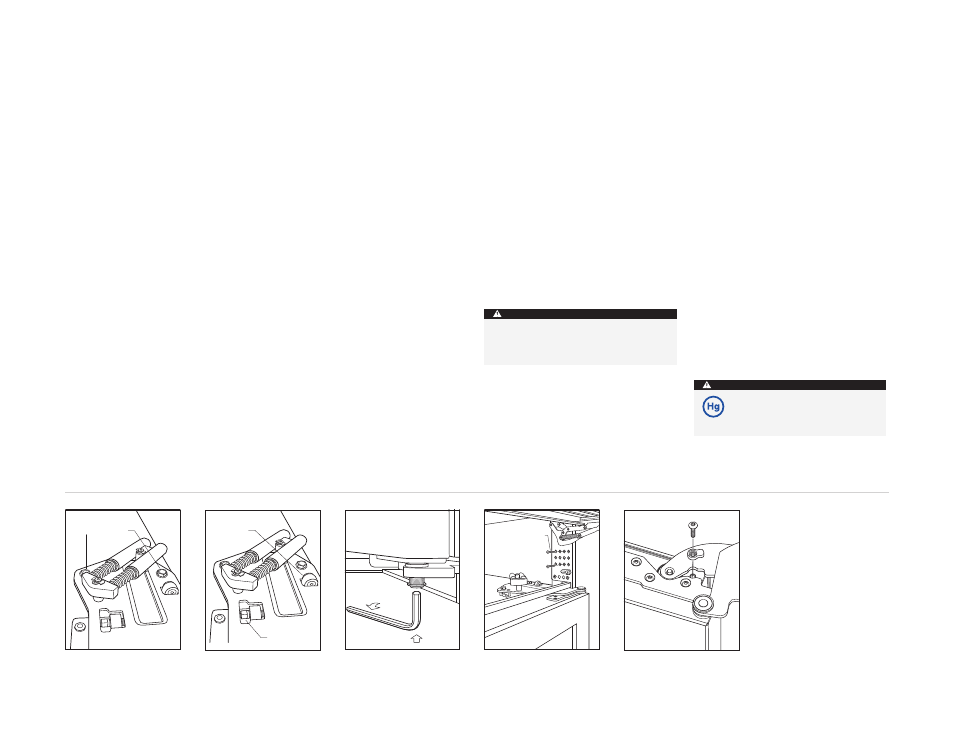
Regardless of the adjustment being made, start
by slightly loosening the two upper hinge bolts
on the upper hinge plate using a 13 mm wrench.
Refer to the first illustration below.
I N A N D O U T A D J U S T M E N T
The second illustration below points out the
proper bolt for the in and out door adjustment.
A 4 mm allen wrench is required.
To adjust a left-hinge door, turn the bolt clock-
wise to bring the handle side of the door inward,
and counterclockwise to move the handle side of
the door outward. Reverse the directions for a
right-hinge door.
Upper Hinge Bolts
In and Out
Adjustment
Side to Side
Tilt Adjustment
Door adjustment—upper hinge
bolt
Door adjustments
Door height adjustment
S I D E T O S I D E T I L T A D J U S T M E N T
The second illustration below also points out the
proper bolt for the side to side tilt door adjust-
ment. A 9 mm wrench is required.
For a left-hinge door, turn the bolt clockwise to
raise the handle side of the door up and counter-
clockwise to tilt the handle side of the door
down. Reverse the directions for a right-hinge
door.
D O O R H E I G H T A D J U S T M E N T
A 6 mm allen wrench is required.
For a left-hinge door, turn the bolt clockwise to
raise the door and counterclockwise to lower the
door. Refer to the illustration below. Reverse the
directions for a right-hinge door.
9 0 ° D O O R S T O P
The doors of all Built-in models open to 110°.
An optional 90° door stop kit is available through
your Sub-Zero dealer.
The 90° door stop will be installed in the top
hinge of the door. To install, open the door to
approximately 90°. At the top of the door, insert
the door stop down between the door hinge and
the door closer arm. Insert the screw through the
door stop and into the door as shown in the
illustration below.
A N C H O R T H E U N I T
After door and side panels have been installed,
the unit has been leveled and door adjustment
completed, anchor the Built-In unit to the
opening. This will assure a proper fit and a
secure installation.
IMPORTANT NOTE: Be sure to level and square
the unit before anchoring it.
To anchor the unit to cabinetry, open the grille,
and install the screws provided through the grille
frame into the cabinetry. There are several hole
locations provided. Check for proper door clear-
ance by fully opening the door. Refer to the illus-
tration below.
Next, drill a screw through the side hole inside
the roller base assembly. There is one on each
side. The screw will need to go in at an angle in
order to attach properly.
Anchoring Screws
Top anchoring
90° door stop
A I R P U R I F I C AT I O N S Y S T E M
All Sub-Zero Built-In units, except Model
ICBBI-36F, come with an advanced air purifica-
tion system. A factory installed air purification
cartridge is located inside the refrigeration
section, on the right-hand side of the back wall.
For information regarding use and removal of
this cartridge, please refer to the Built-In Refrig-
eration Use & Care Information provided with
the unit.
A C C E S S O R I E S
Optional acces-
sories are available
through your
Sub-Zero dealer. To
obtain local dealer
information, visit
our website,
subzero.com.
If the screws provided are not suitable for
your application, you must provide adequate
screws.
CAUTION
CAUTION
LAMP CONTAINS MERCURY
Manage in accordance with disposal
laws.