Aligning the thumb-screw, Attaching the second clamp – HP 8517B User Manual
Page 56
3-18
HP 8517B S-Parameter Test Set Manual
Operating the HP 8517B Test Set
Using Anti-Rotation Clamps
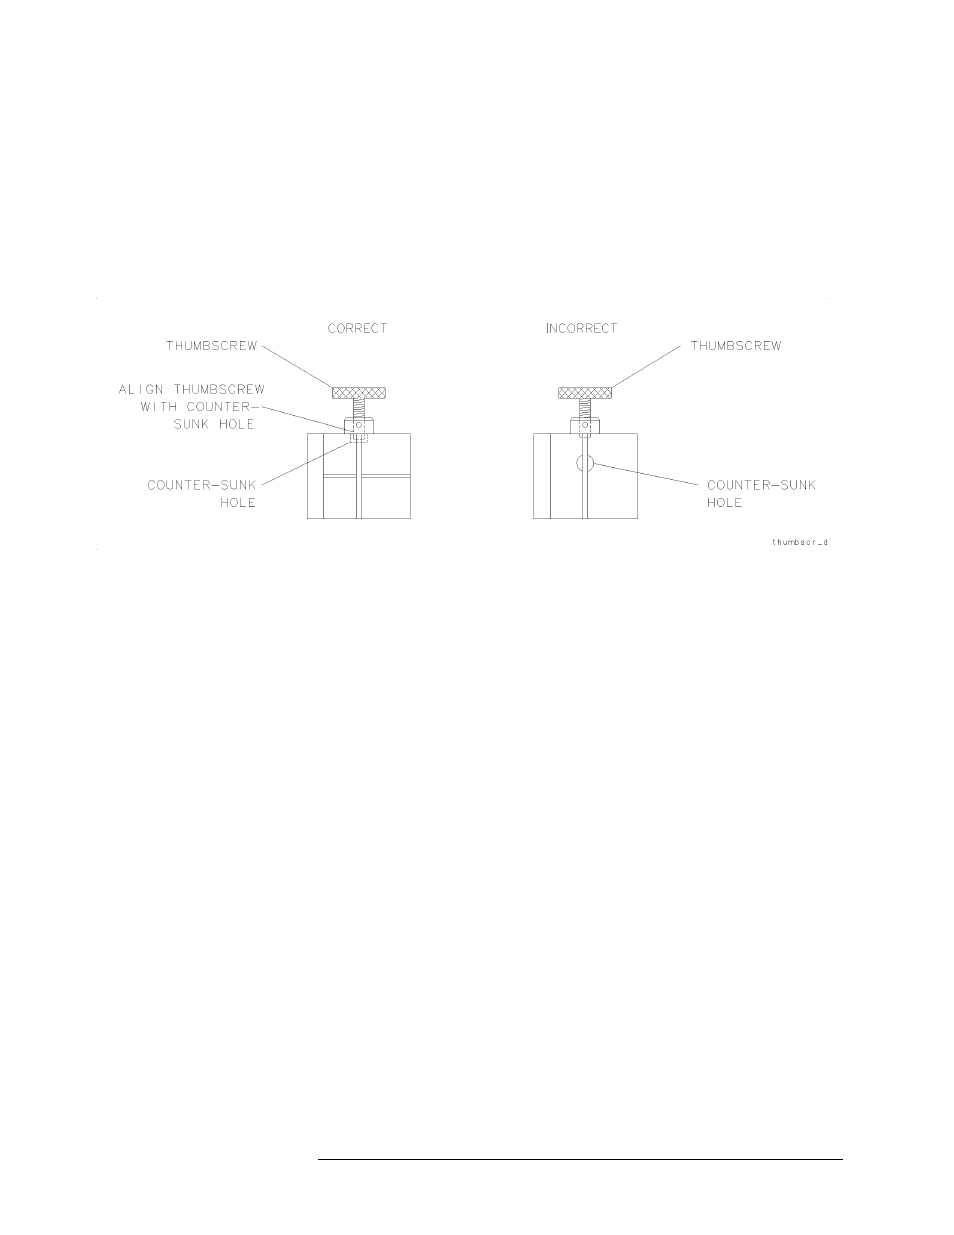
Aligning the thumb-screw
See Figure 3-8. Ensure that the thumb-screw is aligned with the counter-sink
hole on the clamp’s body.
1. Push the clamp toward the test set front panel.
2. Finger-tighten the thumb-screw. The cable cannot be damaged if the
thumb-screw is tightened too tightly.
Figure 3-8
Aligning the Thumbscrew With the Counter-Sink Hole
Attaching the second clamp
To complete the anti-rotation clamp installation, repeat the steps above,
beginning at step 1 to attach the second clamp.
See also other documents in the category HP Hardware:
- NRM42 (61 pages)
- ProLiant ML370 (49 pages)
- ProLiant ML370 (50 pages)
- ProLiant ML110 G5 (32 pages)
- PC Comm Station Pro 304251-008 (North America) (5 pages)
- 100B-TX (32 pages)
- 3C905B-TX (110 pages)
- EK-STWCT-UG. E01 (45 pages)
- 3800ux (13 pages)
- 5991-6764 (8 pages)
- LTO 4 FC (46 pages)
- StorageWorks Network Attached Storage X3000 (16 pages)
- Ultrium Drive (30 pages)
- ProLiant DL360 (49 pages)
- CD Leycom CFL-512 (5 pages)
- RDX160 (12 pages)
- 345524-B21 (54 pages)
- DT-20 (20 pages)
- SureStore 7115w (136 pages)
- HD1600 (2 pages)
- ProLiant DL160 (38 pages)
- Vectra XW (16 pages)
- D2D4004i (20 pages)
- F1588A (4 pages)
- 94500 (1 page)
- Computer Parts (21 pages)
- MSA50 (8 pages)
- 7750 (32 pages)
- Media Gateways G350 (76 pages)
- P400 Serial (9 pages)
- MSL4048 (4 pages)
- 3C590-TPO (40 pages)
- mv2040 (2 pages)
- AHA-8940 (82 pages)
- ProLiant DL385 (47 pages)
- ProLiant DL385 (174 pages)
- 5300A (19 pages)
- AMD Geode E2047551001R (111 pages)
- 1100d (102 pages)
- Reliable Transaction Router (100 pages)
- xp1024 (2 pages)
- 180 Degree Turn (24 pages)
- procurve J8165A (32 pages)
- 04H8095 (28 pages)
- 744 (154 pages)