Ma228 (de_en_fr) – Multi-Contact MA228 User Manual
Page 4
4/4
Die Leitung in die Crimphülse
einführen bis zum Anschlag.
Crimpvorgang ausführen und
gleichzeitig Leitung in axialer Richtung
in Crimphülse drücken. Die Leitung
muss vor und nach dem Crimpen im
Sichtloch sichtbar sein.
(ill.6)
Zuerst die Pilotkontakte (mit
angeschlossener Leitung)
in die
Halterung stecken. Dann die
angecrimpten Leitungen in die Lei-
tungsführungen legen und so bie-gen,
dass die Kontakte leicht einge-setzt
werden können. Die Kontakte in die
entsprechenden Halterungen stecken
bis zum Anschlag.
(ill.7)
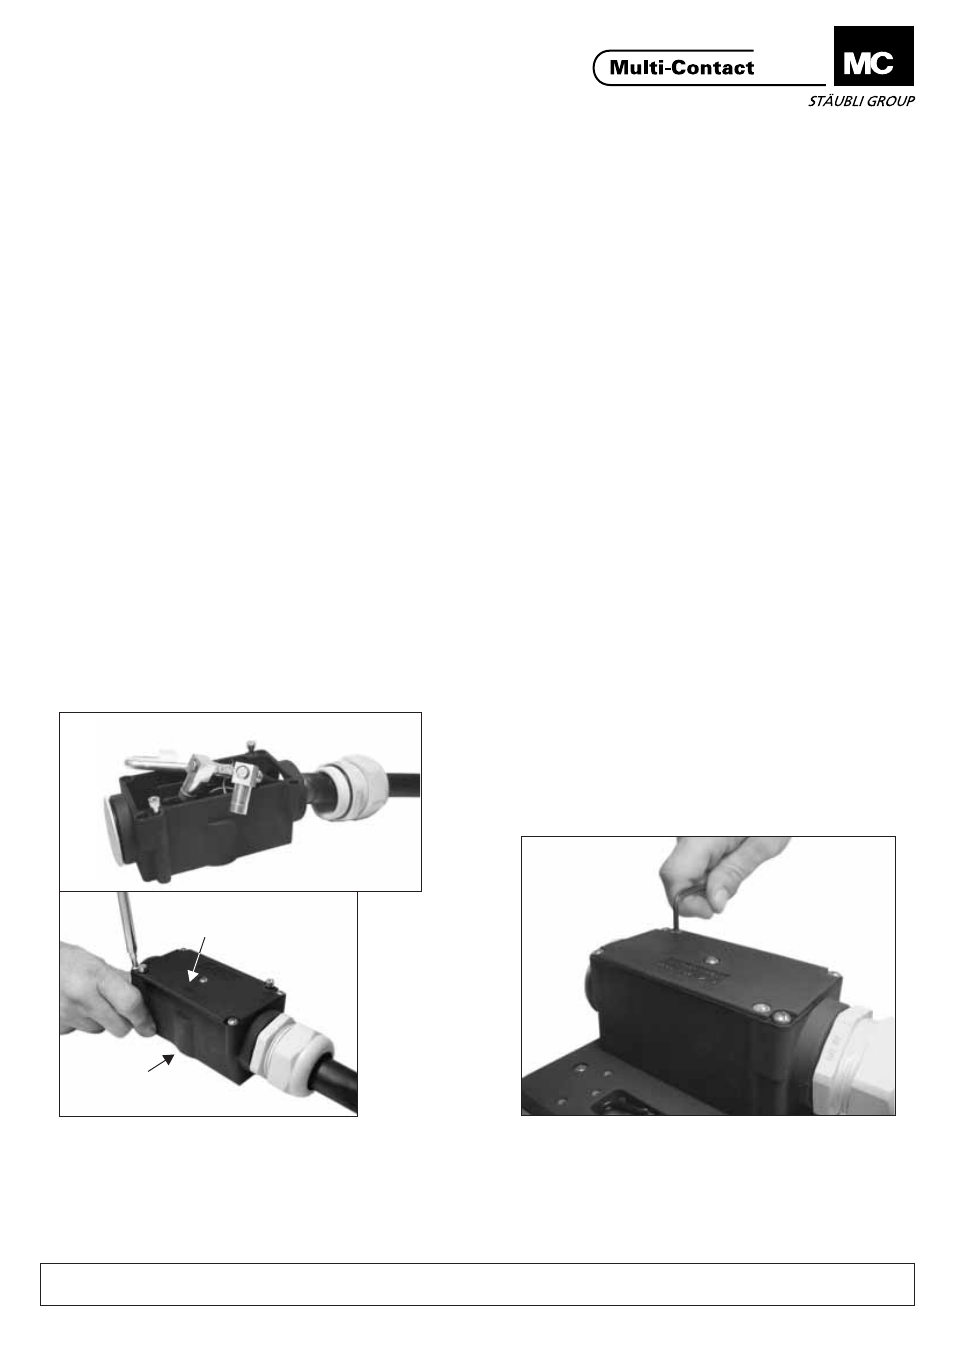
Deckel auflegen und sicherstellen,
dass er richtig schliesst. (MC-Zei-chen
auf der gleichen Seite wie die
Ausbuchtung). Die 5 Schrauben mit
dem Kreuzschlitzschraubendreher
anziehen. Die Kabelverschraubung
über das Kabel schieben, bis sie am
Gewinde befestigt werden kann. Die
Mutter der Kabelverschraubung
festschrauben. Der Anschluss-stecker
ist jetzt betriebsbereit.
mit dem
Einsetzwerkzeug ME-WZ15,-2
(ill.8)
Nach dem Stecken auf die
Adapterplatte des Transformators,
den Anschlussstecker mit den 2 6-
kant Schrauben fixieren.
Insert wire into the contact crimping
sleeve to the end stop. During the
crimping operation, gently push the
wires into the sleeve. Wires must be
visible in the inspection hole before
and after crimping.
(ill.6)
Insert first the pilot contacts (with
connected cables) into their support
with the help of the insertion tool ME-
WZ1,5/2. Lay the crimped cables into
the cable guides and bend them in the
way that the contacts can be inserted
without force. Insert the power
contacts into the contact chambers
accordingly.
(ill.7)
Put on the cover (MC-Logo must be
on the same side like the bulg of
housing) and verify that its closed all
arround. Fasten the 5 screws with the
Philips
. Slip the cable
gland over the cable until it can be
screwed on. Fasten the nut of cable
gland. The female plug is now ready
to use.
screwdriver
(ill.8)
After connecting the adapter plate on
the transformer, fix the female plug
with the 2 screws.
(ill.8)
Lors du montage sur le
transformateur, utiliser les deux vis à
tête hexagonale pour verrouiller
l'ensemble sur son embase.
Introduire le conducteur dans le fыt а
sertir jusqu'en butée. Sertir, tout en
maintenant le conducteur en position
dans le fût (pousser axialement). Le
conducteur doit être visible dans
l'orifice de contrôle après sertissage.
(ill.6)
Monter d'abord les contacts pilotes
dans l'isolant avec l'outil ME-
WZ1,5/2.
. Enfiler les câbles
sertis dans les passages de câble de
l'isolant en veillant à bien positionner
les contacts de puissance. Les
pousser dans leurs logements
respectifs jusqu'à encliquetage.
(ill.7)
Remonter le couvercle et vérifier sa
fermeture correcte (logo MC en face
du bossage). S'il y lieu, repousser
correctement les contacts dans
l'isolant. Serrer les 5 vis à l'aide du
tournevis. Remonter le presse-étoupe
en repoussant le câble, pour que le
joint d'étanchéité du presse-étoupe
fasse effet. Serrer correctement
l'écrou du presse-étoupe.
Ne pas monter les
contacts pilotes s'il n'y a pas lieu
de les utiliser
La prise
ainsi montée est prête à l'emploi.
Assembly
Montage
Montage
ill.8
ill.6
ill.7
Ausbuchtung
Bulg
Bossage
MC
MA228 (de_en_fr)
Änderungen vorbehalten/Subject to alterations/Modifications sous réserve
Copyright by Multi-Contact AG, Switzerland / Robotic
/ 03.2004 / Index b
line
www.multi-contact.com
Advanced Contact Technology