MINOURA SS-700 User Manual
Page 2
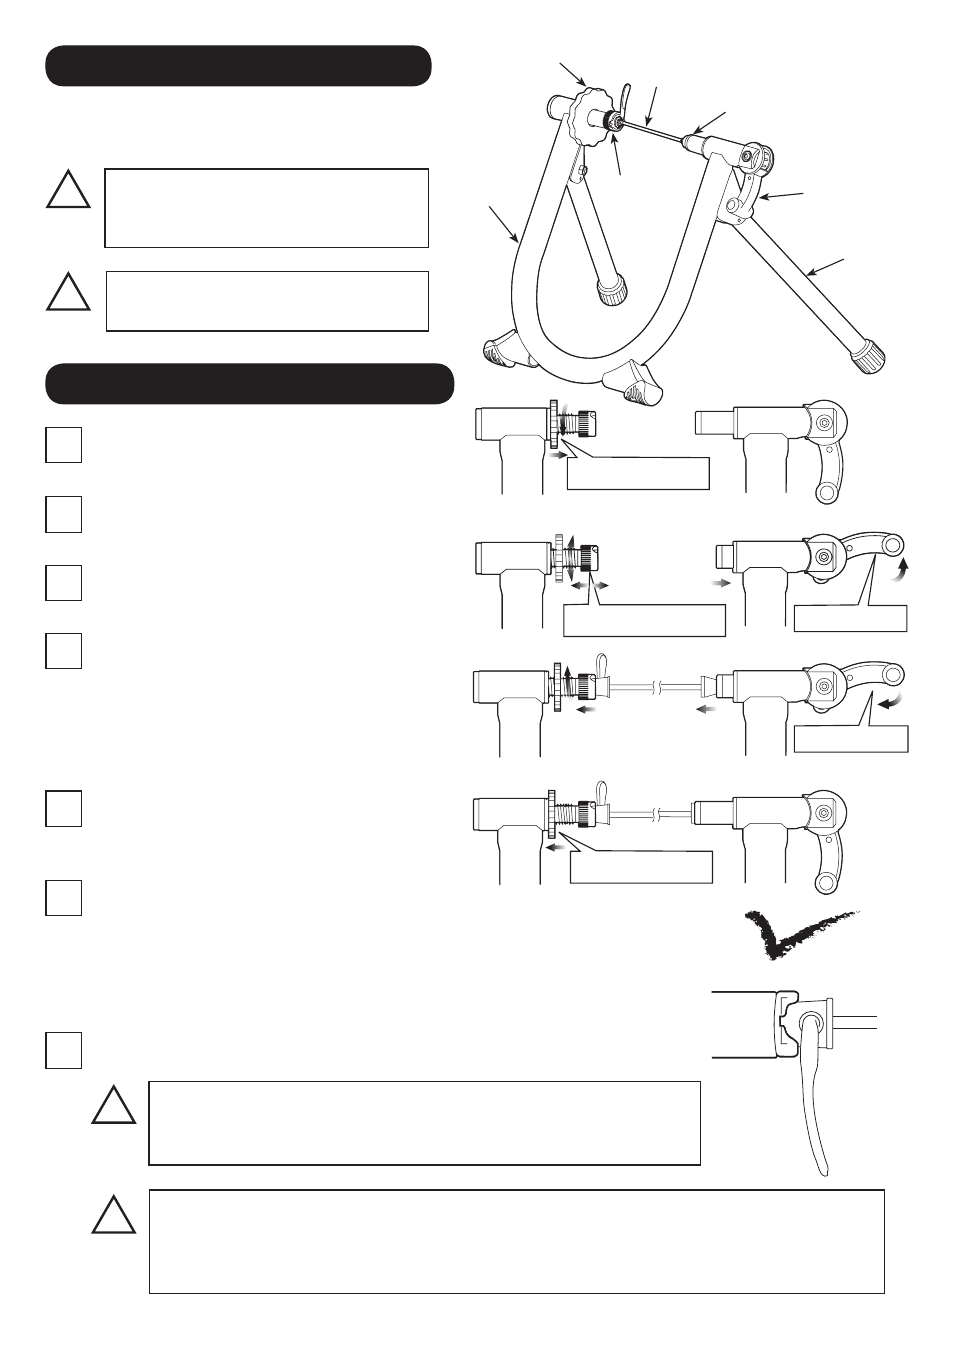
First, replace your skewer with the supplied one.
Loosen the Lock Nut to allow the Left Side
Coupling be free. (see Fig. A)
Pull up the Quick Hub Clamp Lever to retract the
Right Side Coupling. (see Fig. B)
Insert the left side (quick lever side) skewer into
the Left Side Coupling first.
The quick lever shaft must be inserted into the
cut-out on the coupling (see Fig. E) to hold the
bike stable. Turn the coupling to adjust the cut-
out position.
While in this position, bring the bike slowly down
to align the right side of the skewer with the
Right Side Coupling. (see Fig. C)
(Fig. A)
(Fig. B)
(Fig. C)
(Fig. D)
Both left and right side couplings are designed to suit the
supplied quick release skewer. The left side coupling must fit
perfectly in the skewer head to get correct stability. (Fig. E)
!
(Fig. E)
!
Precisely adjust the left side coupling position to keep the correct thightness of rear
hub clamping.
Too tight setting will cause damage to both SS-700 and your bike frame.
Too loose setting may cause the bike to come out of the stand during use.
Push down the Quick Hub Clamp Lever to hold the
1
2
3
4
5
6
7
Quick Release Skewer
Lock Nut
Left Side
Coupling
Right Side Coupling
Quick Hub
Clamp Lever
Leg
Frame
How To Install Your Bike on SS-700
Loosen Lock Nut
Turn to adjust position
Tighten Lock Nut
Push down lever
Pull up lever
Fully open the Legs and place on flat and level floor.
Check if all 4 leg points are touching the floor stably at once.
!
Do not use SS-700 on any sloping
ground. The bike stability will be
disturbed and may fall down.
!
Be careful not to pinch your finger
when opening and closing the legs.
How To Setup Your SS-700
rear wheel. (see Fig. C)
If you start feeling resistance when the lever comes at 4 o'clock position, it's correct.
If clamping the hub is too tight or too loose due to wrong position of the Left
Side Coupling, pull up the lever to release the bike, adjust the Left Side Coupling
position, and try clamping the hub again.
Lastly, tighten the Lock Nut to fix the Left Side Coupling position. (see Fig. D)