Schematics – MINOURA DS-4000 User Manual
Page 2
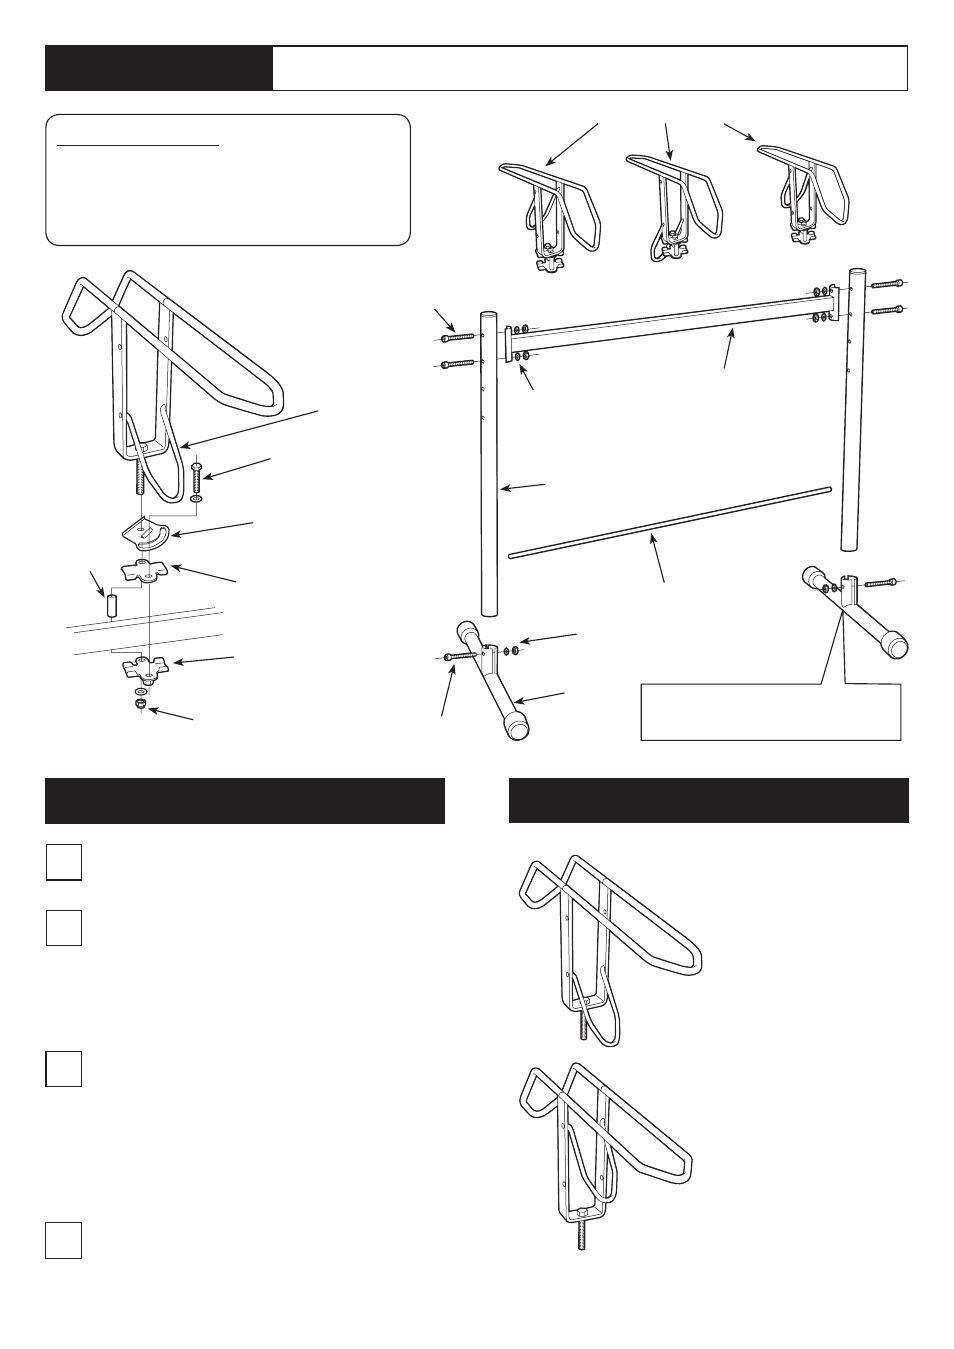
Schematics
/部品図
Parts Pack / 部品セット
4 x Bolt M8x45 / キャップボルト M8x45
2 x Bolt M8x50 / キャップボルト M8x50
6 x M8 Nut / M8 ナット
6 x M8 Spring Washer / M8 スプリングワッシャ
Side Frame / 横フレーム
Pillar / 支柱
Cradle / クレードル
Rear Tire Bar / 後輪バー
Leg / 脚
Bolt M8x45
M8x45 キャップボルト
M8 Spring Washer / Nut
M8 スプリングワッシャ・ナット
M8 Spring Washer / Nut
M8 スプリングワッシャ・ナット
Bolt M8x50
M8x50 キャップボルト
Bolt M8x60
M8x60 六角ボルト
Angle Plate
角度調整板
Upper Plate (without nut)
上側取付板(ナットなし)
Lower Plate (with nut)
下側取付板(ナット付)
Collar
パイプ
カラー
M8 Nut
M8 ナット
Tire Hook
タイヤフック
Required Tools :
組み立てに必要な工具:
6mm Hex Wrench, 13mm Spanner
6mm 六角レンチ、13mm スパナ
Shorter welding faces inward
溶接長さの短い方が内側を向くように
In case of using fat tire such as
MTB, you don't use the hook
and leave it in the lower hole.
MTB など太いタイヤの場合は
タイヤフックは使用せず、下
側の孔に取り付けたままにし
ます。
In case of using narrow road
bike tire, move the hook to
the upper hole to support the
front tire at 3 totally points.
細いロードやクロスバイクの
タイヤで使う場合は、タイヤ
フックを上側の孔に移動させ、
タイヤを前後と下の 3 点で支
えるようにします。
How To Use Tire Hook /タイヤフックの使い方
How To Install Cradle /クレードルの取り付け方
1
2
3
Disassemble the pre-assembled cradle.
仮組みしてあるクレードルを分解します。
Sandwich the side frame with the upper and lower
plates. Put the angle plate on it, then screw the M8x60
bolt with a washer temporarily.
上下の取付板で横フレームを挟み込み、角度調整板を
かぶせ、平ワッシャを通した M8x60 六角ボルトをねじ
込んで仮止めします。
Put the welded bolt on the cradle through the upper
plate, collar and the lower plate then tighten to the
M8 nut. Make sure the cradle and the upper plate are
engaged solidly.
クレードル側の溶接されたボルトを、上側取付板〜
パイプカラー〜下側取付板と通してから、ワッシャと
ナットにねじ込みます。クレードルと上側取付板とは
密着していることを確認してください。
4
Adjust the cradle angle, then tighten the bolt and the
nut equally and securely to fix.
クレードルの角度を決めてから、ボルトとナット とを
均等に締め込んで固定します。