Fig.6 fig.7 fig.8 – Sealey TA200 User Manual
Page 4
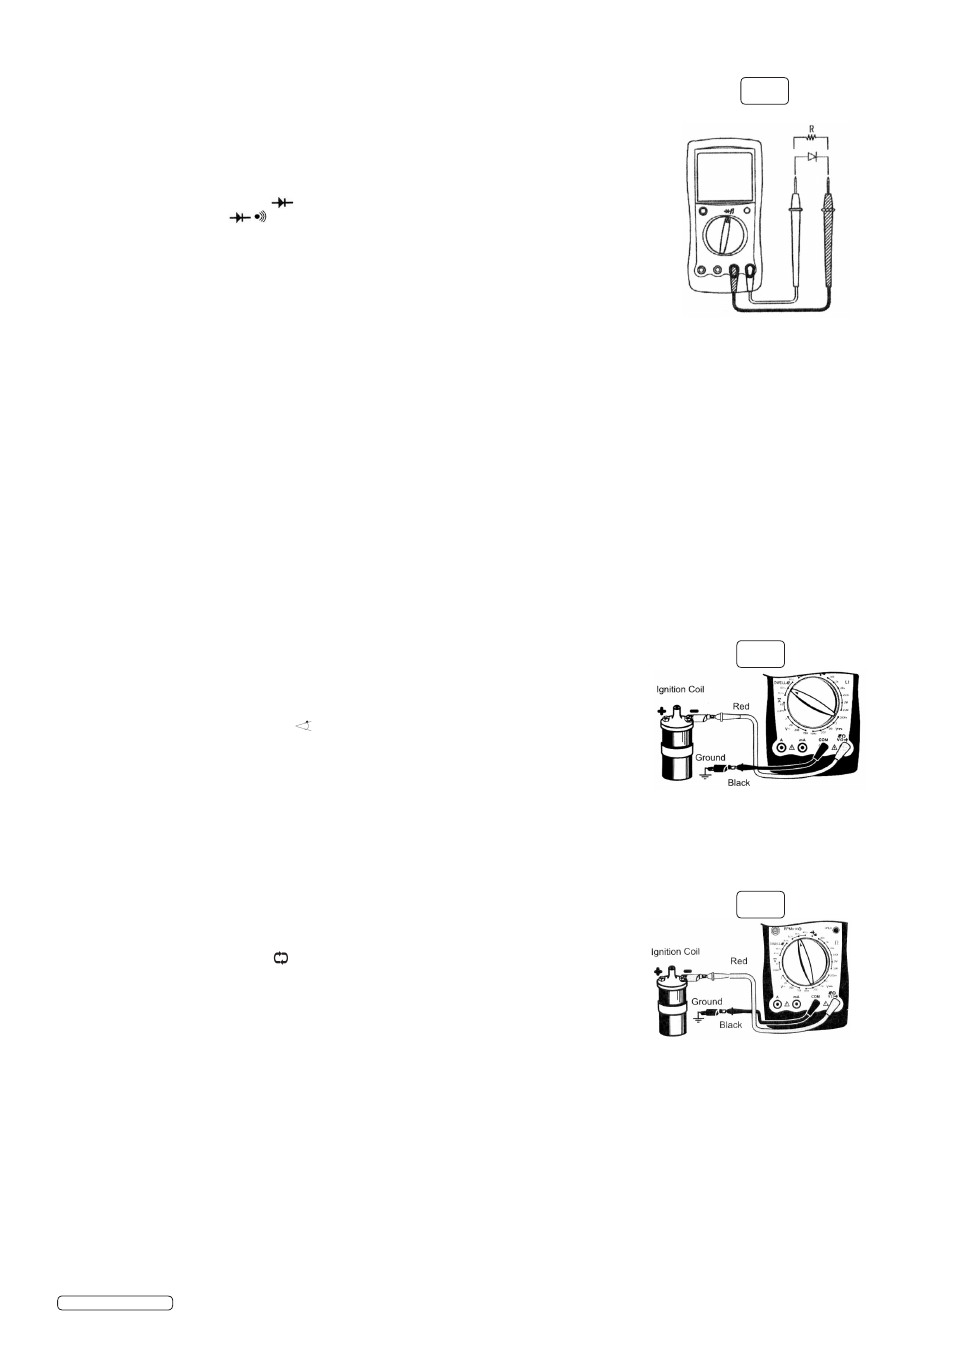
4.4. Diode testing (fig 6)
WARNING! To avoid damage to the meter and/or devices being tested, disconnect
circuit power and discharge all high-voltage capacitors before testing diodes.
Never attempt an in-circuit current measurement where the open circuit voltage
between terminals and ground is greater than 60V DC or 30V AC rms.
Use the diode test to check diodes, transistors, and other semiconductor devices. The diode
test sends current through the semiconductor junction, then measures the voltage drop
across the junction. A good silicon junction drops between 0.5V and 0.8V
4.4.1. To test a diode out of circuit, connect the meter as follows:
4.4.2. Insert the red test lead into the terminal and the black test lead into the COM terminal.
4.4.3. Set the rotary switch to .
4.4.4. For forward voltage drop readings on any semiconductor component, place the red test lead
on the components anode (+) and place the black test lead on the components cathode (-).
The measured value will be displayed.
Note: In a circuit, a good diode should still produce a forward voltage drop reading of 0.5-
0.8V but the reverse voltage drop reading can vary depending on the resistance of other
pathways between the probe tips.
Connect the test leads to the appropriate terminals as described in section 4.4.2 to avoid
error display.
The open circuit voltage is around 2.7V when testing a diode.
The LCD will display “1” indicating open-circuit if the meter test leads are incorrectly
connected.
When diode test has been completed, disconnect the test leads from the circuit being tested.
4.5. Continuity testing
WARNING! To avoid damage to the meter and to the device being tested, disconnect
circuit power and discharge all high-voltage capacitors before testing continuity.
Never attempt an in-circuit current measurement where the open circuit voltage
between terminals and ground is greater than 60V DC or 30V AC rms.
4.5.1. To test for continuity, connect the meter as you would for diode testing (see section 4.4).
4.5.2. Connect the test leads across the object/circuit being tested.
4.5.3. If the resistance value is >50
Ω
(i.e. the circuit is damaged/disconnected) the buzzer will not
sound.
4.5.4. The buzzer sounds continuously when the resistance is ≤30
Ω.
The circuit is operational.
Note: The LCD displays “1” indicating the circuit being tested is open.
Open circuit voltage is approx 2.7V.
When continuity testing has been completed, disconnect the connection between the testing
leads and the circuit under test.
4.6. Dwell testing (fig 7)
4.6.1. This function can be used to test the dwell of the cut-off switch (points or electronic) of an
ignition system.
4.6.1.1. Turn the rotary switch to the appropriate setting within the “DWELL” function area. There
is a choice between 4, 6 & 8 cylinders. Choose the setting appropriate to the engine in
question.
4.6.1.2. Insert the red test lead into the terminal and the black test lead into the COM
terminal. Connect the ends to be tested as shown in fig 7.
4.6.1.3. When testing the cut-off switch of an ignition system, connect the red test lead probe to
the primary negative end of the ignition coil (refer to the vehicle service manual for the
specific position).
4.6.2. If the dwell of arbitrary ON/OFF equipment is to be tested, connect the red probe to the
end of the equipment in question fitted with an ON/OFF switch.
4.6.3. Connect the black test lead probe to the good ground terminal of the automobile.
4.6.4. The measured dwell will be displayed on the LCD.
4.7. Engine tach (rotation speed) RPM x 10 (fig 8)
Engine tach RPM is the number of rotations completed by the main shaft of the engine per
minute.
4.7.1. Turn the rotary switch to the appropriate setting within the “RPM x 10” function area. There is
a choice between 4, 6 & 8 cylinders. Choose the setting appropriate to the engine in
question.
4.7.2. Insert the red test lead into the terminal and the black lead into the COM terminal.
Connect the ends to be tested as shown in fig 8.
4.7.2.1. If the vehicle uses a DIS ignition system with no distributor board, connect the red test
lead probe to the TACH (tachometer) signal line (which is connected to the computer DIS
module of the engine). Refer to the vehicle service manual for the specific location.
4.7.2.2. If the vehicle uses an ignition system with a distributor board, connect the red test lead
probe to the primary negative end of the ignition coil. Refer to the vehicle service manual
for the specific location.
4.7.3. Connect the black test lead probe to the good ground terminal of the automobile.
4.7.4. On starting the engine or whilst it is running, test the rotation speed of the engine and read
the value displayed. The display is RPM ÷ 10 i.e. the actual rotation speed is obtained by
multiplying the displayed value by 10.
Original Language Version
© Jack Sealey Limited
Fig.6
Fig.7
Fig.8