Figure 10a, Figure 10b – Electro-Voice X-Line Very Compact (XLVC) User Manual
Page 32
ELECTRO-VOICE
®
X-Line Very Compact
TM
Rigging Manual
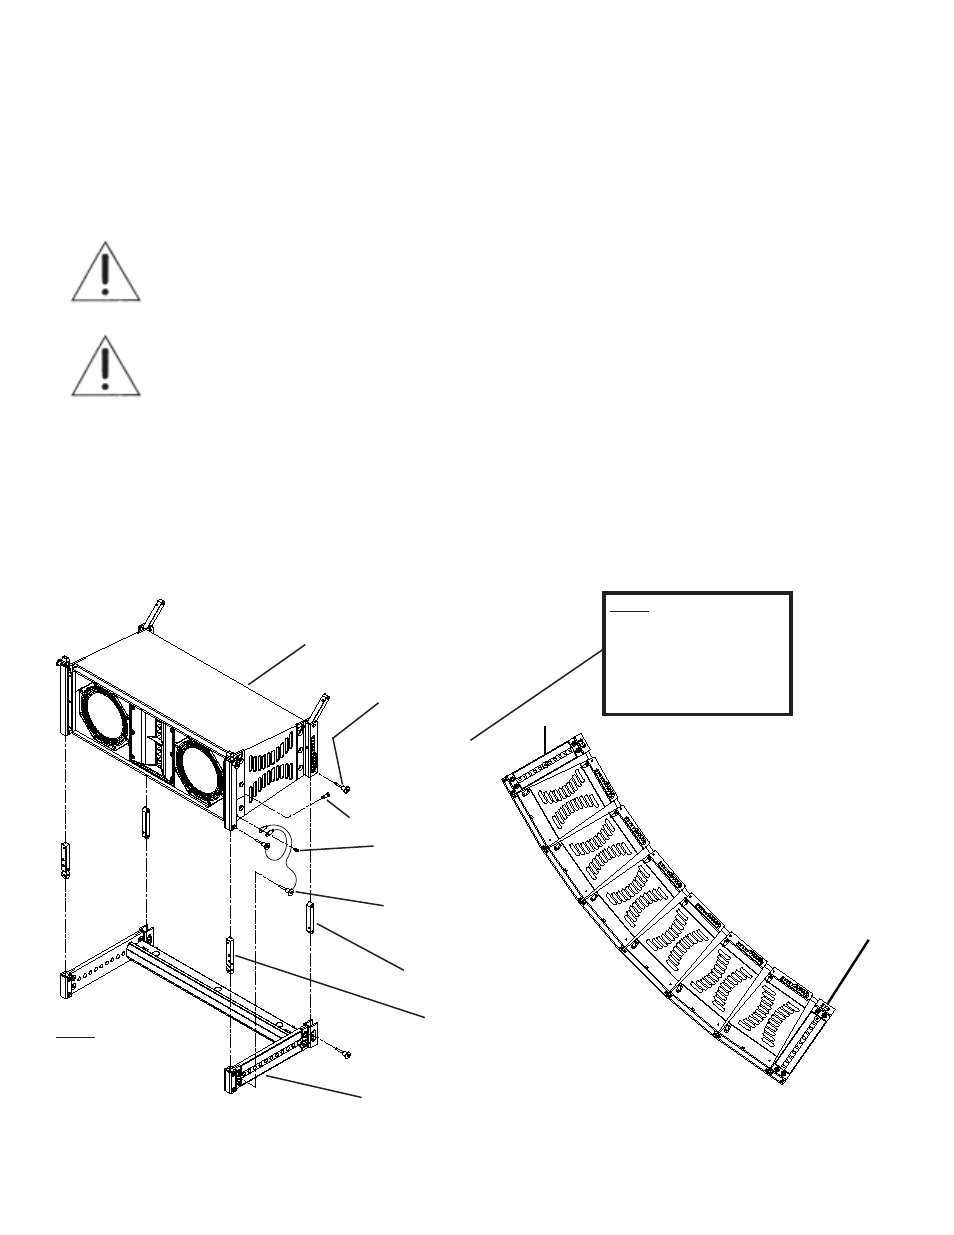
Position an XLVC grid underneath the XLVC loudspeaker system, as shown in Figure 10a. Insert
the loose swing arms on the bottom of the enclosure into the rear rigging channels on the grid and
attach the arms to the grid in the top hole with the quick-release pins. Swing the grid up and insert
the exposed hinge bars at the bottom front of the enclosure into the front rigging tubes on the grid
and secure using the quick-release pins. The standard grid is now attached to the bottom of the
enclosure.
ALWAYS MAKE SURE THAT THE LEFT AND RIGHT SWING ARMS ON THE
ENCLOSURE ARE LOCKED INTO THE SAME HOLES FOR THE SAME
VERTICAL SPLAY ANGLE ON THE GRID.
ALWAYS MAKE SURE THAT THE QUICK-RELEASE PINS FOR EVERY SWING
ARM PASS THEROUGH THE HOLE IN THE SWING ARM AND ARE FULLY
LOCKED IN THE RIGGING CHANNELS IN THE GRID.
A 5/8-inch shackle can be installed into the center position of the spreader bar on the bottom grid.
A ratchet strap can be attached to the shackle to enable adjustment for pull up. The entire array
can then be lifted, as shown in Figure 10b, and the vertical tilt angle adjusted as necessary using
the ratchet strap.
The XLVC-BGK may also be used with the AGCD adapter grid for groundstacking XLD281
loudspeaker systems on top of XLC loudspeaker systems. See the AGCD section for details.
Figure 10a:
Assembling the XLVC-BGK and
Secondary Grid at the Bottom of an Array
Figure 10b:
XLVC Array with XLVC-BGK and
Secondary Grid as a Pull-Up
31
XLD281, XLE181, or
XS212 Loudspeaker at
Bottom of Array
Shoulder Bolt for
Locking Hinge
Bar into Bottom
Loudspeaker
(2 Included in Kit)
Rear Swing Arms
(2 Included in Kit)
Front Hinge Bars
(2 Included in Kit)
Quick-Release Pins
Front Positions
(4 Included in Kit)
XLD or XLE Grid
Installed Upside Down
(Grid Sold Separately)
Quick-Release Pins
Rear Positions
(4 Included in Kit)
Screw for Attaching
Lanyards to Loudspeaker
(2 Included in Kit)
Note: Assembly of
All Pins and Screws
Apply to both Left
and Right Sides
Note: Correct Assembly
of Left and Right Hinge
Bars can be Verified by
Alignment of Holes at
the Rear of Rigging Tube
on Bottom Loudspeaker