Optional installation notice – Airaid 450-264 User Manual
Page 2
Airaid Filter Co. 2688 E Rose Garden Ln. Phoenix AZ 85050 (800) 498-6951
P/N 790-551 Aerosol Spray
P/N 790-550 Squeeze Spray
Thank you for purchasing the Airaid Intake System. Contact Airaid @ (800) 498-6951 8:00 AM - 5:00 PM MST weekdays for questions
regarding fit or instructions that are not clear to you. Your Airaid Intake System was carefully inspected and packaged. Check that no parts are
missing, or were damaged during shipping. If any parts are missing, contact Airaid. The air filter element is protected from direct exposure to wa-
ter and debris; care should be taken not to drive through deep water. WATER INGESTION IS THE DRIVERS RESPONSIBILTY! The air filter is
reusable and should be cleaned periodically.
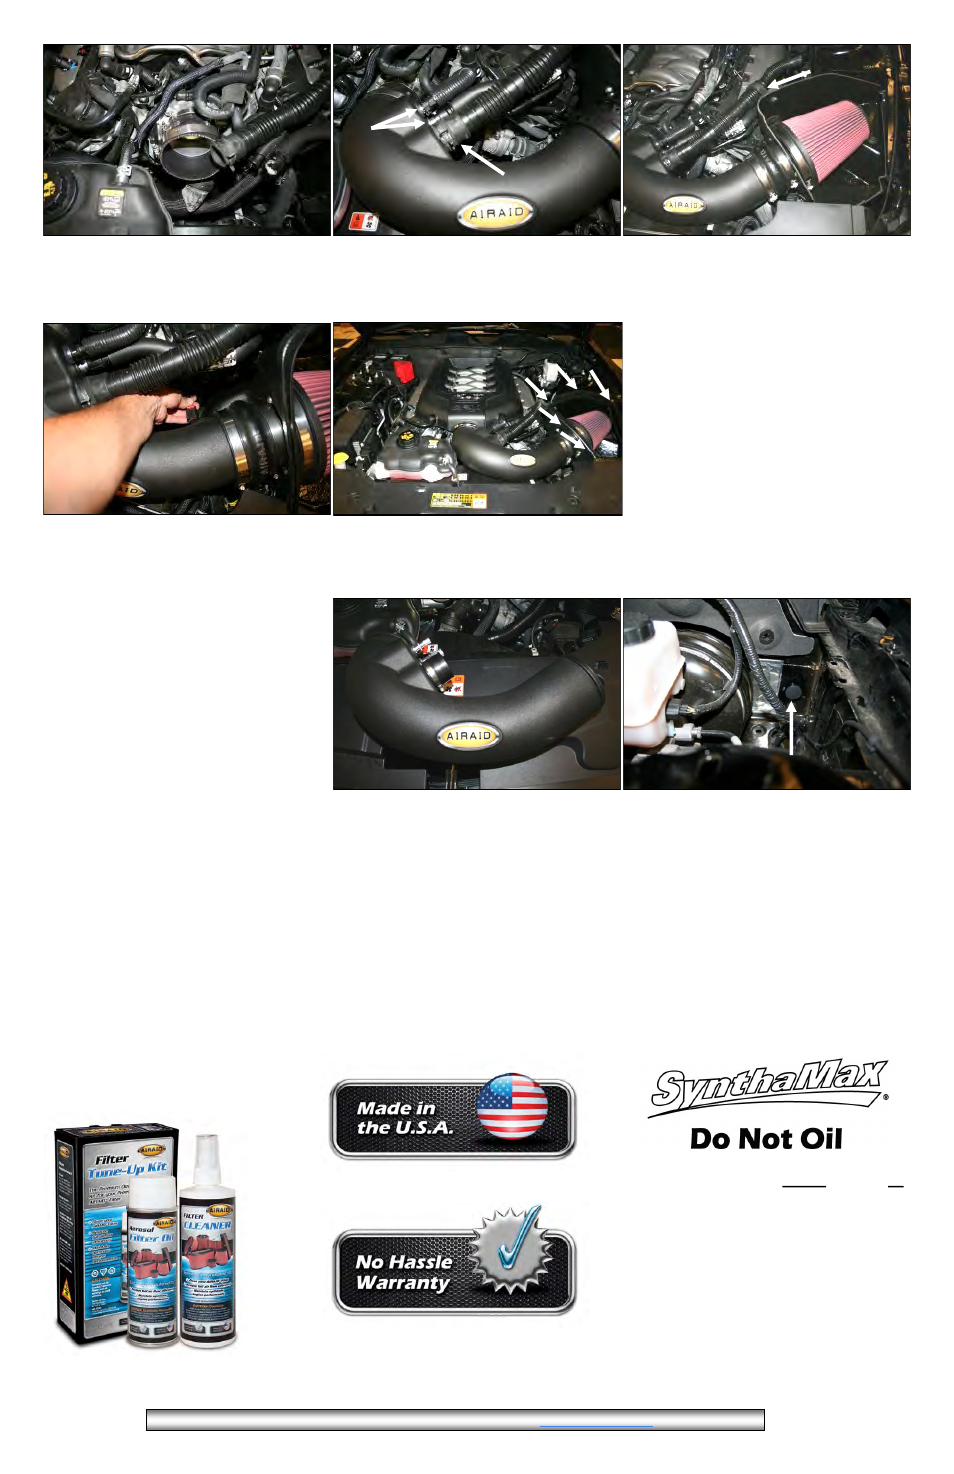
13. Reconnect the Mass Air Flow sensor, which is now
located in the lower back side of the intake. Slide the
locking tab back into the connector.
14. Install the Weather Strip (#9) onto the CAB with the
contoured edge going away from the filter. Start at the
front of the vehicle and work your way back. Replace the
engine cover.
INSTALL NOTE:
If you are installing this kit on a
vehicle equipped with a
Power Dome Hood with Heat Ex-
tractors
we suggest the use of our optional AIRAID pre-filter
(Part #799-469) to give an added layer of protection from the
elements.
10. Install the Silicone Reducer (#6) and Hose clamps
onto the throttle body. Place the #56 clamp (#15) on the
Throttle body side of the reducer, and the #64 clamp
(#14) on to the tube side.
11. Install the Airaid Intake Tube into the couplers as
shown, and tighten all Hose clamps. A) Reconnect the
Resonator tube to the Airaid Intake using the OEM
clamp. B) Reconnect the breather line/lines to the Alumi-
num Fittings depending on your application.
12. A) Install the Air aid Pr emium Filter (#1) onto the
filter adapter and tighten the hose clamp. B) re install the
Resonator tubing into the factory Stand off.
B.
B.
A.
15. Double check your work!
Make sure there is no foreign material in the
intake path. Make sure all clamps, hoses, bolts,
and screws are tight. Double check the hood
clearance!
Reconnect the negative battery cable!
Optional Installation Notice!
Airaid has made it possible to eliminate the factory in-
duction roar resonator if you so desire. The removal of
the resonator from the intake has no negative effect on the
performance of this kit.
Remove the entire Resonator tube assembly and all asso-
ciated stand offs from the intake tube to the Fire wall.
A.) Install the Ur ethane cap (#7) with the 60mm Hose
Clamp (#16) onto the Airaid Intake tube.
B.) Snap the Fir ewall plug (#17) into the fir ewall hole.
A.
B.
Instructions Revision
Date: 10.09.13
Filter Identification
700-461 Airaid Oiled Media Filter 701-461 SynthaMax Dry Media Filter - Red
702-461 SynthaMax Dry Media Filter - Black 703-461 SynthaMax Dry Media Filter - Blue
Synthamax Air Filters do not require oil.
Service air filter as needed by cleaning with
common non-petroleum all-purpose house-
hold cleaner and water. Simple Green®,
Formula 409® or equivalent works great.
Apply cleaner to outside of air filter and al-
low to soak. Then flush filter clean from the
inside out with a garden hose and repeat
steps if necessary. Do not apply high pres-
sure water or air to clean filter. Allow filter
to air dry and reinstall
.
For your Oiled media filter
we suggest using the
AIRAID Filter Tune- Up
Kit
Full Color instruction can be viewed on our web site at Airaid.com. Use the Product Search function to find your part number, and click View Details.