Airaid 400-131-1 User Manual
Page 2
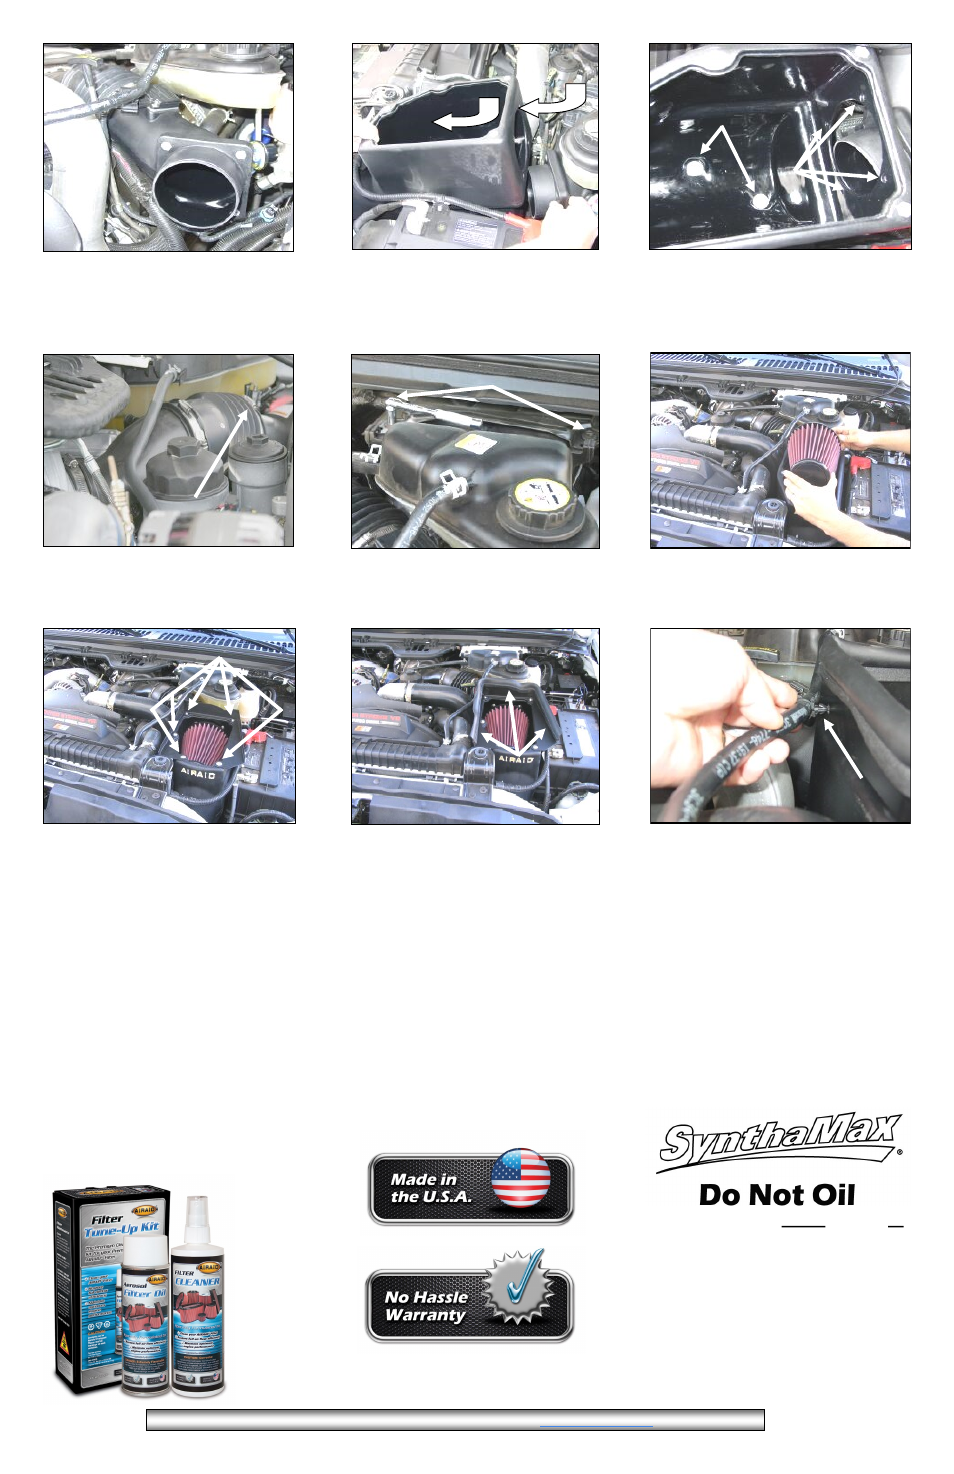
19. Double check your work!
Make sure there is no foreign material in
the intake path. Make sure all clamps,
hoses, bolts, and screws are tight.
20. Reconnect the negative bat-
tery cables!
Airaid Filter Co. 2688 E Rose Garden Ln. Phoenix AZ 85050 (800) 498-6951
REV.10.21.2013
P/N 790-551 Aerosol Spray
P/N 790-550 Squeeze Spray
Thank you for purchasing the Airaid Intake System. Contact Airaid @ (800) 498-6951 8:00 AM - 5:00 PM MST weekdays for questions regarding fit or instructions
that are not clear to you. Your Airaid Intake System was carefully inspected and packaged. Check that no parts are missing, or were damaged during shipping. If any parts are
missing, contact Airaid. The air filter element is protected from direct exposure to water and debris; care should be taken not to drive through deep water. WATER INGESTION
IS THE DRIVERS RESPONSIBILTY! The air filter is reusable and should be cleaned periodically.
13. Tighten the hose clamp where the factory
flexible turbo inlet tube slides over the Airaid
Intake Tube.
14. Factory tolerances may vary between the
MAF sensor and the coolant r eser voir . Ther e-
fore, it may be necessary to loosen the two 5/16”
mounting bolts and adjust the reservoir for better
clearance.
15. Install the Airaid Premium Filter (#1) onto the
Airaid Intake Tube inside of the airbox, and tighten
the hose clamp.
10. Slide the Airaid Intake Tube (#3) into the
factory flexible turbo inlet hose. (Note: Do not
tighten the hose clamp until assembly is com-
plete.) Reconnect the sensor wiring harness (to
the temperature sensor, or the MAF sensor,
whichever is present on your vehicle.)
11. A.) Install the Airaid Cool Air Box (#2) by
inserting the long extension of the box into the
radiator support. (Note: Make sure the cool air
box inlet is not blocked by the factory insulation.)
B.) Insert the Airaid Intake Tube into the airbox
hole.
12. A.) Insert two billet rivet/box mounts (#10)
through the bottom of the Airaid Cool Air Box and
into the factory grommets. B.) Using four stainless
steel ¼-20x1/2” button head bolts (#6) and 1/4” flat
washers (#7), mount the Airaid Intake Tube to the
airbox.
A
B
A.
B.
16. Install the Top Panel (#4) onto the top of the
Airaid Cool Air Box using five stainless steel ¼-
20x1/2” button head bolts (#6) and 1/4” flat wash-
ers (#7).
17. Install the weather strip (#5) around the edges
of the top panel. (Hint: Start at one corner of the
panel and work to the other end.)
18. Spread the black hose mount (#8) over the radi-
ator overflow hose and insert the tab through the
hole in the side of the top panel.
FILTER IDENTIFICATION
720-128 Airaid Oiled Media 721-128 Airaid SynthaMax Dry Media - Red
722-128 Airaid SynthaMax Dry Media - Black 723-128 Airaid SynthaMax Dry Media - Blue
For your Oiled media filter we
suggest using the AIRAID Filter
Tune-Up Kit!
Synthamax Air Filters do not require oil.
Service air filter as needed by cleaning with
common non-petroleum all-purpose house-
hold cleaner and water. Simple Green®,
Formula 409® or equivalent works great.
Apply cleaner to outside of air filter and al-
low to soak. Then flush filter clean from the
inside out with a garden hose and repeat
steps if necessary. Do not apply high pres-
sure water or air to clean filter. Allow filter
to air dry and reinstall
.