Removal/replacement procedures, Main cover, Main cover removal – Visara SCON-25L Reference Manual User Manual
Page 45: Removal/replacement procedures -3, Main cover -3, Chapter 4. assembly removal/replacement
Chapter 4. Assembly Removal/Replacement
707028-007
4-3
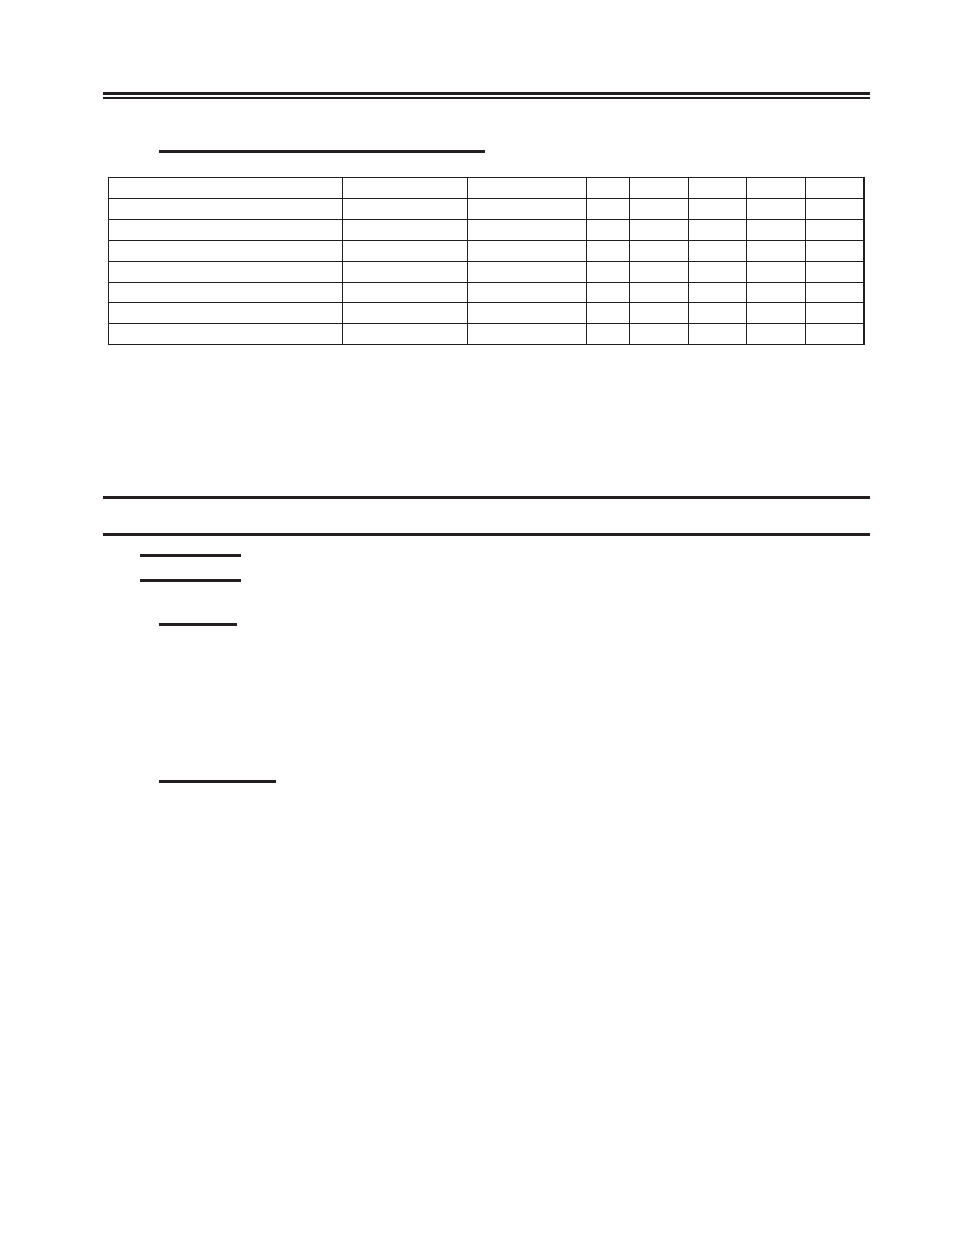
Field Replaceable Assemblies cont’d
n
o
i
t
p
i
r
c
s
e
D
m
s
s
A
n
o
N
/
P
N
/
P
U
R
F
L
5
2
L
8
2
S
5
2
4
7
0
3
s
e
t
o
N
B
C
P
C
C
S
r
o
f
e
l
b
a
C
5
3
.
V
1
0
0
-
0
3
1
1
1
2
1
0
0
-
1
6
6
6
5
9
o
N
o
N
s
e
Y
o
N
B
C
P
C
S
H
r
o
f
e
l
b
a
C
2
3
2
S
R
E
T
D
0
2
0
-
1
1
7
8
6
9
0
2
0
-
1
1
7
8
6
9
o
N
o
N
s
e
Y
o
N
B
C
P
C
S
H
r
o
f
e
l
b
a
C
2
3
2
S
R
E
C
D
0
2
0
-
2
1
7
8
6
9
0
2
0
-
2
1
7
8
6
9
o
N
o
N
s
e
Y
o
N
B
C
P
C
S
H
r
o
f
e
l
b
a
C
5
3
.
V
E
T
D
0
2
0
-
3
1
7
8
6
9
0
2
0
-
3
1
7
8
6
9
o
N
o
N
s
e
Y
o
N
B
C
P
C
S
H
r
o
f
e
l
b
a
C
5
3
.
V
E
C
D
0
2
0
-
4
1
7
8
6
9
0
2
0
-
4
1
7
8
6
9
o
N
o
N
s
e
Y
o
N
B
C
P
C
S
H
r
o
f
e
l
b
a
C
1
2
.
X
E
T
D
0
2
0
-
5
1
7
8
6
9
0
2
0
-
5
1
7
8
6
9
o
N
o
N
s
e
Y
o
N
g
u
l
P
N
O
C
S
E
1
0
0
-
3
5
5
3
5
1
0
0
-
3
5
5
3
5
s
e
Y
s
e
Y
s
e
Y
s
e
Y
:
s
e
t
o
N
r
o
2
.
8
S
C
N
I
L
s
e
r
i
u
q
e
r
t
u
b
9
0
9
-
2
7
2
0
2
2
B
C
P
C
S
E
e
c
a
l
p
e
r
n
a
c
7
1
9
-
2
7
2
0
2
2
B
C
P
C
S
E
.
1
.
m
r
o
f
t
a
l
p
e
h
t
n
o
d
e
l
l
a
t
s
n
i
e
b
r
e
h
g
i
h
e
h
t
n
o
d
r
a
c
C
S
E
l
a
n
o
i
t
i
d
d
a
n
a
l
l
a
t
s
n
i
o
t
d
e
s
u
e
b
t
o
n
n
a
c
9
0
0
-
2
7
2
7
6
9
U
R
F
C
S
E
.
2
.
t
r
o
p
p
u
s
R
A
P
L
l
a
n
o
i
t
i
d
d
a
r
o
f
n
o
i
t
a
v
i
t
c
a
e
r
u
t
a
e
f
s
e
r
i
u
q
e
r
o
s
l
a
L
5
2
-
N
O
C
S
e
h
T
.
L
5
2
-
N
O
C
S
e
r
a
s
e
v
i
r
D
d
r
a
H
I
S
C
S
,
S
5
2
-
4
7
1
1
e
h
t
n
o
y
l
l
a
n
i
g
i
r
o
d
e
p
p
i
h
s
y
l
n
o
e
v
i
r
D
d
r
a
H
I
S
C
S
e
h
T
.
3
.
)
0
0
1
-
5
3
3
1
2
2
N
/
P
(
e
g
d
i
r
b
E
D
I
o
t
I
S
C
S
e
h
t
h
t
i
w
e
v
i
r
d
E
D
I
w
e
n
a
g
n
i
l
l
a
t
s
n
i
y
b
d
e
c
a
l
p
e
r
Removal/Replacement Procedures
Main Cover
Removal
1. Ensure power is off.
2. Remove the six screws attaching the main cover to the unit chassis.
3. Slide the main cover toward the front of the unit and lift clear to remove it
from the chassis.
Replacement
Reverse the procedure to replace the cover. Be careful when moving the main
cover towards the rear, so as not to snag any of the cables. Proper alignment of the
main cover before pushing it into place is very important to avoid damaging the
hardware. Pay particular attention to the position of the On/Off switch and the
floppy disk drive with regards to their openings in the cover. When the main cover
is in the correct position, the rear cover should make direct contact with it. (If it
appears that you can not reinstall the screws without distorting the rear cover, then
the main cover is not correctly positioned.)