LD Systems ROADBUDDY 10 User Manual
Page 25
25
IT
LED acceso in verde: trasmettitore tascabile acceso e stato batterie ok. Il LED lampeggia in verde: sincronizzazione del canale radio tramite
infrarossi attiva. Il LED lampeggia in rosso: stato della batteria basso. Sostituire immediatamente le pile usate con pile cariche.
51
AUDIO INPUT / AUDIO-EINGANG / ENTRÉE AUDIO / ENTRADA DE AUDIO / WEJŚCIE AUDIO / INGRESSO AUDIO
EN
3-pin mini XLR socket to connect a headset, lavalier or instrument microphone, as well as guitar cable.
DE
3-polige Mini-XLR Buchse zum Anschließen eines Headsets, Lavalier-, oder Instrumentenmikrofons sowie Gitarrenkabel.
FR
Connecteur mini-XLR 3 points, pour connexion d'un serre-tête, d'un micro cravate, de micros instrument, voire de câbles instrument.
ES
Mini-XLR de 3 pines para conectar un micrófono de diadema, de corbata, un micrófono para instrumentos o un cable de guitarra.
PL
3-stykowe gniazdo mini XLR dla mikrofonów z zestawem nagłownym, mikrofonów lavalier i mikrofonów do instrumentów, jak również dla kabli
do gitary.
IT
Presa mini-XLR a 3 poli per il collegamento di microfono ad archetto, microfono Lavalier o strumenti e cavo per chitarra.
52
POWER
EN
To switch on or off, please hold down the button for two seconds.
DE
Zum Ein- bzw. Ausschalten bitte ca. 2 Sekunden gedrückt halten.
FR
Pour allumer ou éteindre l'émetteur, maintenez enfoncée cette touche pendant environ 2 secondes.
ES
Para encender o apagar, pulse el botón durante dos segundos.
PL
Aby włączyć lub wyłączyć urządzenie, należy przytrzymać przycisk wciśnięty przez ok. dwie sekundy.
IT
Per l'accensione e lo spegnimento tenere premuto per circa 2 secondi.
53
ASC
EN
To synchronize the wireless channel on both the receiver and the transmitter, select the desired radio channel (see point 32) on the receiver
and then press the ASC button while aiming the infrared interface of the transmitter in direct visual contact to the infrared interface of the receiver,
and also pressing the ASC button on the belt pack transmitter The infrared interface of the belt pack transmitter can be found at the back of the
housing (point 54).
DE
Um den Funkkanal von Empfänger und Taschensender zu synchronisieren, wählen Sie am Empfänger den gewünschten Funkkanal aus (siehe
Punkt 32) und drücken anschließend die ASC-Taste, während Sie die Infrarot-Schnittstelle des Taschensenders in direktem Sichtkontakt auf die
Infrarot-Schnittstelle des Empfängers richten und ebenfalls die ASC-Taste am Taschensender drücken. Die Infrarot-Schnittstelle des Taschensenders
befindet sich auf der Rückseite des Gehäuses (Punkt 54).
FR
Pour synchroniser le canal HF entre récepteur et émetteur, sélectionnez sur le récepteur le canal HF désiré (voir point 32) et appuyez sur sa
touche ASC, tout en orientant le port infrarouge de l'émetteur de poche en direction du port infrarouge du récepteur (contact visuel direct) en
appuyant également sur sa touche ASC. Le port infrarouge de l'émetteur de poche se trouve à l'arrière du boîtier (point 54).
ES
Para sincronizar el canal de radio del receptor y de la petaca transmisora, seleccione un canal de radio en el receptor (ver punto 32), pulse el
botón ASC mientras el sensor de infrarrojos de la petaca apunta directamente al sensor de infrarrojos del receptor, y también pulse el botón ASC de
la petaca. El sensor de infrarrojos de la petaca se encuentra en la parte posterior de la carcasa (ver punto 54).
PL
Aby zsynchronizować kanał radiowy odbiornika i nadajnika kieszonkowego, należy ustawić wybrany kanał w odbiorniku (patrz punkt 32) i
nacisnąć przycisk ASC. Równocześnie ustawić interfejs podczerwieni nadajnika kieszonkowego w bezpośrednim „kontakcie wzrokowym” z
interfejsem podczerwieni odbiornika i także nacisnąć przycisk ASC na nadajniku kieszonkowym. Interfejs podczerwieni nadajnika kieszonkowego
znajduje się na tylnym panelu obudowy (punkt 54).
IT
Per sincronizzare il canale radio da ricevitore e trasmettitore tascabile, sul ricevitore selezionare il canale radio desiderato (v. punto 32), quindi
premere il tasto ASC orientando l'interfaccia a infrarossi del trasmettitore tascabile direttamente verso l'interfaccia a infrarossi del ricevitore e
premendo anche il tasto ASC del trasmettitore tascabile. L'interfaccia a infrarossi del trasmettitore tascabile si trova sul lato posteriore della cassa
(punto 54).
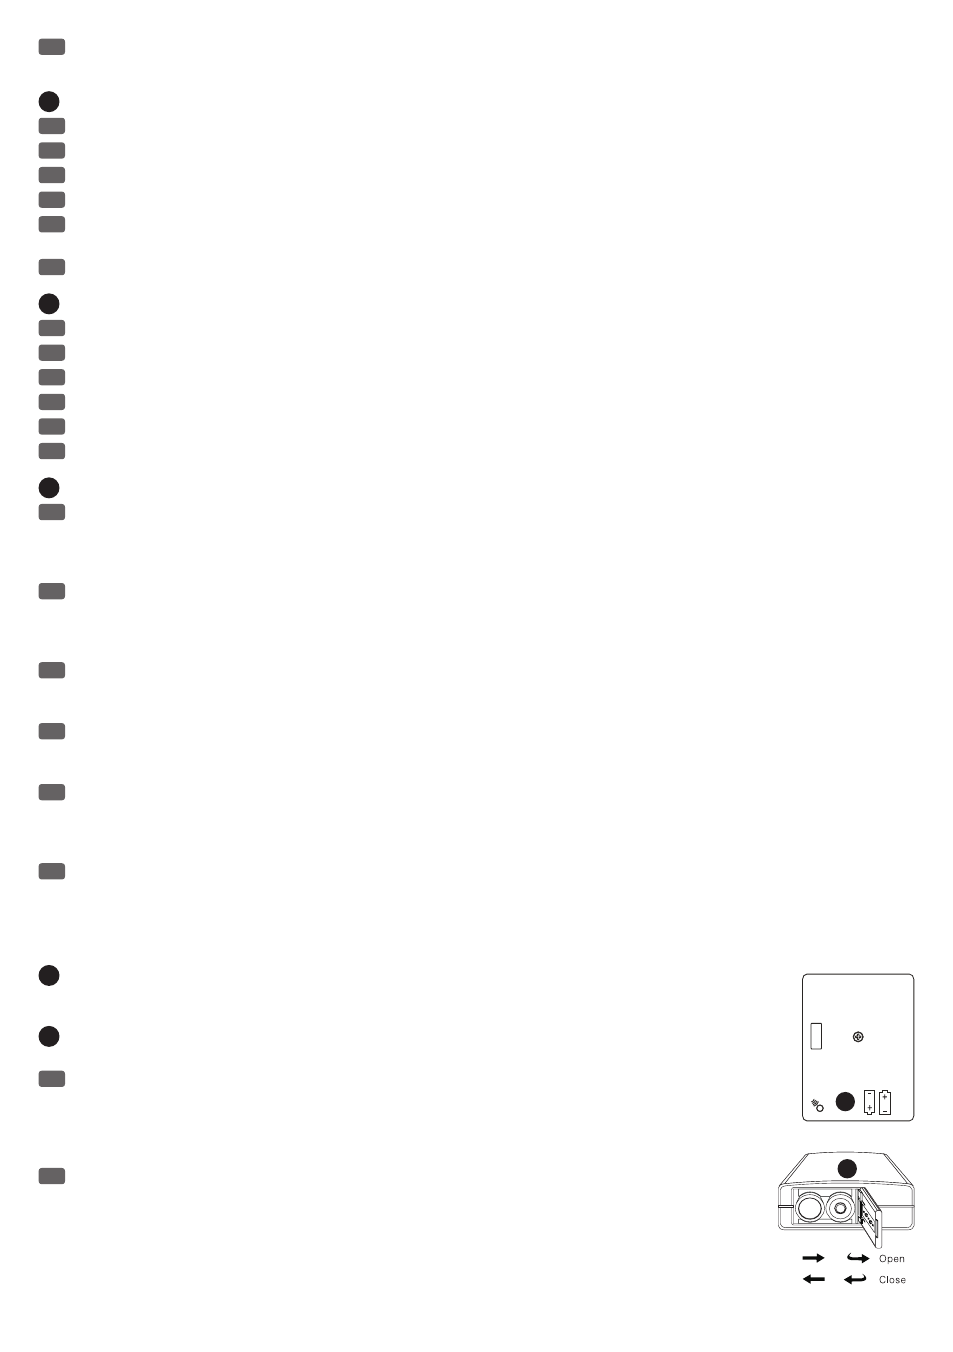
54
INFRARED INTERFACE / INFRAROT-SCHNITTSTELLE / PORT INFRAROUGE / SENSOR DE INFRARROJOS / INTERFEJS
PODCZERWIENI / INTERFACCIA A INFRAROSSI
55
BATTERY REPLACEMENT / BATTERIEWECHSEL / REMPLACEMENT DES PILES / SUSTITUCIÓN DE LAS PILAS /
WYMIANA BATERII / SOSTITUZIONE BATTERIA
EN
As soon as the red LED flashes to indicate the battery status, please replace the batteries by pressing down on the battery
compartment cover at the marked position (OPEN) and slide it to the side. Insert two 1.5 V AA size alkaline batteries (LR6, AA) as
in the illustration on the transmitter back and close the battery compartment cover by pressing the marked position (CLOSE) of
the cover and then slide it to the side. If the transmitter is not in use for a long period of time, remove the batteries from the
battery compartment to avoid damage caused by defective batteries.
DE
Sobald die rote LED für die Batteriestatus-Anzeige blinkt, ersetzen Sie bitte die Batterien, indem Sie den Batteriefach-
deckel an der markierten Stelle (OPEN) herunterdrücken und zur Seite schieben. Legen Sie zwei 1,5 V Alkaline Batterien der
Größe AA (LR6, Mignon) gemäß der Abbildung auf der Senderrückseite ein und schließen das Batteriefach indem Sie die
markierte Stelle (CLOSE) des Deckels herunterdrücken und ihn dann zur Seite schieben. Ist die Sendeanlage für längere Zeit
nicht in Gebrauch, entnehmen Sie bitte die Batterien aus dem Batteriefach, um Schäden durch schadhafte Batterien zu
vermeiden.
54
55