Leading block and tackle to side wall, A. mount riser board and drill holes, A. install welded screw eye (a) – Harken 7801 4-Point Storage System - 60 lb User Manual
Page 9: B. assemble rope organizer, Placement on front wall
9
Front
wall
Top
plate
Pigtail lag
screw
Pigtail lag
screw
Rope
organizer
Welded
screw eye
Front mounting board
DIAGRAM 12. If distance
to front wall is less than
distance needed to lift
object, move the welded
screw eye (A) along the
front wall until distance
2 is equal to distance 3
(see Diagram 11).
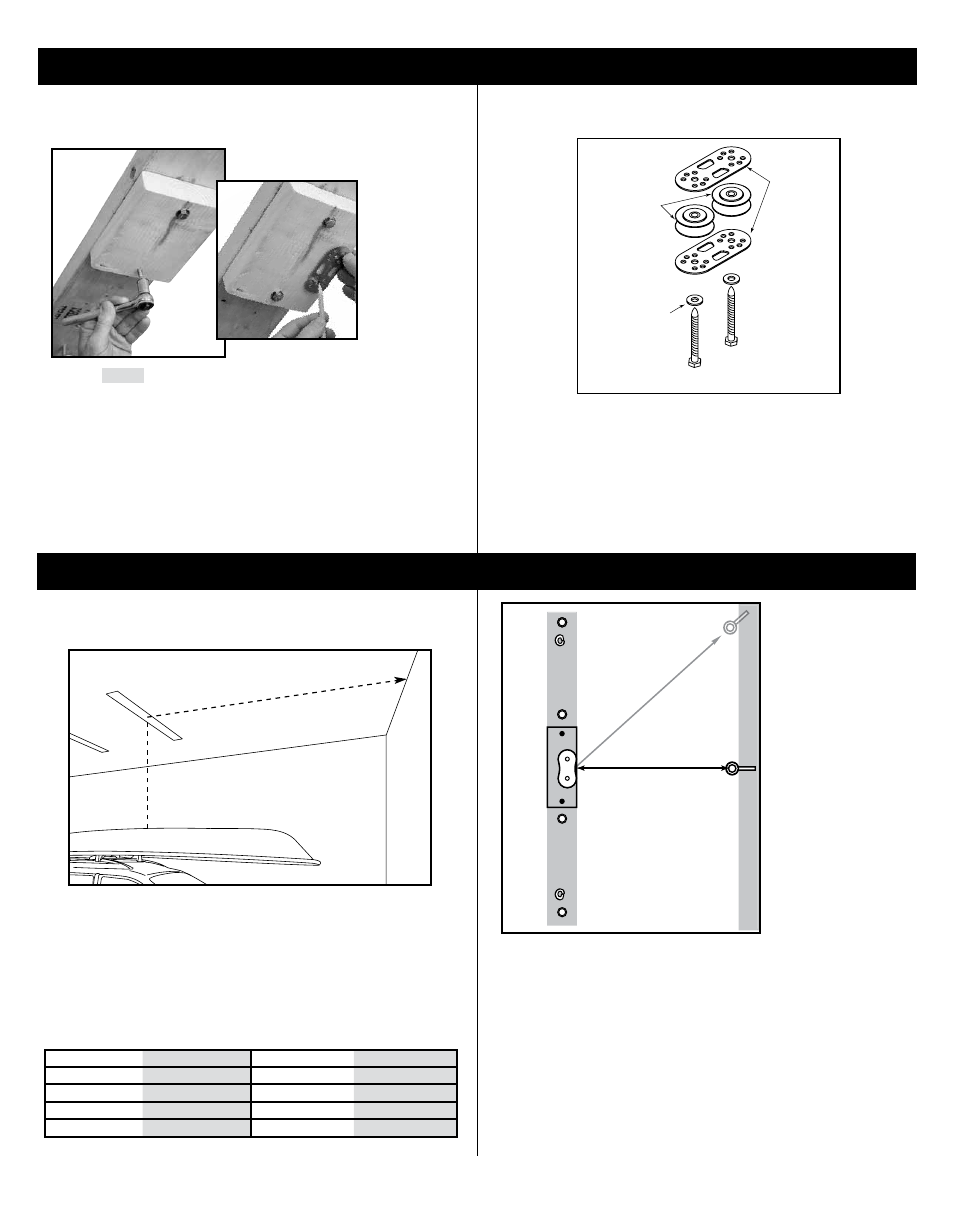
Rope organizer
plates (K)
Rope organizer
pulleys (L)
Washer (J)
Lag bolt
(I)
Washer (J)
Lag bolt
(I)
DIAGRAM 10. Assemble rope organizer using plate (K)
and pulleys (L). Fasten to mounting board with lag bolts (I)
and washers (J).
IMPORTANT! Do not overtighten bolts. This can keep
rope organizer pulleys (L) from turning properly.
STEP 4: INSTALL ROPE ORGANIZER; RAFTERS RUNNING FRONT-TO-BACK
STEP 5: ASSEMBLE HOISTER SYSTEM; RAFTERS RUNNING FRONT-TO-BACK
Front
wall
Ceiling
2
3
DIAGRAM 11. Distance 2 must be equal or somewhat
greater than distance 3. See chart below. For a larger view,
see Diagram 3 (page 6).
If distance 2 is distance 3 will be If distance 2 is distance 3 will be
10
10
14
6
11
9
15
5
12
8
16
4
13
7
17
3
A. MOUNT RISER BOARD AND DRILL HOLES
IMPORTANT! Use smaller drill bit in this step.
FRONT W
ALL
When distance 2 is much greater than 3, purchase longer rope
for drop ropes (H) to maximize distance object can be lowered.
A. INSTALL WELDED SCREW EYE (A)
PLACEMENT ON FRONT WALL
B. ASSEMBLE ROPE ORGANIZER
If distance to front wall is still too short, consider
running block and tackle to the side of to the object
instead of lengthwise.
SEE APPENDIX — PAGE 19.
LEADING BLOCK AND TACKLE TO SIDE WALL
DIAGRAM 9
MAXIMIZING LOWERING OF OBJECT
You may want to lower object to floor or onto sawhorses.
If distance 2 is much greater than 3, the distance object
can be lowered will be limited by length of rope supplied.
Drill a
7
/
32
" (5.5 mm) hole into top plate of garage for mounting
welded screw eye. Always wear safety glasses. Screw welded
screw eye into top plate until threads just disappear into top
plate. Do not overtighten. See procedure and warnings for
Install Pigtail Lag Screws.
Mount 2" x 6" x 7" (50 mm x 152 mm x 180 mm) riser
board on front mounting board centered between the
two pigtail lag screws (B). Drill
5
/
32
"
(4 mm) holes.
Always wear safety glasses. Attach riser boards using
two
1
/
4
"
(6 mm) lag bolts (l) and washers (J) (included).
Do not overtighten.
DIAGRAM 8. Hold rope organizer plate (K) on riser board near
the side toward the front wall. Use plate as template to mark
center holes. Drill two 5/32" (4 mm) holes.
VIEWED FROM BELOW