Greenheck TSU Base Unit Manual (464441) User Manual
Page 3
Make-Up Air Unit
3
®
Table of Contents
Installation
Slab Mounted Unit . . . . . . . . . . . . . . . . . . . . . . . . . 3
Rail Mounted Unit . . . . . . . . . . . . . . . . . . . . . . . . . 4
Curb Mounted Unit . . . . . . . . . . . . . . . . . . . . . . . . 4
Filter Section and Weatherhood . . . . . . . . . . . . . . 5
Evaporative Cooling Module (optional) . . . . . . . . . 5
Electrical Wiring . . . . . . . . . . . . . . . . . . . . . . . . . . . 6
Direct Gas Piping . . . . . . . . . . . . . . . . . . . . . . . . . 7-8
Optional Evaporative Cooler Piping . . . . . . . . . . . 8-9
Optional Water Wizard™ . . . . . . . . . . . . . . . . . . . 10
Optional Building Pressure Control . . . . . . . . . . . 11
Optional Dirty Filter Switch . . . . . . . . . . . . . . . . . 11
Start-Up
Blower . . . . . . . . . . . . . . . . . . . . . . . . . . . . . . . . . 12
Direct Gas . . . . . . . . . . . . . . . . . . . . . . . . . . . . 13-15
Optional Evaporative Cooling Recirculating . . . . 16
Optional Water Wizard™ . . . . . . . . . . . . . . . . . 17-18
Operation
Optional Water Wizard™ . . . . . . . . . . . . . . . . . . . 18
Optional VAV Units . . . . . . . . . . . . . . . . . . . . . . . . 19
Optional Recirculating Units . . . . . . . . . . . . . . . . 20
Electrical . . . . . . . . . . . . . . . . . . . . . . . . . . . . . . . . 21
Troubleshooting
Blower . . . . . . . . . . . . . . . . . . . . . . . . . . . . . . . . . 22
Motor Overamps . . . . . . . . . . . . . . . . . . . . . . . . . 23
Insufficient / Too Much Airflow . . . . . . . . . . . . . . 24
Excessive Noise or Vibration . . . . . . . . . . . . . . . . 25
Heater . . . . . . . . . . . . . . . . . . . . . . . . . . . . . . . . 26-28
Optional Evaporative Cooling . . . . . . . . . . . . . . . 29
Optional Water Wizard™ . . . . . . . . . . . . . . . . . . . 30
Maintenance
Routine . . . . . . . . . . . . . . . . . . . . . . . . . . . . . . . 30-32
Fall . . . . . . . . . . . . . . . . . . . . . . . . . . . . . . . . . . . . 32
Reference
Gas Train Layouts . . . . . . . . . . . . . . . . . . . . . . . . 33
Control Center Layout . . . . . . . . . . . . . . . . . . . . 34
Start-Up Check List . . . . . . . . . . . . . . . . . . . . . . . 35
Maintenance Log . . . . . . . . . . . . . . . . . . . Backcover
Our Commitment . . . . . . . . . . . . . . . . . . . Backcover
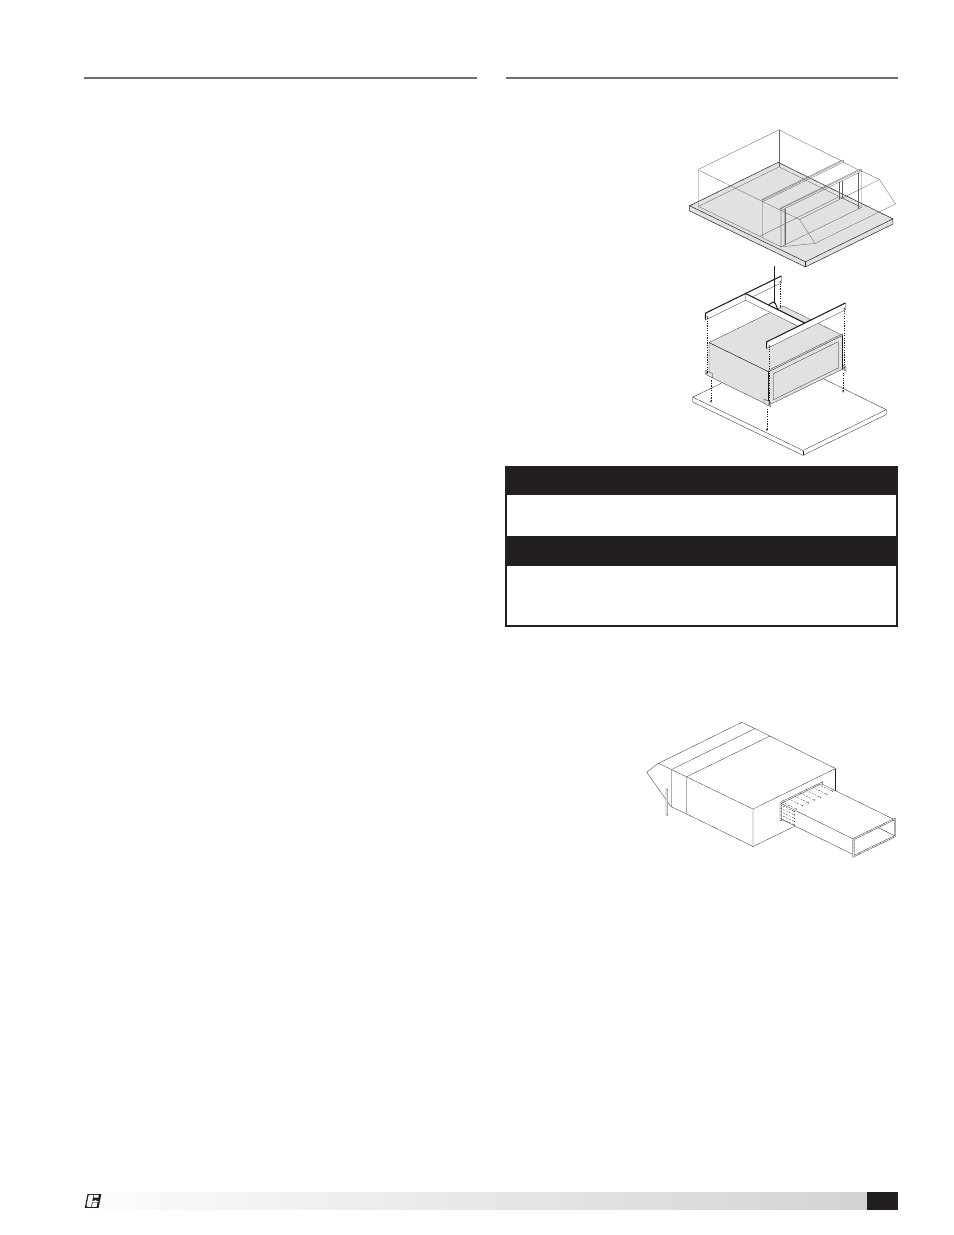
Installation – Slab Mounted Unit
1. Pour Concrete Slab
Pour the concrete slab. The slab should be one foot
larger than the unit on all sides.
The slab should be at
least four inches thick
and poured on a bed of
gravel to ensure proper
drainage. Allow the
concrete slab to properly cure
before installing the unit.
2. Install Unit
Use a crane and a set of
spreader bars hooked
to the factory lifting lugs
to lift and center the unit
on the concrete slab.
Fasten the unit to the
slab through the factory-
provided lifting lugs.
NOTE
The use of all lifting lugs and a set of spreader bars in
mandatory when lifting the unit.
NOTE
For easy installation, it is recommended that the
weatherhood, filter section or evaporative cooler be
installed after the base unit.
3. Attach Ductwork
Refer to the CAPS submittal for the duct size and
location. Manufacturer recommends attaching ductwork
using a rubber duct section at the unit to reduce
vibration. An
appropriate
sealant should
be used around
the discharge
opening of the
unit to create a
weathertight seal.
Good duct practices should be followed for all
ductwork. Ductwork should be installed in accordance
with SMACNA and AMCA guidelines, NFPA 96 and any
local codes.